

Appearance
Appearance
A Uniform Resource Locator (URL) is a web address that lets you access all kinds of online content—whether it's a webpage, a video, a photo, or other media. It guides your browser to the right place on the Internet.
Anatomy of a URL
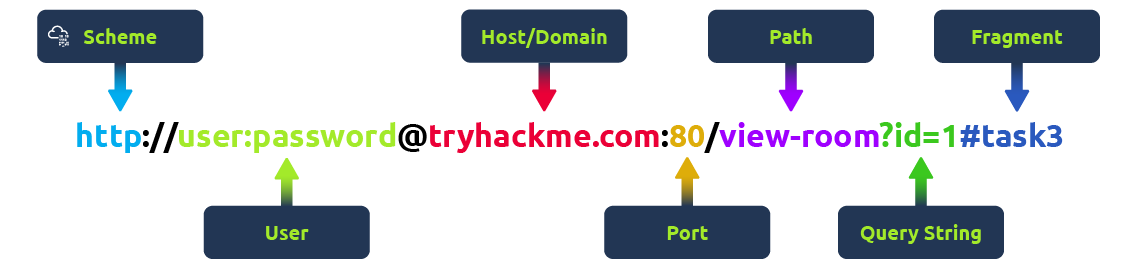
Think of a URL as being made up of several parts, each playing a different role in helping you find the right resource. Understanding how these parts fit together is important for browsing the web, developing web applications, and even troubleshooting problems.
Here's a breakdown of the key components:
Scheme
The scheme is the protocol used to access the website. The most common are HTTP (HyperText Transfer Protocol) and HTTPS (Hypertext Transfer Protocol Secure). HTTPS is more secure because it encrypts the connection, which is why browsers and cyber security experts recommend it. Websites often enforce HTTPS for added protection.
User
Some URLs can include a user's login details (usually a username) for sites that require authentication. This happens mostly in URLs that need credentials to access certain resources. However, it's rare nowadays because putting login details in the URL isn't very safe—it can expose sensitive information, which is a security risk.
Host/Domain
The host or domain is the most important part of the URL because it tells you which website you're accessing. Every domain name has to be unique and is registered through domain registrars. From a security standpoint, look for domain names that appear almost like real ones but have small differences (this is called typosquatting). These fake domains are often used in phishing attacks to trick people into giving up sensitive info.
Port
The port number helps direct your browser to the right service on the web server. It's like telling the server which doorway to use for communication. Port numbers range from 1 to 65,535, but the most common are 80 for HTTP and 443 for HTTPS.
Path
The path points to the specific file or page on the server that you're trying to access. It's like a roadmap that shows the browser where to go. Websites need to secure these paths to make sure only authorised users can access sensitive resources.
Query String
The query string is the part of the URL that starts with a question mark (?). It's often used for things like search terms or form inputs. Since users can modify these query strings, it's important to handle them securely to prevent attacks like injections, where malicious code could be added.
Fragment
The fragment starts with a hash symbol (#) and helps point to a specific section of a webpage—like jumping directly to a particular heading or table. Users can modify this too, so like with query strings, it's important to check and clean up any data here to avoid issues like injection attacks.
HTTP messages are packets of data exchanged between a user (the client) and the web server.
There are two types of HTTP messages:
Each message follows a specific format that helps both the user and the server communicate smoothly.
Start Line
The start line is like the introduction of the message. It tells you what kind of message is being sent—whether it's a request from the user or a response from the server. This line also gives important details about how the message should be handled.
Headers
Headers are made up of key-value pairs that provide extra information about the HTTP message. They give instructions to both the client and the server handling the request or response. These headers cover all sorts of things, like security, content types, and more, making sure everything goes smoothly in the communication.
Empty Line
The empty line is a little divider that separates the header from the body. It's essential because it shows where the headers stop and where the actual content of the message begins. Without this empty line, the message might get messed up, and the client or server could misinterpret it, causing errors.
Body
The body is where the actual data is stored. In a request, the body might include data the user wants to send to the server (like form data). In a response, it's where the server puts the content that the user requested (like a webpage or API data).
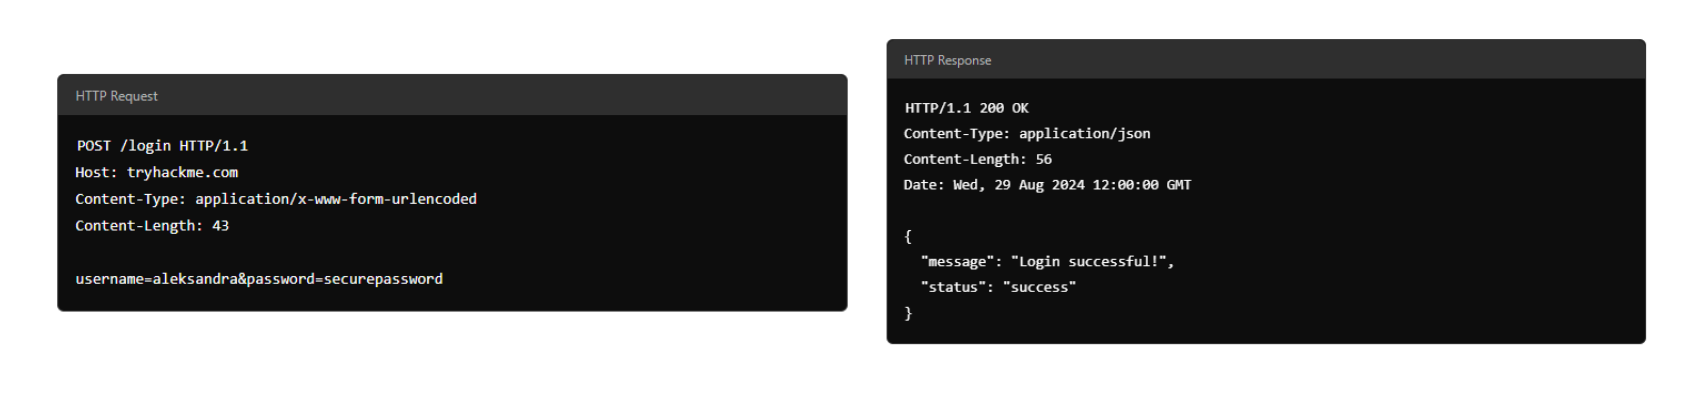
An HTTP request is what a user sends to a web server to interact with a web application and make something happen. Since these requests are often the first point of contact between the user and the web server, knowing how they work is super important—especially if you're into cyber security.
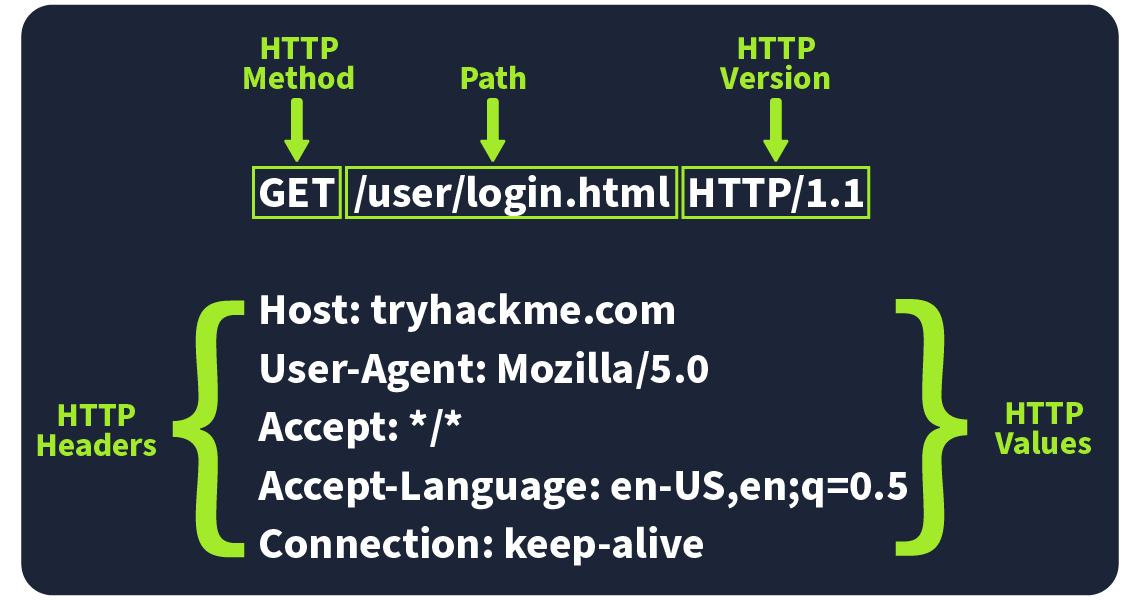
Imagine an HTTP request showing the key parts like the method (e.g., GET or POST), path (e.g., /login), and version (e.g., HTTP/1.1). These elements make up the basics of how a client (user) communicates with a server.
Request Line
The request line (or start line) is the first part of an HTTP request and tells the server what kind of request it's dealing with. It has three main parts: the HTTP method, the URL path, and the HTTP version.
Example: METHOD /path HTTP/version
HTTP Methods
The HTTP method tells the server what action the user wants to perform on the resource identified by the URL path. Here are some of the most common methods and their possible security issue:
GET
Used to fetch data from the server without making any changes. Reminder! Make sure you're only exposing data the user is allowed to see. Avoid putting sensitive info like tokens or passwords in GET requests since they can show up as plaintext.
POST
Sends data to the server, usually to create or update something. Reminder! Always validate and clean the input to avoid attacks like SQL injection or XSS.
PUT
Replaces or updates something on the server. Reminder! Make sure the user is authorised to make changes before accepting the request.
DELETE
Removes something from the server. Reminder! Just like with PUT, make sure only authorised users can delete resources.
Besides these common methods, there are a few others used in specific cases:
PATCH
Updates part of a resource. It's useful for making small changes without replacing the whole thing, but always validate the data to avoid inconsistencies.
HEAD
Works like GET but only retrieves headers, not the full content. It's handy for checking metadata without downloading the full response.
OPTIONS
Tells you what methods are available for a specific resource, helping clients understand what they can do with the server.
TRACE
Similar to OPTIONS, it shows which methods are allowed, often for debugging. Many servers disable it for security reasons.
CONNECT
Used to create a secure connection, like for HTTPS. It's not as common but is critical for encrypted communication.
Each of these methods has its own set of security rules. For example, PATCH requests should be validated to avoid inconsistencies, and OPTIONS and TRACE should be turned off if not needed to avoid possible security risks.
URL Path
The URL path tells the server where to find the resource the user is asking for. For instance, in the URL https://tryhackme.com/api/users/123, the path /api/users/123 identifies a specific user.
Attackers often try to manipulate the URL path to exploit vulnerabilities, so it's crucial to:
Following these practices helps protect your web application from common attacks.
HTTP Version
The HTTP version shows the protocol version used to communicate between the client and server. Here's a quick rundown of the most common ones:
HTTP/0.9 (1991) The first version, only supported GET requests.
HTTP/1.0 (1996) Added headers and better support for different types of content, improving caching.
HTTP/1.1 (1997) Brought persistent connections, chunked transfer encoding, and better caching. It's still widely used today.
HTTP/2 (2015) Introduced features like multiplexing, header compression, and prioritisation for faster performance.
HTTP/3 (2022) Built on HTTP/2, but uses a new protocol (QUIC) for quicker and more secure connections.
Although HTTP/2 and HTTP/3 offer better speed and security, many systems still use HTTP/1.1 because it's well-supported and works with most existing setups. However, upgrading to HTTP/2 or HTTP/3 can provide significant performance and security improvements as more systems adopt them.
Request Headers
Request Headers allow extra information to be conveyed to the web server about the request. Some common headers are as follows:
| Request Header | Example | Description |
|---|---|---|
| Host | Host: tryhackme.com | Specifies the name of the web server the request is for. |
| User-Agent | User-Agent: Mozilla/5.0 | Shares information about the web browser the request is coming from. |
| Referer | Referer: https://www.google.com/ | Indicates the URL from which the request came from. |
| Cookie | Cookie: user_type=student; room=introtowebapplication; room_status=in_progress | Information the web server previously asked the web browser to store is held in cookies. |
| Content-Type | Content-Type: application/json | Describes what type or format of data is in the request. |
Request Body
In HTTP requests such as POST and PUT, where data is sent to the web server as opposed to requested from the web server, the data is located inside the HTTP Request Body. The formatting of the data can take many forms, but some common ones are URL Encoded, Form Data, JSON, or XML.
URL Encoded (application/x-www-form-urlencoded)
A format where data is structured in pairs of key and value where (key=value). Multiple pairs are separated by an (&) symbol, such as key1=value1&key2=value2. Special characters are percent-encoded.
Example
POST /profile HTTP/1.1
Host: tryhackme.com
User-Agent: Mozilla/5.0
Content-Type: application/x-www-form-urlencoded
Content-Length: 33

name=Aleksandra&age=27&country=USForm Data (multipart/form-data)
Allows multiple data blocks to be sent where each block is separated by a boundary string. The boundary string is the defined header of the request itself. This type of formatting can be used to send binary data, such as when uploading files or images to a web server.
POST /upload HTTP/1.1
Host: tryhackme.com
User-Agent: Mozilla/5.0
Content-Type: multipart/form-data; boundary=----WebKitFormBoundary7MA4YWxkTrZu0gW

----WebKitFormBoundary7MA4YWxkTrZu0gW
Content-Disposition: form-data; name="username"

aleksandra
----WebKitFormBoundary7MA4YWxkTrZu0gW
Content-Disposition: form-data; name="profile_pic"; filename="aleksandra.jpg"
Content-Type: image/jpeg

[Binary Data Here representing the image]
----WebKitFormBoundary7MA4YWxkTrZu0gW--JSON (application/json)
In this format, the data can be sent using the JSON (JavaScript Object Notation) structure. Data is formatted in pairs of name : value. Multiple pairs are separated by commas, all contained within curly braces { }.
POST /api/user HTTP/1.1
Host: tryhackme.com
User-Agent: Mozilla/5.0
Content-Type: application/json
Content-Length: 62

{
    "name": "Aleksandra",
    "age": 27,
    "country": "US"
}XML (application/xml)
In XML formatting, data is structured inside labels called tags, which have an opening and closing. These labels can be nested within each other. You can see in the example below the opening and closing of the tags to send details about a user called Aleksandra.
POST /api/user HTTP/1.1
Host: tryhackme.com
User-Agent: Mozilla/5.0
Content-Type: application/xml
Content-Length: 124

<user>
    <name>Aleksandra</name>
    <age>27</age>
    <country>US</country>
</user>When you interact with a web application, the server sends back an HTTP response to let you know whether your request was successful or something went wrong. These responses include a status code and a short explanation (called the Reason Phrase) that gives insight into how the server handled your request.
Status Line
The first line in every HTTP response is called the Status Line. It gives you three key pieces of info:
Status Codes and Reason Phrases
The Status Code is the number that tells you if the request succeeded or failed, while the Reason Phrase explains what happened. These codes fall into five main categories:
Informational Responses (100-199)
These codes mean the server has received part of the request and is waiting for the rest. It's a "keep going" signal.
Successful Responses (200-299) These codes mean everything worked as expected. The server processed the request and sent back the requested data.
Redirection Messages (300-399)
These codes tell you that the resource you requested has moved to a different location, usually providing the new URL.
Client Error Responses (400-499)
These codes indicate a problem with the request. Maybe the URL is wrong, or you're missing some required info, like authentication.
Server Error Responses (500-599)
These codes mean the server encountered an error while trying to fulfil the request. These are usually server-side issues and not the client's fault.
Common Status Codes
Here are some of the most frequently seen status codes:
100 (Continue)
The server got the first part of the request and is ready for the rest.
200 (OK)
The request was successful, and the server is sending back the requested resource.
301 (Moved Permanently)
The resource you're requesting has been permanently moved to a new URL. Use the new URL from now on.
404 (Not Found)
The server couldn't find the resource at the given URL. Double-check that you've got the right address.
500 (Internal Server Error)
Something went wrong on the server's end, and it couldn't process your request.
Response Headers
When a web server responds to an HTTP request, it includes HTTP response headers, which are basically key-value pairs. These headers provide important info about the response and tell the client (usually the browser) how to handle it.
Picture an example of an HTTP response with the headers highlighted. Key headers like Content-Type, Content-Length, and Date give us important details about the response the server sends back.

Required Response Headers
Some response headers are crucial for making sure the HTTP response works properly. They provide essential info that both the client and server need to process everything correctly. Here are a few important ones:
Example: Date: Fri, 23 Aug 2024 10:43:21 GMT This header shows the exact date and time when the response was generated by the server.
Example: Content-Type: text/html; charset=utf-8 It tells the client what kind of content it's getting, like whether it's HTML, JSON, or something else. It also includes the character set (like UTF-8) to help the browser display it properly.
Example: Server: nginx This header shows what kind of server software is handling the request. It's good for debugging, but it can also reveal server information that might be useful for attackers, so many people remove or obscure this one.
Other Common Response Headers
Besides the essential ones, there are other common headers that give additional instructions to the client or browser and help control how the response should be handled.
Example: Set-Cookie: sessionId=38af1337es7a8 This one sends cookies from the server to the client, which the client then stores and sends back with future requests. To keep things secure, make sure cookies are set with the HttpOnly flag (so they can't be accessed by JavaScript) and the Secure flag (so they're only sent over HTTPS).
Example: Cache-Control: max-age=600 This header tells the client how long it can cache the response before checking with the server again. It can also prevent sensitive info from being cached if needed (using no-cache).
Example: Location: /index.html This one's used in redirection (3xx) responses. It tells the client where to go next if the resource has moved. If users can modify this header during requests, be careful to validate and sanitise it—otherwise, you could end up with open redirect vulnerabilities, where attackers can redirect users to harmful sites.
Response Body
The HTTP response body is where the actual data lives—things like HTML, JSON, images, etc., that the server sends back to the client. To prevent injection attacks like Cross-Site Scripting (XSS), always sanitise and escape any data (especially user-generated content) before including it in the response.
XSS: A type of security vulnerability typically found in web applications. It allows attackers to inject malicious scripts into web pages viewed by other users. These scripts can then steal sensitive information, like user's cookies, session tokens, or other sensitive data.
Security Headers
HTTP Security Headers help improve the overall security of the web application by providing mitigations against attacks like Cross-Site Scripting (XSS), clickjacking, and others. We will now dig deeper into the following security headers:
You can use a site like https://securityheaders.io/ to analyse the security headers of any website. After the discussion in this task, you will hopefully have a better understanding of what it is reporting on.
Content-Security-Policy (CSP)
A CSP header is an additional security layer that can help mitigate against common attacks like Cross-Site Scripting (XSS). Malicious code could be hosted on a separate website or domain and injected into the vulnerable website. A CSP provides a way for administrators to say what domains or sources are considered safe and provides a layer of mitigation to such attacks.
Within the header itself, you may see properties such as default-src or script-src defined and many more. Each of these give an option to an administrator to define at various levels of granularity, what domains are allowed for what type of content. The use of self is a special keyword that reflects the same domain on which the website is hosted.
Looking at an example CSP header:
Content-Security-Policy: default-src 'self'; script-src 'self' https://cdn.tryhackme.com; style-src 'self'
We see the use of:
default-src
- which specifies the default policy of self, which means only the current website.
script-src
- which specifics the policy for where scripts can be loaded from, which is self along with scripts hosted on https://cdn.tryhackme.com
style-src
- which specifies the policy for where style CSS style sheets can be loaded from the current website (self)
Strict-Transport-Security (HSTS)
The HSTS header ensures that web browsers will always connect over HTTPS. Let's look at an example of HSTS:
Strict-Transport-Security: max-age=63072000; includeSubDomains; preload
Here's a breakdown of the example HSTS header by directive:
max-age
- This is the expiry time in seconds for this setting
includeSubDomains
- An optional setting that instructs the browser to also apply this setting to all subdomains.
preload
- This optional setting allows the website to be included in preload lists. Browsers can use preload lists to enforce HSTS before even having their first visit to a website.
X-Content-Type-Options
The X-Content-Type-Options header can be used to instruct browsers not to guess the MIME time of a resource but only use the Content-Type header. Here's an example:
X-Content-Type-Options: nosniff
Here's a breakdown of the X-Content-Type-Options header by directives:
Referrer-Policy
This header controls the amount of information sent to the destination web server when a user is redirected from the source web server, such as when they click a hyperlink. The header is available to allow a web administrator to control what information is shared. Here are some examples of Referrer-Policy:
Referrer-Policy: no-referrerReferrer-Policy: same-originReferrer-Policy: strict-originReferrer-Policy: strict-origin-when-cross-originHere's a breakdown of the Referrer-Policy header by directives:
no-referrer - This completely disables any information being sent about the referrer
same-origin - This policy will only send referrer information when the destination is part of the same origin. This is helpful when you want referrer information passed when hyperlinks are within the same website but not outside to external websites.
strict-origin - This policy only sends the referrer as the origin when the protocol stays the same. So, a referrer is sent when an HTTPS connection goes to another HTTPS connection.
strict-origin-when-cross-origin - This is similar to strict-origin except for same-origin requests, where it sends the full URL path in the origin header.
JS is an interpreted language, meaning the code is executed directly in the browser without prior compilation.
There are two main ways to integrate JS into HTML: internally and externally.
Internal JavaScript
internal.html 文件
<!DOCTYPE html>
<html lang="en">
<head>
    <title>Internal JS</title>
</head>
<body>
    <h1>Addition of Two Numbers</h1>
    <p id="result"></p>

    <script>
        let x = 5;
        let y = 10;
        let result = x + y;
        document.getElementById("result").innerHTML = "The result is: " + result;
    </script>
</body>
</html>External JavaScript
script.js 文件
let x = 5;
let y = 10;
let result = x + y;
document.getElementById("result").innerHTML = "The result is: " + result;external.html
<!DOCTYPE html>
<html lang="en">
<head>
    <meta charset="UTF-8">
    <meta name="viewport" content="width=device-width, initial-scale=1.0">
    <title>External JS</title>
</head>
<body>
    <h1>Addition of Two Numbers</h1>
    <p id="result"></p>

    <!-- Link to the external JS file -->
    <script src="script.js"></script>
</body>
</html>hink of objects as building blocks that hold information. Inheritance is like passing down traits from one object to another. Functions are like tools that can be used alone or as part of these objects. Lastly, classes in JavaScript are like blueprints that help us make similar things easily. Once we get these basics, we can then explore the more complex topic of prototype pollution in our room.
Objects
let user = {
  name: 'Ben S',
  age: 25,
  followers: 200,
  DoB: '1/1/1990'
};console.log(user.name)
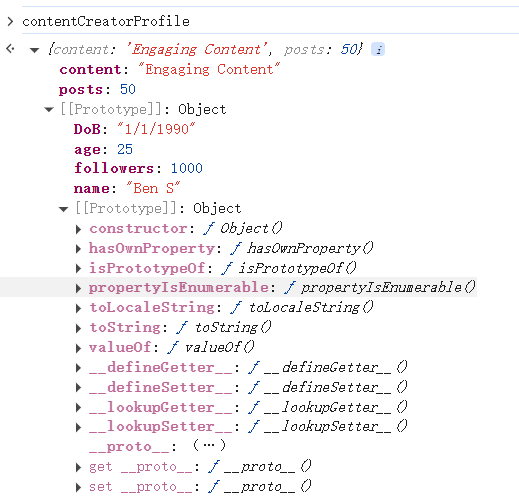
Classes
In JavaScript, classes are like blueprints that help create multiple objects with similar structures and behaviours. We can use a class to define a general user and a content creator. Classes provide a convenient way to organise and instantiate objects with shared characteristics.
// Class for User
class UserProfile {
  constructor(name, age, followers, dob) {
    this.name = name;
    this.age = age;
    this.followers = followers;
    this.dob = dob; // Adding Date of Birth
  }
}

// Class for Content Creator Profile inheriting from User
class ContentCreatorProfile extends UserProfile {
  constructor(name, age, followers, dob, content, posts) {
    super(name, age, followers, dob);
    this.content = content;
    this.posts = posts;
  }
}

// Creating instances of the classes
let regularUser = new UserProfile('Ben S', 25, 1000, '1/1/1990');
let contentCreator = new ContentCreatorProfile('Jane Smith', 30, 5000, '1/1/1990', 'Engaging Content', 50);Prototype
In JavaScript, every object is linked to a prototype object, and these prototypes form a chain commonly referred to as the prototype chain. The prototype serves as a template or blueprint for objects. When you create an object using a constructor function or a class, JavaScript automatically sets up a link between the object and its prototype. In the context of our social network example, let's illustrate how prototypes work:
// Prototype for User
let userPrototype = {
  greet: function() {
    return `Hello, ${this.name}!`;
  }
};

// User Constructor Function
function UserProfilePrototype(name, age, followers, dob) {
  let user = Object.create(userPrototype);
  user.name = name;
  user.age = age;
  user.followers = followers;
  user.dob = dob;
  return user;
}

// Creating an instance
let regularUser = UserProfilePrototype('Ben S', 25, 1000, '1/1/1990');

// Using the prototype method
console.log(regularUser.greet());Difference between Class and Prototype
Classes and prototypes in JS are two ways to achieve a similar goal: creating objects with behaviours and characteristics. Imagine you're building models of cars in your room. Using classes is like having a detailed blueprint or a set of instructions for each car model you want to develop. You follow the blueprint exactly to create each car, and all cars made from the exact blueprint are guaranteed to have the same features and behaviours. Classes in JavaScript work similarly; they provide a clear, structured way to create objects that share the same properties and methods, making them easy to understand and use.
On the other hand, prototypes are like having a basic car model and then customising it by adding or modifying features directly on the car itself. With prototypes, you start with a simple object and then add behaviours to it by linking it to a prototype object that already has those behaviours. Objects created this way are linked through the prototype chain, allowing them to inherit behaviours from other objects. This method is more dynamic and flexible but can be harder to manage and understand than the structured approach of classes.
Inheritance
In JavaScript, inheritance allows one object to inherit properties from another, creating a hierarchy of related objects. Continuing with our social network example, let's consider a more specific profile for a content creator. This new object can inherit properties from the general user profile, like name and followers, and add particular properties, such as content and posts.
let user = {
  name: 'Ben S',
  age: 25,
  followers: 1000,
  DoB: '1/1/1990'
};

// Content Creator Profile inheriting from User
let contentCreatorProfile = Object.create(user);
contentCreatorProfile.content = 'Engaging Content';
contentCreatorProfile.posts = 50;Here, contentCreatorProfile inherits properties from the user using Object.create(). Now, it has specific properties like content and posts and inherits name, age, and followers from the general user profile, as shown below.
This way, inheritance helps create a more specialised object while reusing common properties from a parent object. JavaScript supports both classes and prototype-based inheritance.
Object.create() method to create a new object with a specified prototype, or you can directly modify the prototype of an existing object using its prototype property.One of the main objectives of JS is to provide dialogue boxes for interaction with users and dynamically update content on web pages. JS provides built-in functions like alert, prompt, and confirm to facilitate this interaction. These functions allow developers to display messages, gather input, and obtain user confirmation. However, if not implemented securely, attackers may exploit these features to execute attacks like Cross-Site Scripting (XSS).
Alert
The alert function displays a message in a dialogue box with an "OK" button, typically used to convey information or warnings to users. For example, if we want to display "Hello THM" to the user, we would use an alert("HelloTHM");. To try it out, open the Chrome console, type alert("Hello THM"), and press Enter. A dialogue box with the message will appear on the screen.
Prompt
The prompt function displays a dialogue box that asks the user for input. It returns the entered value when the user clicks "OK", or null if the user clicks "Cancel". For example, to ask the user for their name, we would use prompt("What is your name?");.
To test this, open the Chrome console and paste the following that asks for a username and then greets him.
name = prompt("What is your name?");
alert("Hello " + name);Once you paste the code and hit Enter, a dialogue box will appear, and the value entered by the user will be returned to the console.
Confirm
The confirm function displays a dialogue box with a message and two buttons: "OK" and "Cancel". It returns true if the user clicks "OK" and false if the user clicks "Cancel". For example, to ask the user for confirmation, we would use confirm("Are you sure?");. To try this out, open the Chrome console, type confirm("Do you want to proceed?"), and press Enter.
A dialogue box will appear, and depending on whether the user clicks "OK" or "Cancel", the value true or false will be returned to the console.
How Hackers Exploit the Functionality
Imagine receiving an email from a stranger with an attached HTML file. The file looks harmless, but when you open it, it contains JS that disrupts your browsing experience. For example, the following code will show an alert box with the message "Hacked" three times:
<!DOCTYPE html>
<html lang="en">
<head>
    <title>Hacked</title>
</head>
<body>
    <script>
        for (let i = 0; i < 3; i++) {
            alert("Hacked");
        }
    </script>
</body>
</html>Control flow in JS refers to the order in which statements and code blocks are executed based on certain conditions. JS provides several control flow structures such as if-else, switch statements to make decisions, and loops like for, while, and do...while to repeat actions. Proper use of control flow ensures that a program can handle various conditions effectively.
Conditional Statements in Action
One of the most used conditional statements is the if-else statements, which allows you to execute different blocks of code depending on whether a condition evaluates to true or false.
age.html
<!DOCTYPE html>
<html lang="en">
<head>
    <title>Age Verification</title>
</head>
<body>
    <h1>Age Verification</h1>
    <p id="message"></p>

    <script>
        age = prompt("What is your age")
        if (age >= 18) {
            document.getElementById("message").innerHTML = "You are an adult.";
        } else {
            document.getElementById("message").innerHTML = "You are a minor.";
        }
    </script>
</body>
</html>Bypassing Login Forms
Suppose a developer has implemented authentication functionality in JS, where only users with the username "admin" and passwords matching a specific value are allowed to log in. To see this in action, open the login.html file in the exercises folder.
login.html
<!DOCTYPE html>
<html lang="en">
<head>
    <title>Login Page</title>
</head>
<body>
    <h2>Login Authentication</h2>

    <script>
        let username = prompt("Enter your username:");
        let password = prompt("Enter your password:");

        if (username === "admin" && password === "ComplexPassword") {
            document.write("You are successfully authenticated!");
        } else {
            document.write("Authentication failed. Incorrect username or password.");
        }
    </script>
</body>
</html>We have understood how JS works and how we can read it until now, but what if the file is not human-readable and has been minified?
Minification in JS is the process of compressing JS files by removing all unnecessary characters, such as spaces, line breaks, comments, and even shortening variable names. This helps reduce the file size and improves the loading time of web pages, especially in production environments. Minified files make the code more compact and harder to read for humans, but they still function exactly the same.
Similarly, obfuscation is often used to make JS harder to understand by adding undesired code, renaming variables and functions to meaningless names, and even inserting dummy code.
Avoid Relying on Client-Side Validation Only
One of JS's primary functions is performing client-side validation. Developers sometimes use it for validating forms and rely entirely on it, which is not a good practice. Since a user can disable/manipulate JS on the client side, performing validation on the server side is also essential.
Refrain from Adding Untrusted Libraries
As discussed in earlier tasks, JS allows you to include any other JS scripts using the src attribute inside a script tag. But have you considered whether the library we include is from a trusted source? Bad actors have uploaded a bundle of libraries on the internet with names that resemble legitimate ones. So, if you blindly include a malicious library, you will expose your web application to threats.
Avoid Hardcoded Secrets
Never hardcode sensitive data like API keys, access tokens, or credentials into your JS code, as the user can easily check the source code and get the password.
// Bad Practice
const privateAPIKey = 'pk_TryHackMe-1337';Minify and Obfuscate Your JavaScript Code
Minifying and obfuscating JS code reduces its size, improves load time, and makes it harder for attackers to understand the logic of the code. Therefore, always minify and obfuscate the code when using code in production. The attacker can eventually reverse engineer it, but getting the original code will take at least some effort.
There are two primary types: relational databases (aka SQL) vs non-relational databases (aka NoSQL).
Structured query language (SQL) is a programming language for storing and processing information in a relational database. A relational database stores information in tabular form, with rows and columns representing different data attributes and the various relationships between the data values. You can use SQL statements to store, update, remove, search, and retrieve information from the database. You can also use SQL to maintain and optimize database performance.
Relational databases: Store structured data, meaning the data inserted into this database follows a structure. For example, the data collected on a user consists of first_name, last_name, email_address, username and password. When a new user joins, an entry is made in the database following this structure. This structured data is stored in rows and columns in a table; relationships can then be made between two or more tables (for example, user and order_history), hence the term relational databases.
Non-relational databases: Instead of storing data the above way, store data in a non-tabular format. For example, if documents are being scanned, which can contain varying types and quantities of data, and are stored in a database that calls for a non-tabular format.
Relational databases
Tables, Rows and Columns
Primary and Foreign Keys

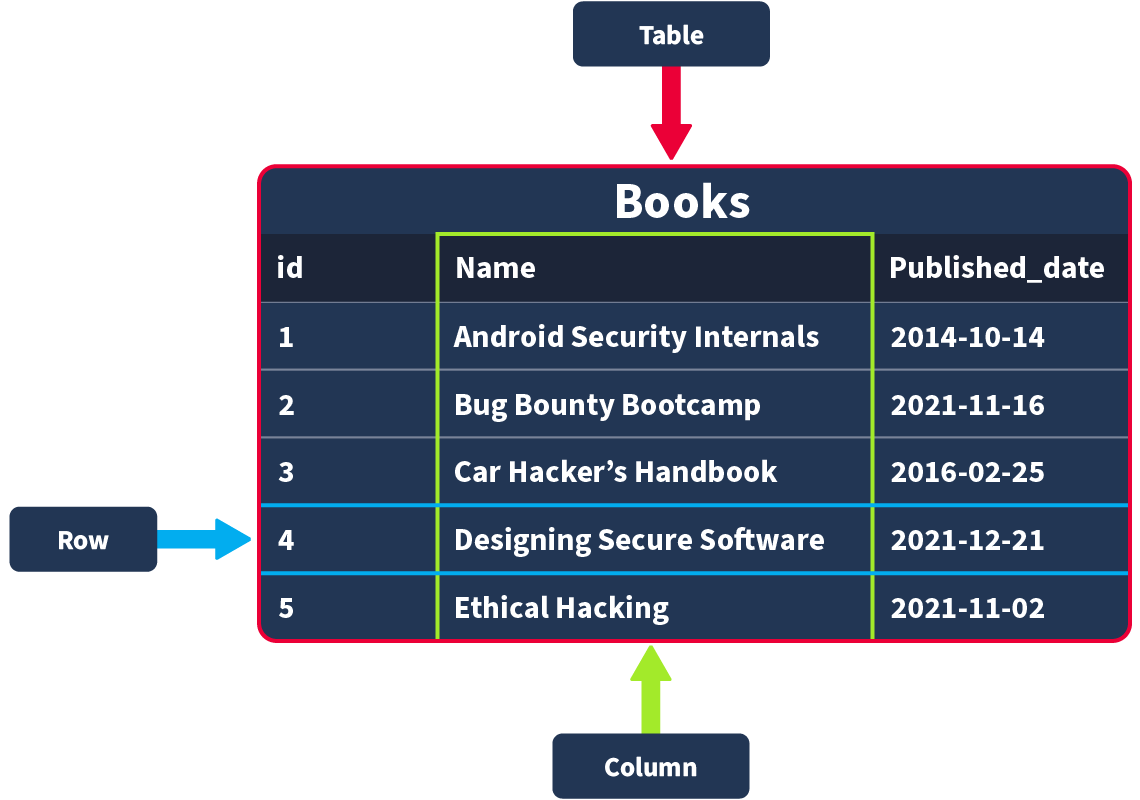
Primary Keys: A primary key is used to ensure that the data collected in a certain column is unique. That is, there needs to be a way to identify each record stored in a table, a value unique to that record and is not repeated by any other record in that table. Think about matriculation numbers in a university; these are numbers assigned to a student so they can be uniquely identified in records (as sometimes students can have the same name). A column has to be chosen in each table as a primary key; in our example, “id” would make the most sense as an id has been uniquely created for each book where, as books can have the same publication date or (in rarer cases) book title. Note that there can only be one primary key column in a table.
Foreign Keys: A foreign key is a column (or columns) in a table that also exists in another table within the database, and therefore provides a link between the two tables. In our example, think about adding an “author_id” field to our “Books” table; this would then act as a foreign key because the author_id in our Books table corresponds to the “id” column in the author table. Foreign keys are what allow the relationships between different tables in relational databases. Note that there can be more than one foreign key column in a table.
Databases are usually controlled using a Database Management System (DBMS). Serving as an interface between the end user and the database, a DBMS is a software program that allows users to retrieve, update and manage the data being stored. Some examples of DBMSs include MySQL, MongoDB, Oracle Database and Maria DB.
Database Statements
mysql
CREATE DATABASE
# CREATE DATABASE
CREATE DATABASE database_name;

# SHOW DATABASES
SHOW DATABASES;

# USE DATABASE
USE employees_db;Table Statements
# CREATE TABLE
CREATE TABLE book_inventory (
    book_id INT AUTO_INCREMENT PRIMARY KEY,
    book_name VARCHAR(255) NOT NULL,
    publication_date DATE
);

# SHOW TABLES
SHOW TABLES ;

# DESCRIBE to know what columns are contained within a table (and their data type)
DESCRIBE book_inventory;

# ALTER
ALTER TABLE book_inventory
ADD page_count INT;

# removing the database
DROP TABLE table_name;CRUD Operations
CRUD stands for Create, Read, Update, and Delete
# Create
INSERT INTO books (id, name, published_date, description)
    VALUES (1, "Android Security Internals", "2014-10-14", "An In-Depth Guide to Android's Security Architecture");

# Read
SELECT * FROM books;

# Update
UPDATE books
    SET description = "An In-Depth Guide to Android's Security Architecture."
    WHERE id = 1;
# Delete
DELETE FROM books WHERE id = 1;clause
A clause is a part of a statement that specifies the criteria of the data being manipulated, usually by an initial statement. Clauses can help us define the type of data and how it should be retrieved or sorted.
# DISTINCT
SELECT DISTINCT name FROM books;

# GROUP BY
SELECT name, COUNT(*)
    FROM books
    GROUP BY name;

# ORDER BY
# ASCENDING ORDER
SELECT *
    FROM books
    ORDER BY published_date ASC;
# DESCENDING ORDER
SELECT *
    FROM books
    ORDER BY published_date DESC;

# HAVING
SELECT name, COUNT(*)
    FROM books
    GROUP BY name
HAVING name LIKE '%Hack%';operators
When working with SQL and dealing with logic and comparisons, operators are our way to filter and manipulate data effectively. Understanding these operators will help us to create more precise and powerful queries.
Logical Operators
These operators test the truth of a condition and return a boolean value of TRUE or FALSE.
# LIKE
SELECT *
    FROM books
    WHERE description LIKE "%guide%";

# AND
SELECT *
    FROM books
    WHERE category = "Offensive Security" AND name = "Bug Bounty Bootcamp";

# OR
SELECT *
    FROM books
    WHERE name LIKE "%Android%" OR name LIKE "%iOS%";

# NOT
SELECT *
    FROM books
    WHERE NOT description LIKE "%guide%";

# BETWEEN
SELECT *
    FROM books
WHERE id BETWEEN 2 AND 4;Comparison Operators
The comparison operators are used to compare values and check if they meet specified criteria.
# equal
SELECT *
    FROM books
    WHERE name = "Designing Secure Software";

# not equal
SELECT *
    FROM books
    WHERE category != "Offensive Security";

# Less Than
SELECT *
    FROM books
    WHERE published_date < "2020-01-01";

# Greater Than
SELECT *
    FROM books
    WHERE published_date > "2020-01-01";

# Less Than or Equal
SELECT *
    FROM books
WHERE published_date <= "2021-11-15";Functions
String Functions
Strings functions perform operations on a string, returning a value associated with it.
# CONCAT() add two or more strings together. It is useful to combine text from different columns.
SELECT CONCAT(name, " is a type of ", category, " book.") AS book_info FROM books;

# GROUP_CONCAT() concatenate data from multiple rows into one field.
SELECT category, GROUP_CONCAT(name SEPARATOR ", ") AS books
    FROM books
    GROUP BY category;

# SUBSTRING()  retrieve a substring from a string within a query, starting at a determined position. The length of this substring can also be specified.
mysql> SELECT SUBSTRING(published_date, 1, 4) AS published_year FROM books;

# LENGTH() returns the number of characters in a string. This includes spaces and punctuation.
SELECT LENGTH(name) AS name_length FROM books;Aggregate Functions
These functions aggregate the value of multiple rows within one specified criteria in the query; It can combine multiple values into one result.
# COUNT()  returns the number of records within an expression
SELECT COUNT(*) AS total_books FROM books;

# SUM() sums all values (not NULL) of a determined column
SELECT SUM(price) AS total_price FROM books;

# MAX()
SELECT MAX(published_date) AS latest_book FROM books;

# MIN()
SELECT MIN(published_date) AS earliest_book FROM books;Q&A
Using the tools_db database, what are the tool names where the amount does not end in 0, and group the tool names concatenated by " & ".
select group_concat(name separator "&") as name from hacking_tools where amount not like "%0";JSON Web Tokens (JWT)
JWTs are very simple tokens that allow you to store key-value pairs on a token that provides integrity as part of the token. The idea is that you can generate tokens that you can give your users with the certainty that they won't be able to alter the key-value pairs and pass the integrity check. The structure of a JWT token is formed of 3 parts:
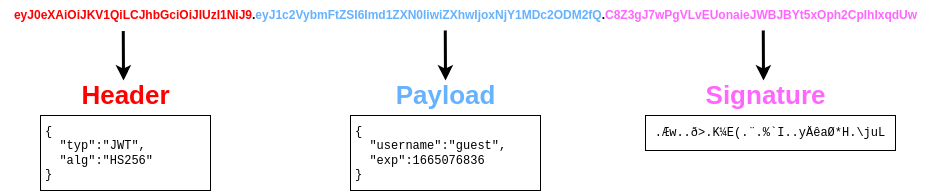
The header contains metadata indicating this is a JWT, and the signing algorithm in use is HS256. The payload contains the key-value pairs with the data that the web application wants the client to store. The signature is similar to a hash, taken to verify the payload's integrity. If you change the payload, the web application can verify that the signature won't match the payload and know that you tampered with the JWT. Unlike a simple hash, this signature involves the use of a secret key held by the server only, which means that if you change the payload, you won't be able to generate the matching signature unless you know the secret key.
Notice that each of the 3 parts of the token is simply plaintext encoded with base64. You can use this online tool to encode/decode base64. Try decoding the header and payload of the following token:
eyJ0eXAiOiJKV1QiLCJhbGciOiJIUzI1NiJ9.eyJ1c2VybmFtZSI6Imd1ZXN0IiwiZXhwIjoxNjY1MDc2ODM2fQ.C8Z3gJ7wPgVLvEUonaieJWBJBYt5xOph2CpIhlxqdUw
Note: The signature contains binary data, so even if you decode it, you won't be able to make much sense of it anyways.
Socket (套接字) 是计算机网络编程中一个非常核心的概念,它是应用程序与网络协议栈进行通信的接口。你可以把它想象成:
Socket 本质上是操作系统提供的网络编程接口(API),用于实现进程间的网络通信。它将底层复杂的网络协议(如 TCP/IP、UDP)封装成简洁的函数或类,让开发者可以通过调用这些接口来实现数据的发送和接收,无需关心网络协议的具体实现细节,从而可以专注于业务逻辑而不是底层协议。。
一个 Socket 通常由以下几个关键信息唯一标识:
所以,一个完整的 Socket 地址可以表示为 IP地址:端口号。例如,192.168.1.100:8080 就标识了 IP 地址为 192.168.1.100 的主机上,端口号为 8080 的应用程序的 Socket。
Socket 接口通常以函数或类的形式存在,开发者通过调用这些接口完成网络操作。
服务器端:
客户端:
Socket 是网络编程的基石,它抽象了底层复杂的网络通信细节,为应用程序提供了一个统一的接口,使得程序可以方便地通过网络进行数据传输。无论是简单的 Web 访问,还是复杂的分布式系统,Socket 都是其背后不可或缺的技术。