

Appearance
Appearance
In passive reconnaissance, you rely on publicly available knowledge. It is the knowledge that you can access from publicly available resources without directly engaging with the target.
Passive reconnaissance activities include many activities, for instance:
WHOIS is a request and response protocol that follows the RFC 3912 specification. A WHOIS server listens on TCP port 43 for incoming requests. The domain registrar is responsible for maintaining the WHOIS records for the domain names it is leasing. The WHOIS server replies with various information related to the domain requested. Of particular interest, we can learn:
whois DOMAIN_NAMEnslookup
Find the IP address of a domain name using nslookup, which stands for Name Server Look Up.
# nslookup OPTIONS DOMAIN_NAME SERVER
nslookup -type=A tryhackme.com 1.1.1.1A for IPv4 addresses and AAAA for IPv6 addresses.1.1.1.1 and 1.0.0.1, Google offers 8.8.8.8 and 8.8.4.4, and Quad9 offers 9.9.9.9 and 149.112.112.112. There are many more public DNS servers that you can choose from if you want alternatives to your ISP’s DNS servers.| Query type | Result |
|---|---|
| A | IPv4 Addresses |
| AAAA | IPv6 Addresses |
| CNAME | Canonical Name |
| MX | Mail Servers |
| SOA | Start of Authority |
| TXT | TXT Records |
dig
For more advanced DNS queries and additional functionality, you can use dig, the acronym for “Domain Information Groper,” if you are curious.
# dig @SERVER DOMAIN_NAME TYPE
dig @1.1.1.1 tryhackme.com MXA quick comparison between the output of nslookup and dig shows that dig returned more information, such as the TTL (Time To Live) by default.
root@ip-10-10-108-122:~# nslookup -type=MX tryhackme.com 1.1.1.1
Server:		1.1.1.1
Address:	1.1.1.1#53

Non-authoritative answer:
tryhackme.com	mail exchanger = 1 aspmx.l.google.com.
tryhackme.com	mail exchanger = 10 alt3.aspmx.l.google.com.
tryhackme.com	mail exchanger = 10 alt4.aspmx.l.google.com.
tryhackme.com	mail exchanger = 5 alt1.aspmx.l.google.com.
tryhackme.com	mail exchanger = 5 alt2.aspmx.l.google.com.

Authoritative answers can be found from:root@ip-10-10-108-122:~# dig @1.1.1.1 tryhackme.com MX
; <<>> DiG 9.18.28-0ubuntu0.20.04.1-Ubuntu <<>> @1.1.1.1 tryhackme.com MX
; (1 server found)
;; global options: +cmd
;; Got answer:
;; ->>HEADER<<- opcode: QUERY, status: NOERROR, id: 26795
;; flags: qr rd ra; QUERY: 1, ANSWER: 5, AUTHORITY: 0, ADDITIONAL: 1
;; OPT PSEUDOSECTION:
; EDNS: version: 0, flags:; udp: 1232
;; QUESTION SECTION:
;tryhackme.com. IN MX
;; ANSWER SECTION:
tryhackme.com. 300 IN MX 1 aspmx.l.google.com.
tryhackme.com. 300 IN MX 10 alt3.aspmx.l.google.com.
tryhackme.com. 300 IN MX 10 alt4.aspmx.l.google.com.
tryhackme.com. 300 IN MX 5 alt1.aspmx.l.google.com.
tryhackme.com. 300 IN MX 5 alt2.aspmx.l.google.com.
;; Query time: 4 msec
;; SERVER: 1.1.1.1#53(1.1.1.1) (UDP)
;; WHEN: Wed Jun 11 14:13:37 BST 2025
;; MSG SIZE rcvd: 157DNS lookup tools, such as nslookup and dig, cannot find subdomains on their own.
To avoid such a time-consuming search, one can use an online service that offers detailed answers to DNS queries, such as DNSDumpster. If we search DNSDumpster for tryhackme.com, we will discover the subdomain blog.tryhackme.com, which a typical DNS query cannot provide. In addition, DNSDumpster will return the collected DNS information in easy-to-read tables and a graph. DNSDumpster will also provide any collected information about listening servers.
When you are tasked to run a penetration test against specific targets, as part of the passive reconnaissance phase, a service like Shodan.io can be helpful to learn various pieces of information about the client’s network, without actively connecting to it. Furthermore, on the defensive side, you can use different services from Shodan.io to learn about connected and exposed devices belonging to your organization.
Shodan.io tries to connect to every device reachable online to build a search engine of connected “things” in contrast with a search engine for web pages. Once it gets a response, it collects all the information related to the service and saves it in the database to make it searchable.
It is essential to remember not to engage in active reconnaissance work before getting signed legal authorization from the client.
The web browser can be a convenient tool, especially that it is readily available on all systems. There are several ways where you can use a web browser to gather information about a target.
There are also plenty of add-ons for Firefox and Chrome that can help in penetration testing. Here are a few examples:
Ping is a command that sends an ICMP Echo packet to a remote system. If the remote system is online, and the ping packet was correctly routed and not blocked by any firewall, the remote system should send back an ICMP Echo Reply. Similarly, the ping reply should reach the first system if appropriately routed and not blocked by any firewall. This way, you can conclude that the remote system is online and that the network is working between the two systems.
# linux count
ping -c 10 10.10.108.99

# windows
ping -n 10 10.10.108.99The traceroute command traces the route taken by the packets from your system to another host. The purpose of a traceroute is to find the IP addresses of the routers or hops that a packet traverses as it goes from your system to a target host. This command also reveals the number of routers between the two systems. It is helpful as it indicates the number of hops (routers) between your system and the target host. However, note that the route taken by the packets might change as many routers use dynamic routing protocols that adapt to network changes.
# linux&mac
traceroute 10.10.108.99

# windwos
tracert 10.10.108.99The TELNET (Teletype Network) protocol was developed in 1969 to communicate with a remote system via a command-line interface (CLI). Hence, the command telnet uses the TELNET protocol for remote administration. The default port used by telnet is 23. From a security perspective, telnet sends all the data, including usernames and passwords, in cleartext. Sending in cleartext makes it easy for anyone, who has access to the communication channel, to steal the login credentials. The secure alternative is SSH (Secure SHell) protocol.
However, the telnet client, with its simplicity, can be used for other purposes. Knowing that telnet client relies on the TCP protocol, you can use Telnet to connect to any service and grab its banner. Using telnet 10.10.108.99 PORT, you can connect to any service running on TCP and even exchange a few messages unless it uses encryption.
Let’s say we want to discover more information about a web server, listening on port 80. We connect to the server at port 80, and then we communicate using the HTTP protocol. You don’t need to dive into the HTTP protocol; you just need to issue GET / HTTP/1.1. To specify something other than the default index page, you can issue GET /page.html HTTP/1.1, which will request page.html. We also specified to the remote web server that we want to use HTTP version 1.1 for communication. To get a valid response, instead of an error, you need to input some value for the host host: example and hit enter twice. Executing these steps will provide the requested index page.
root@ip-10-10-178-220:~# telnet 10.10.108.99 80
Trying 10.10.108.99...
Connected to 10.10.108.99.
Escape character is '^]'.
GET / HTTP/1.1
host: telnet

HTTP/1.1 200 OK
Date: Thu, 12 Jun 2025 03:09:30 GMT
Server: Apache/2.4.61 (Debian)
Last-Modified: Mon, 30 Aug 2021 12:09:24 GMT
ETag: "15-5cac5b436ddfa"
Accept-Ranges: bytes
Content-Length: 21
Content-Type: text/html

Telnet to port 80...
Connection closed by foreign host.Netcat or simply nc has different applications that can be of great value to a pentester. Netcat supports both TCP and UDP protocols. It can function as a client that connects to a listening port; alternatively, it can act as a server that listens on a port of your choice. Hence, it is a convenient tool that you can use as a simple client or server over TCP or UDP.
client
root@ip-10-10-178-220:~# nc 10.10.187.57 80
GET / HTTP/1.1
host: netcat

HTTP/1.1 200 OK
Server: nginx/1.22.1
Date: Thu, 12 Jun 2025 03:31:14 GMT
Content-Type: text/html
Content-Length: 867
Last-Modified: Fri, 08 Oct 2021 04:30:27 GMT
Connection: keep-alive
ETag: "615fc963-363"
Accept-Ranges: bytesNmap (Network Mapper) is a open-source tool used for network discovery and security auditing. It also assists in the exploration of network hosts and services, providing information about open ports, operating systems, and other details.
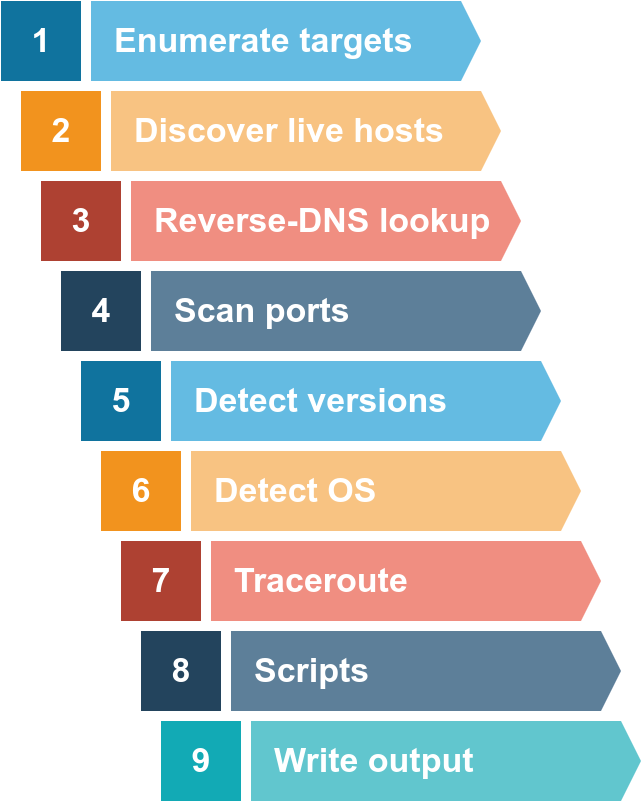
Nmap's scripting engine can further extend its functionality, from fingerprinting services to exploiting vulnerabilities. A Nmap scan usually goes through the steps shown in the figure below, although many are optional and depend on the command-line arguments you provide.
| Scan Type | Example Command |
|---|---|
| ARP Scan | sudo nmap -PR -sn MACHINE_IP/24 |
| ICMP Echo Scan | sudo nmap -PE -sn MACHINE_IP/24 |
| ICMP Timestamp Scan | sudo nmap -PP -sn MACHINE_IP/24 |
| ICMP Address Mask Scan | sudo nmap -PM -sn MACHINE_IP/24 |
| TCP SYN Ping Scan | sudo nmap -PS22,80,443 -sn MACHINE_IP/30 |
| TCP ACK Ping Scan | sudo nmap -PA22,80,443 -sn MACHINE_IP/30 |
| UDP Ping Scan | sudo nmap -PU53,161,162 -sn MACHINE_IP/30 |
| Option | Purpose |
|---|---|
-n | no DNS lookup |
-R | reverse-DNS lookup for all hosts |
-sn | host discovery only |
ARP has one purpose: sending a frame to the broadcast address on the network segment and asking the computer with a specific IP address to respond by providing its MAC (hardware) address.
ICMP has many types. ICMP ping uses Type 8 (Echo) and Type 0 (Echo Reply).
If you want to ping a system on the same subnet, an ARP query should precede the ICMP Echo.
Although TCP and UDP are transport layers, for network scanning purposes, a scanner can send a specially-crafted packet to common TCP or UDP ports to check whether the target will respond. This method is efficient, especially when ICMP Echo is blocked.
How would you know which hosts are up and running? It is essential to avoid wasting our time port-scanning an offline host or an IP address not in use. There are various ways to discover online hosts. When no host discovery options are provided, Nmap follows the following approaches to discover live hosts:
root or a user who belongs to sudoers and can run sudo.Nmap, by default, uses a ping scan to find live hosts, then proceeds to scan live hosts only.
Nmap Host Discovery Using ARP

Nmap only to perform an ARP scan without port-scanning
sudo nmap -PR -sn 10.10.210.6/24-PR indicates that you only want an ARP scan-sn 在 Nmap 中代表 "No port scan"(禁用端口扫描),也被称为 "ping scan"(ping 扫描)。Nmap Host Discovery Using ICMP
We can ping every IP address on a target network and see who would respond to our ping (ICMP Type 8/Echo) requests with a ping reply (ICMP Type 0). Simple, isn’t it? Although this would be the most straightforward approach, it is not always reliable. Many firewalls block ICMP echo; new versions of MS Windows are configured with a host firewall that blocks ICMP echo requests by default. Remember that an ARP query will precede the ICMP request if your target is on the same subnet.

sudo nmap -PE -sn 10.10.210.6/24-PE use ICMP echo request to discover live hostsBecause ICMP echo requests tend to be blocked, you might also consider ICMP Timestamp or ICMP Address Mask requests to tell if a system is online. Nmap uses timestamp request (ICMP Type 13) and checks whether it will get a Timestamp reply (ICMP Type 14). Adding the -PP option tells Nmap to use ICMP timestamp requests. As shown in the figure below, you expect live hosts to reply.

sudo nmap -PP -sn 10.10.68.220/24Similarly, Nmap uses address mask queries (ICMP Type 17) and checks whether it gets an address mask reply (ICMP Type 18). This scan can be enabled with the option -PM. As shown in the figure below, live hosts are expected to reply to ICMP address mask requests.

sudo nmap -PM -sn 10.10.68.220/24Nmap Host Discovery Using TCP and UDP
TCP SYN Ping
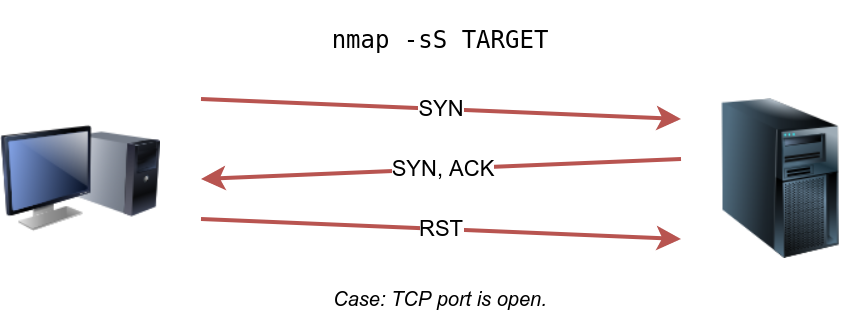
We can send a packet with the SYN (Synchronize) flag set to a TCP port, 80 by default, and wait for a response. An open port should reply with a SYN/ACK (Acknowledge); a closed port would result in an RST (Reset). In this case, we only check whether we will get any response to infer whether the host is up. The specific state of the port is not significant here. The figure below is a reminder of how a TCP 3-way handshake usually works.

If you want Nmap to use TCP SYN ping, you can do so via the option -PS followed by the port number, range, list, or a combination of them. For example, -PS21 will target port 21, while -PS21-25 will target ports 21, 22, 23, 24, and 25. Finally -PS80,443,8080 will target the three ports 80, 443, and 8080.
Privileged users (root and sudoers) can send TCP SYN packets and don’t need to complete the TCP 3-way handshake even if the port is open, as shown in the figure below. Unprivileged users have no choice but to complete the 3-way handshake if the port is open.

sudo nmap -PS -sn 10.10.68.220/24TCP ACK Ping
As you have guessed, this sends a packet with an ACK flag set. You must be running Nmap as a privileged user to be able to accomplish this. If you try it as an unprivileged user, Nmap will attempt a 3-way handshake.
By default, port 80 is used. The syntax is similar to TCP SYN ping. -PA should be followed by a port number, range, list, or a combination of them. For example, consider -PA21, -PA21-25 and -PA80,443,8080. If no port is specified, port 80 will be used.
The following figure shows that any TCP packet with an ACK flag should get a TCP packet back with an RST flag set. The target responds with the RST flag set because the TCP packet with the ACK flag is not part of any ongoing connection. The expected response is used to detect if the target host is up.
sudo nmap -PA -sn 10.10.68.220/24UDP Ping
Finally, we can use UDP to discover if the host is online. Contrary to TCP SYN ping, sending a UDP packet to an open port is not expected to lead to any reply. However, if we send a UDP packet to a closed UDP port, we expect to get an ICMP port unreachable packet; this indicates that the target system is up and available.
In the following figure, we see a UDP packet sent to an open UDP port and not triggering any response. However, sending a UDP packet to any closed UDP port can trigger a response indirectly indicating that the target is online.


The syntax to specify the ports is similar to that of TCP SYN ping and TCP ACK ping; Nmap uses -PU for UDP ping. In the following example, we use a UDP scan, and we discover five live hosts.
sudo nmap -PU -sn 10.10.68.220/24Nmap’s default behaviour is to use reverse-DNS online hosts. Because the hostnames can reveal a lot, this can be a helpful step. However, if you don’t want to send such DNS queries, you use -n to skip this step.
By default, Nmap will look up online hosts; however, you can use the option -R to query the DNS server even for offline hosts. If you want to use a specific DNS server, you can add the --dns-servers DNS_SERVER option.
| Option | Purpose |
|---|---|
-n | no DNS lookup |
-R | reverse-DNS lookup for all hosts |
-sn | host discovery only |
| Port Scan Type | Example Command |
|---|---|
| TCP Connect Scan | nmap -sT 10.10.81.103 |
| TCP SYN Scan | sudo nmap -sS 10.10.81.103 |
| UDP Scan | sudo nmap -sU 10.10.81.103 |
| Option | Purpose |
|---|---|
-p- | all ports |
-p1-1023 | scan ports 1 to 1023 |
-F | 100 most common ports |
-r | scan ports in consecutive order |
-T<0-5> | -T0 being the slowest and T5 the fastest |
--max-rate 50 | rate <= 50 packets/sec |
--min-rate 15 | rate >= 15 packets/sec |
--min-parallelism 100 | at least 100 probes in parallel |
In the same sense that an IP address specifies a host on a network among many others, a TCP port or UDP port is used to identify a network service running on that host. A server provides the network service, and it adheres to a specific network protocol. Examples include providing time, responding to DNS queries, and serving web pages. A port is usually linked to a service using that specific port number. For instance, an HTTP server would bind to TCP port 80 by default; moreover, if the HTTP server supports SSL/TLS, it would listen on TCP port 443. (TCP ports 80 and 443 are the default ports for HTTP and HTTPS; however, the webserver administrator might choose other port numbers if necessary.) Furthermore, no more than one service can listen on any TCP or UDP port (on the same IP address).
At the risk of oversimplification, we can classify ports in two states:
However, in practical situations, we need to consider the impact of firewalls. For instance, a port might be open, but a firewall might be blocking the packets. Therefore, Nmap considers the following six states:
-sA.Nmap supports different types of TCP port scans. To understand the difference between these port scans, we need to review the TCP header. The TCP header is the first 24 bytes of a TCP segment. The following figure shows the TCP header as defined in RFC 793. This figure looks sophisticated at first; however, it is pretty simple to understand. In the first row, we have the source TCP port number and the destination port number. We can see that the port number is allocated 16 bits (2 bytes). In the second and third rows, we have the sequence number and the acknowledgement number. Each row has 32 bits (4 bytes) allocated, with six rows total, making up 24 bytes.
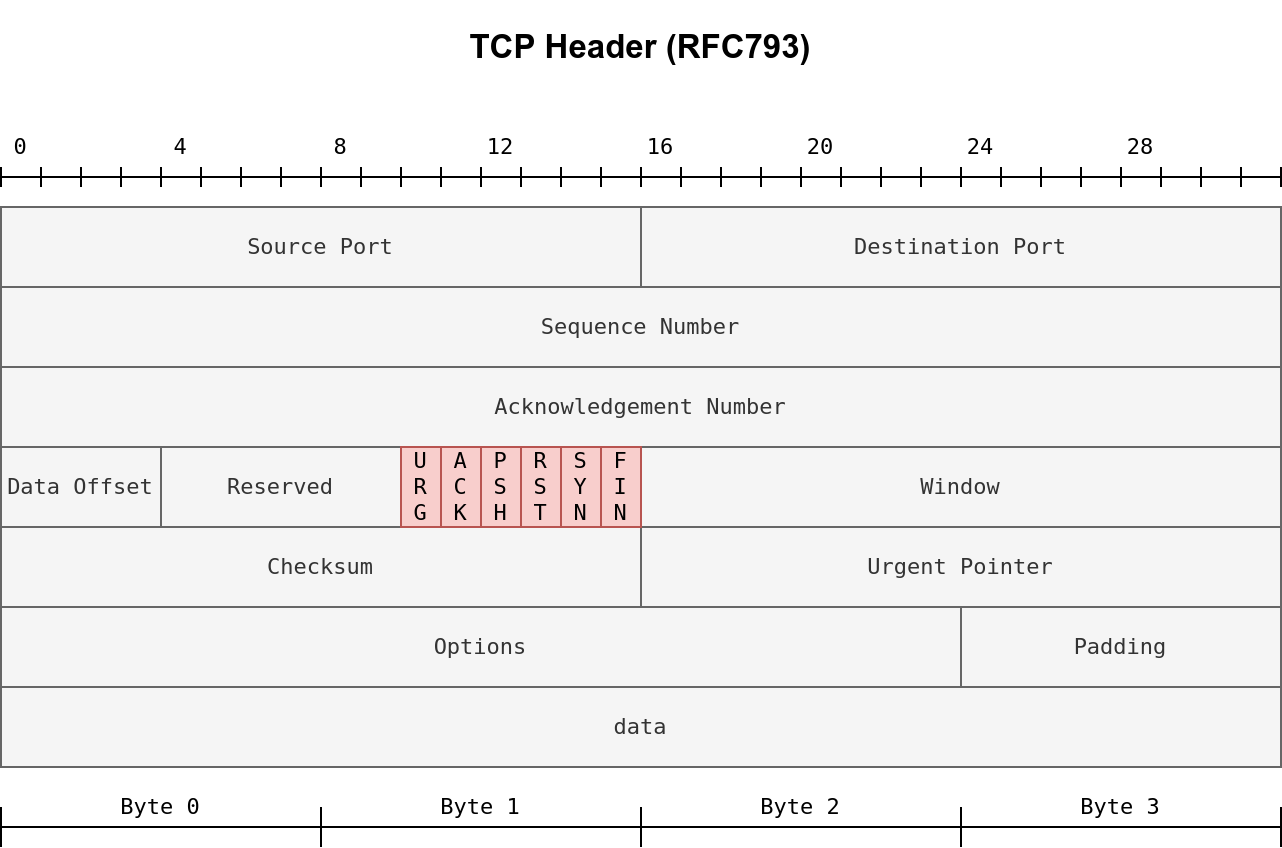
In particular, we need to focus on the flags that Nmap can set or unset. We have highlighted the TCP flags in red. Setting a flag bit means setting its value to 1. From left to right, the TCP header flags are:
TCP connect scan works by completing the TCP 3-way handshake. In standard TCP connection establishment, the client sends a TCP packet with SYN flag set, and the server responds with SYN/ACK if the port is open; finally, the client completes the 3-way handshake by sending an ACK.
We are interested in learning whether the TCP port is open, not establishing a TCP connection. Hence the connection is torn as soon as its state is confirmed by sending a RST/ACK. You can choose to run TCP connect scan using -sT.

It is important to note that if you are not a privileged user (root or sudoer), a TCP connect scan is the only possible option to discover open TCP ports.
nmap -sT 10.10.184.141Unprivileged users are limited to connect scan. However, the default scan mode is SYN scan, and it requires a privileged (root or sudoer) user to run it. SYN scan does not need to complete the TCP 3-way handshake; instead, it tears down the connection once it receives a response from the server. Because we didn’t establish a TCP connection, this decreases the chances of the scan being logged. We can select this scan type by using the -sS option. The figure below shows how the TCP SYN scan works without completing the TCP 3-way handshake.
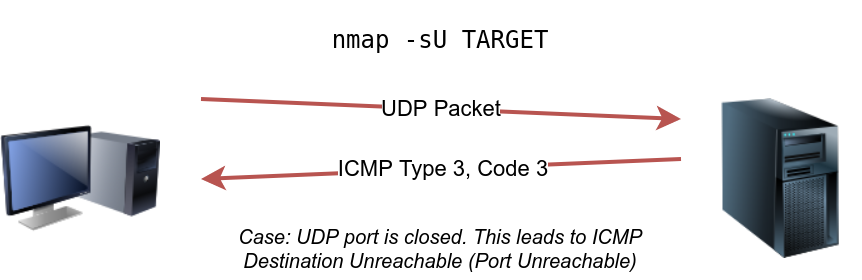
sudo nmap -sS 10.10.224.119UDP is a connectionless protocol, and hence it does not require any handshake for connection establishment. We cannot guarantee that a service listening on a UDP port would respond to our packets. However, if a UDP packet is sent to a closed port, an ICMP port unreachable error (type 3, code 3) is returned. You can select UDP scan using the -sU option; moreover, you can combine it with another TCP scan.
The following figure shows that if we send a UDP packet to an open UDP port, we cannot expect any reply in return. Therefore, sending a UDP packet to an open port won’t tell us anything.
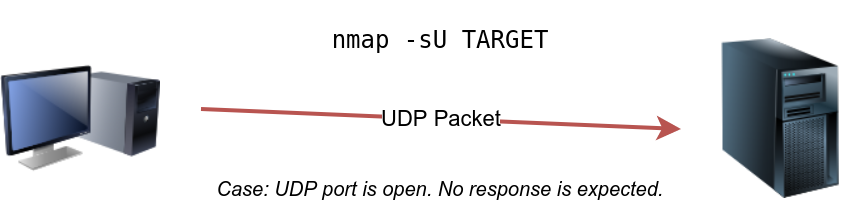
However, as shown in the figure below, we expect to get an ICMP packet of type 3, destination unreachable, and code 3, port unreachable. In other words, the UDP ports that don’t generate any response are the ones that Nmap will state as open.
sudo nmap -sU -F -v 10.10.81.103-F Fast Mode 只扫描最常用的100个端口-v Verbose 显示详细信息 可以使用 -vv 或 -vvv 获取更详细的输出You can specify the ports you want to scan instead of the default 1000 ports. Specifying the ports is intuitive by now. Let’s see some examples:
-p22,80,443 will scan ports 22, 80 and 443.-p1-1023 will scan all ports between 1 and 1023 inclusive, while -p20-25 will scan ports between 20 and 25 inclusive.You can request the scan of all ports by using -p-, which will scan all 65535 ports. If you want to scan the most common 100 ports, add -F. Using --top-ports 10 will check the ten most common ports.
You can control the scan timing using -T<0-5>. -T0 is the slowest (paranoid), while -T5 is the fastest. According to Nmap manual page, there are six templates:
To avoid IDS alerts, you might consider -T0 or -T1. For instance, -T0 scans one port at a time and waits 5 minutes between sending each probe, so you can guess how long scanning one target would take to finish. If you don’t specify any timing, Nmap uses normal -T3. Note that -T5 is the most aggressive in terms of speed; however, this can affect the accuracy of the scan results due to the increased likelihood of packet loss. Note that -T4 is often used during CTFs and when learning to scan on practice targets, whereas -T1 is often used during real engagements where stealth is more important.
Alternatively, you can choose to control the packet rate using --min-rate <number> and --max-rate <number>. For example, --max-rate 10 or --max-rate=10 ensures that your scanner is not sending more than ten packets per second.
Moreover, you can control probing parallelization using --min-parallelism <numprobes> and --max-parallelism <numprobes>. Nmap probes the targets to discover which hosts are live and which ports are open; probing parallelization specifies the number of such probes that can be run in parallel. For instance, --min-parallelism=512 pushes Nmap to maintain at least 512 probes in parallel; these 512 probes are related to host discovery and open ports.
| Port Scan Type | Example Command |
|---|---|
| TCP Null Scan | sudo nmap -sN 10.10.161.116 |
| TCP FIN Scan | sudo nmap -sF 10.10.161.116 |
| TCP Xmas Scan | sudo nmap -sX 10.10.161.116 |
| TCP Maimon Scan | sudo nmap -sM 10.10.161.116 |
| TCP ACK Scan | sudo nmap -sA 10.10.161.116 |
| TCP Window Scan | sudo nmap -sW 10.10.161.116 |
| Custom TCP Scan | sudo nmap --scanflags URGACKPSHRSTSYNFIN 10.10.161.116 |
| Spoofed Source IP | sudo nmap -S SPOOFED_IP 10.10.161.116 |
| Spoofed MAC Address | --spoof-mac SPOOFED_MAC |
| Decoy Scan | nmap -D DECOY_IP,ME 10.10.161.116 |
| Idle (Zombie) Scan | sudo nmap -sI ZOMBIE_IP 10.10.161.116 |
| Fragment IP data into 8 bytes | -f |
| Fragment IP data into 16 bytes | -ff |
| Option | Purpose |
|---|---|
--source-port PORT_NUM | specify source port number |
--data-length NUM | append random data to reach given length |
| Option | Purpose |
|---|---|
--reason | explains how Nmap made its conclusion |
-v | verbose |
-vv | very verbose |
-d | debugging |
-dd | more details for debugging |
Security researchers and hackers contemplated the TCP flags, and started to experiment. They wanted to know what would happen if we send a TCP packet, which is not part of any ongoing TCP connection, with one or more flags set.
For instance, an ACK flag is set when you want to acknowledge received data. An ACK scan is like trying to acknowledge data that was neither sent nor received in the first place. Consider this simple analogy, someone coming to you out of nowhere to tell you, “yes, I hear you, please continue.” when you haven’t said anything.
One scenario where these three scan types can be efficient is when scanning a target behind a stateless (non-stateful) firewall. A stateless firewall will check if the incoming packet has the SYN flag set to detect a connection attempt. Using a flag combination that does not match the SYN packet makes it possible to deceive the firewall and reach the system behind it. However, a stateful firewall will practically block all such crafted packets and render this kind of scan useless.
Null Scan
The null scan does not set any flag; all six flag bits are set to zero. You can choose this scan using the -sN option. A TCP packet with no flags set will not trigger any response when it reaches an open port, as shown in the figure below. Therefore, from Nmap’s perspective, a lack of reply in a null scan indicates that either the port is open or a firewall is blocking the packet.

However, we expect the target server to respond with an RST packet if the port is closed. Consequently, we can use the lack of RST response to figure out the ports that are not closed: open or filtered.

sudo nmap -sN 10.10.244.187Note that many Nmap options require root privileges. Unless you are running Nmap as root, you need to use sudo as in the example above using the -sN option.
FIN Scan
The FIN scan sends a TCP packet with the FIN flag set. You can choose this scan type using the -sF option. Similarly, no response will be sent if the TCP port is open. Again, Nmap cannot be sure if the port is open or if a firewall is blocking the traffic related to this TCP port.

However, the target system should respond with an RST if the port is closed. Consequently, we will be able to know which ports are closed and use this knowledge to infer the ports that are open or filtered. It's worth noting some firewalls will 'silently' drop the traffic without sending an RST.

sudo nmap -sF 10.10.244.187Xmas Scan
The Xmas scan gets its name after Christmas tree lights. An Xmas scan sets the FIN, PSH, and URG flags simultaneously. You can select Xmas scan with the option -sX.
Like the Null scan and FIN scan, if an RST packet is received, it means that the port is closed. Otherwise, it will be reported as open|filtered.
The following two figures show the case when the TCP port is open and the case when the TCP port is closed.


sudo nmap -sX 10.10.244.187FIN (Finish)
PSH (Push)
URG (Urgent)
示例使用场景:
| 标志位 | 常见用途 |
|---|---|
| FIN | 关闭连接 |
| PSH | 实时通信 |
| URG | 紧急命令 |
这三个标志位是 TCP 头部中的控制位,对于网络通信的流量控制和数据处理具有重要意义。
Uriel Maimon first described this scan in 1996. In this scan, the FIN and ACK bits are set. The target should send an RST packet as a response. However, certain BSD-derived systems drop the packet if it is an open port exposing the open ports. This scan won’t work on most targets encountered in modern networks; however, we include it in this place to better understand the port scanning mechanism and the hacking mindset. To select this scan type, use the -sM option.
Most target systems respond with an RST packet regardless of whether the TCP port is open. In such a case, we won’t be able to discover the open ports. The figure below shows the expected behaviour in the cases of both open and closed TCP ports.
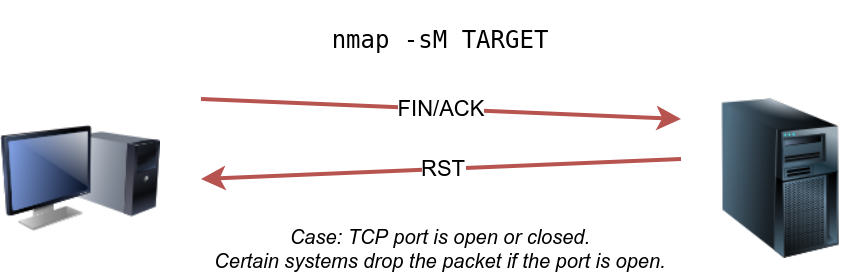
As mentioned, because open ports and closed ports are behaving the same way, the Maimon scan could not discover any open ports on the target system.
sudo nmap -sM 10.10.252.27TCP ACK Scan
Let’s start with the TCP ACK scan. As the name implies, an ACK scan will send a TCP packet with the ACK flag set. Use the -sA option to choose this scan. As we show in the figure below, the target would respond to the ACK with RST regardless of the state of the port. This behaviour happens because a TCP packet with the ACK flag set should be sent only in response to a received TCP packet to acknowledge the receipt of some data, unlike our case. Hence, this scan won’t tell us whether the target port is open in a simple setup.

sudo nmap -sA 10.10.6.39This kind of scan would be helpful if there is a firewall in front of the target. Consequently, based on which ACK packets resulted in responses, you will learn which ports were not blocked by the firewall. In other words, this type of scan is more suitable to discover firewall rule sets and configuration.
root@ip-10-10-106-176:~# sudo nmap -sA 10.10.6.39
Starting Nmap 7.80 ( https://nmap.org ) at 2025-06-14 04:06 BST
Nmap scan report for 10.10.6.39
Host is up (0.00098s latency).
Not shown: 996 filtered ports
PORT    STATE      SERVICE
22/tcp  unfiltered ssh
25/tcp  unfiltered smtp
80/tcp  unfiltered http
443/tcp unfiltered https
MAC Address: 02:C7:24:13:29:B1 (Unknown)

Nmap done: 1 IP address (1 host up) scanned in 5.22 secondsWindow Scan
Another similar scan is the TCP window scan. The TCP window scan is almost the same as the ACK scan; however, it examines the TCP Window field of the RST packets returned. On specific systems, this can reveal that the port is open. You can select this scan type with the option -sW . As shown in the figure below, we expect to get an RST packet in reply to our “uninvited” ACK packets, regardless of whether the port is open or closed.

Similarly, launching a TCP window scan against a Linux system with no firewall will not provide much information. As we can see in the console output below, the results of the window scan against a Linux server with no firewall didn’t give any extra information compared to the ACK scan executed earlier.
sudo nmap -sW 10.10.6.39root@ip-10-10-106-176:~# sudo nmap -sW 10.10.6.39
Starting Nmap 7.80 ( https://nmap.org ) at 2025-06-14 04:15 BST
Nmap scan report for 10.10.6.39
Host is up (0.00052s latency).
Not shown: 996 filtered ports
PORT STATE SERVICE
22/tcp closed ssh
25/tcp closed smtp
80/tcp closed http
443/tcp closed https
MAC Address: 02:C7:24:13:29:B1 (Unknown)
Nmap done: 1 IP address (1 host up) scanned in 5.23 secondsCustom Scan
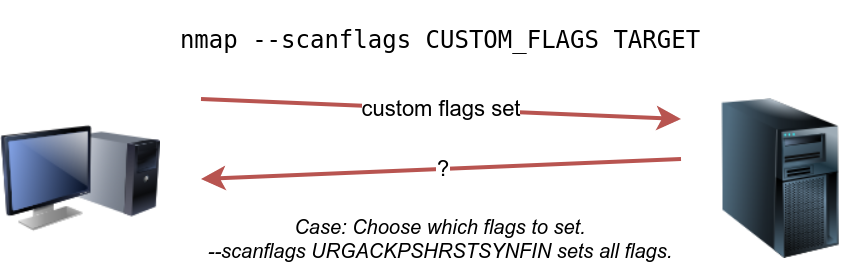
If you want to experiment with a new TCP flag combination beyond the built-in TCP scan types, you can do so using --scanflags . For instance, if you want to set SYN, RST, and FIN simultaneously, you can do so using --scanflags RSTSYNFIN . As shown in the figure below, if you develop your custom scan, you need to know how the different ports will behave to interpret the results in different scenarios correctly.
sudo nmap --scanflags ACK 10.10.6.39
sudo nmap --scanflags RST 10.10.6.39Finally, it is essential to note that the ACK scan and the window scan were very efficient at helping us map out the firewall rules. However, it is vital to remember that just because a firewall is not blocking a specific port, it does not necessarily mean that a service is listening on that port. For example, there is a possibility that the firewall rules need to be updated to reflect recent service changes. Hence, ACK and window scans are exposing the firewall rules, not the services.
In some network setups, you will be able to scan a target system using a spoofed IP address and even a spoofed MAC address. Such a scan is only beneficial in a situation where you can guarantee to capture the response. If you try to scan a target from some random network using a spoofed IP address, chances are you won’t have any response routed to you, and the scan results could be unreliable.
The following figure shows the attacker launching the command nmap -S SPOOFED_IP 10.10.6.39. Consequently, Nmap will craft all the packets using the provided source IP address SPOOFED_IP. The target machine will respond to the incoming packets sending the replies to the destination IP address SPOOFED_IP. For this scan to work and give accurate results, the attacker needs to monitor the network traffic to analyze the replies.
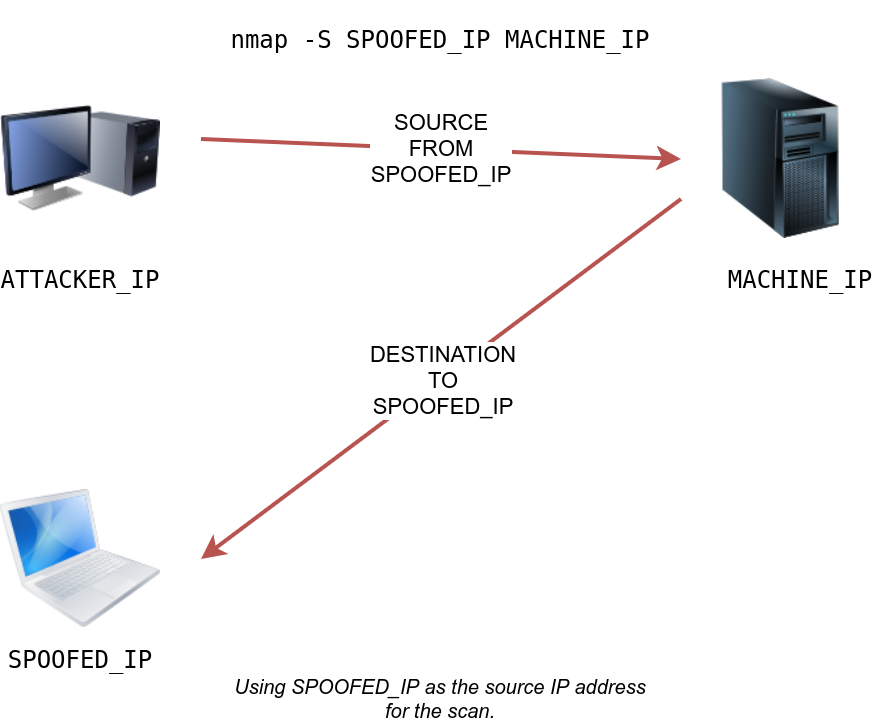
In brief, scanning with a spoofed IP address is three steps:
In general, you expect to specify the network interface using -e and to explicitly disable ping scan -Pn. Therefore, instead of nmap -S SPOOFED_IP 10.10.6.39, you will need to issue nmap -e NET_INTERFACE -Pn -S SPOOFED_IP 10.10.6.39 to tell Nmap explicitly which network interface to use and not to expect to receive a ping reply. It is worth repeating that this scan will be useless if the attacker system cannot monitor the network for responses.
When you are on the same subnet as the target machine, you would be able to spoof your MAC address as well. You can specify the source MAC address using --spoof-mac SPOOFED_MAC. This address spoofing is only possible if the attacker and the target machine are on the same Ethernet (802.3) network or same WiFi (802.11).
Spoofing only works in a minimal number of cases where certain conditions are met. Therefore, the attacker might resort to using decoys to make it more challenging to be pinpointed. The concept is simple, make the scan appear to be coming from many IP addresses so that the attacker’s IP address would be lost among them. As we see in the figure below, the scan of the target machine will appear to be coming from 3 different sources, and consequently, the replies will go the decoys as well.
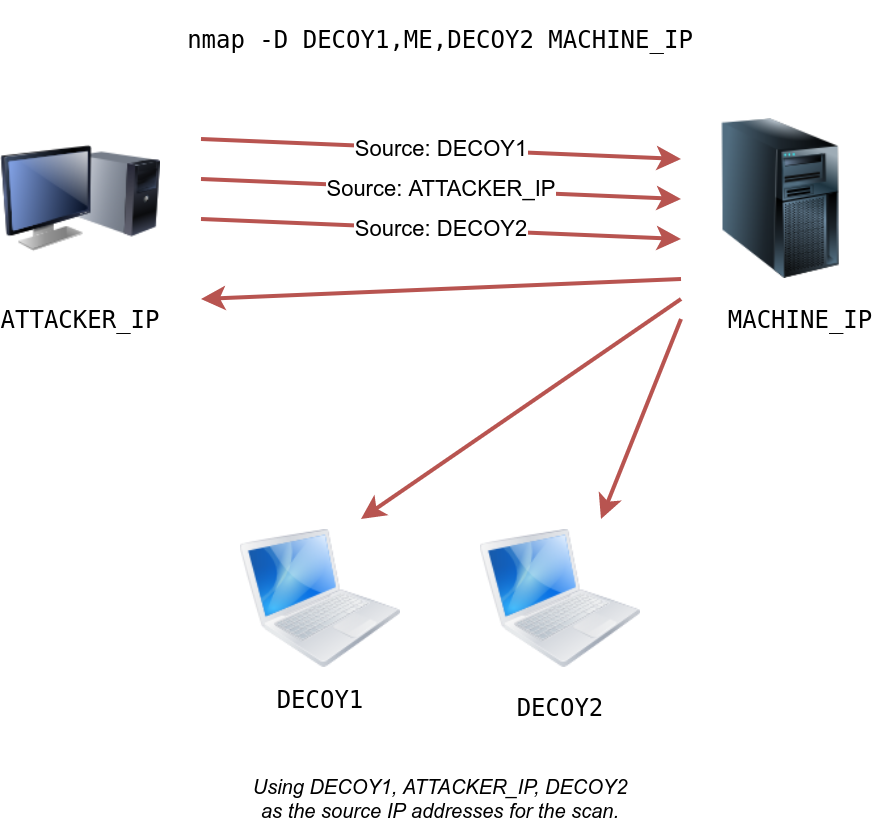
You can launch a decoy scan by specifying a specific or random IP address after -D. For example, nmap -D 10.10.0.1,10.10.0.2,ME 10.10.6.39 will make the scan of 10.10.6.39 appear as coming from the IP addresses 10.10.0.1, 10.10.0.2, and then ME to indicate that your IP address should appear in the third order. Another example command would be nmap -D 10.10.0.1,10.10.0.2,RND,RND,ME 10.10.6.39, where the third and fourth source IP addresses are assigned randomly, while the fifth source is going to be the attacker’s IP address. In other words, each time you execute the latter command, you would expect two new random IP addresses to be the third and fourth decoy sources.
Firewall
A firewall is a piece of software or hardware that permits packets to pass through or blocks them. It functions based on firewall rules, summarized as blocking all traffic with exceptions or allowing all traffic with exceptions. For instance, you might block all traffic to your server except those coming to your web server. A traditional firewall inspects, at least, the IP header and the transport layer header. A more sophisticated firewall would also try to examine the data carried by the transport layer.
IDS
An intrusion detection system (IDS) inspects network packets for select behavioural patterns or specific content signatures. It raises an alert whenever a malicious rule is met. In addition to the IP header and transport layer header, an IDS would inspect the data contents in the transport layer and check if it matches any malicious patterns. How can you make it less likely for a traditional firewall/IDS to detect your Nmap activity? It is not easy to answer this; however, depending on the type of firewall/IDS, you might benefit from dividing the packet into smaller packets.
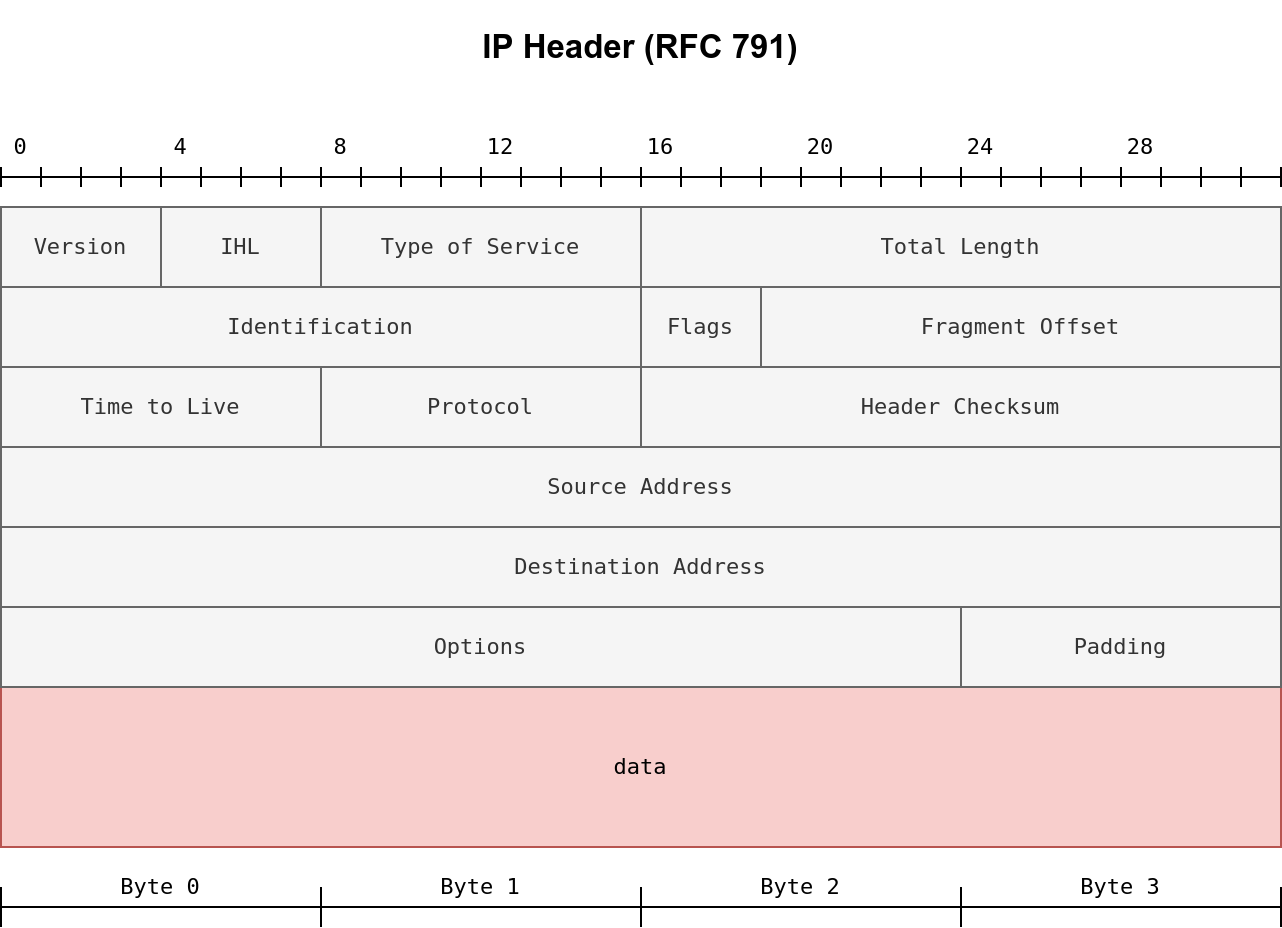
Fragmented Packets
Nmap provides the option -f to fragment packets. Once chosen, the IP data will be divided into 8 bytes or less. Adding another -f (-f -f or -ff) will split the data into 16 byte-fragments instead of 8. You can change the default value by using the --mtu; however, you should always choose a multiple of 8.
To properly understand fragmentation, we need to look at the IP header in the figure below. It might look complicated at first, but we notice that we know most of its fields. In particular, notice the source address taking 32 bits (4 bytes) on the fourth row, while the destination address is taking another 4 bytes on the fifth row. The data that we will fragment across multiple packets is highlighted in red. To aid in the reassembly on the recipient side, IP uses the identification (ID) and fragment offset, shown on the second row of the figure below.
Let’s compare running sudo nmap -sS -p80 10.20.30.144 and sudo nmap -sS -p80 -f 10.20.30.144. As you know by now, this will use stealth TCP SYN scan on port 80; however, in the second command, we are requesting Nmap to fragment the IP packets.
In the first two lines, we can see an ARP query and response. Nmap issued an ARP query because the target is on the same Ethernet. The second two lines show a TCP SYN ping and a reply. The fifth line is the beginning of the port scan; Nmap sends a TCP SYN packet to port 80. In this case, the IP header is 20 bytes, and the TCP header is 24 bytes. Note that the minimum size of the TCP header is 20 bytes.

With fragmentation requested via -f, the 24 bytes of the TCP header will be divided into multiples of 8 bytes, with the last fragment containing 8 bytes or less of the TCP header. Since 24 is divisible by 8, we got 3 IP fragments; each has 20 bytes of IP header and 8 bytes of TCP header. We can see the three fragments between the fifth and the seventh lines.

Note that if you added -ff (or -f -f), the fragmentation of the data will be multiples of 16. In other words, the 24 bytes of the TCP header, in this case, would be divided over two IP fragments, the first containing 16 bytes and the second containing 8 bytes of the TCP header.
On the other hand, if you prefer to increase the size of your packets to make them look innocuous, you can use the option --data-length NUM, where num specifies the number of bytes you want to append to your packets.
Spoofing the source IP address can be a great approach to scanning stealthily. However, spoofing will only work in specific network setups. It requires you to be in a position where you can monitor the traffic. Considering these limitations, spoofing your IP address can have little use; however, we can give it an upgrade with the idle scan.
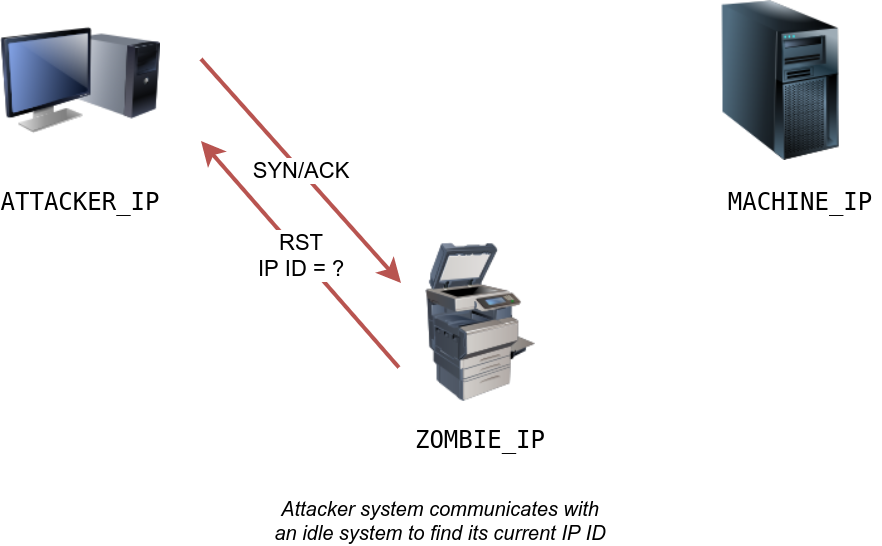
The idle scan, or zombie scan, requires an idle system connected to the network that you can communicate with. Practically, Nmap will make each probe appear as if coming from the idle (zombie) host, then it will check for indicators whether the idle (zombie) host received any response to the spoofed probe. This is accomplished by checking the IP identification (IP ID) value in the IP header. You can run an idle scan using nmap -sI ZOMBIE_IP 10.10.161.116, where ZOMBIE_IP is the IP address of the idle host (zombie).
The idle (zombie) scan requires the following three steps to discover whether a port is open:
Let’s explain with figures. In the figure below, we have the attacker system probing an idle machine, a multi-function printer. By sending a SYN/ACK, it responds with an RST packet containing its newly incremented IP ID.
The attacker will send a SYN packet to the TCP port they want to check on the target machine in the next step. However, this packet will use the idle host (zombie) IP address as the source. Three scenarios would arise. In the first scenario, shown in the figure below, the TCP port is closed; therefore, the target machine responds to the idle host with an RST packet. The idle host does not respond; hence its IP ID is not incremented.
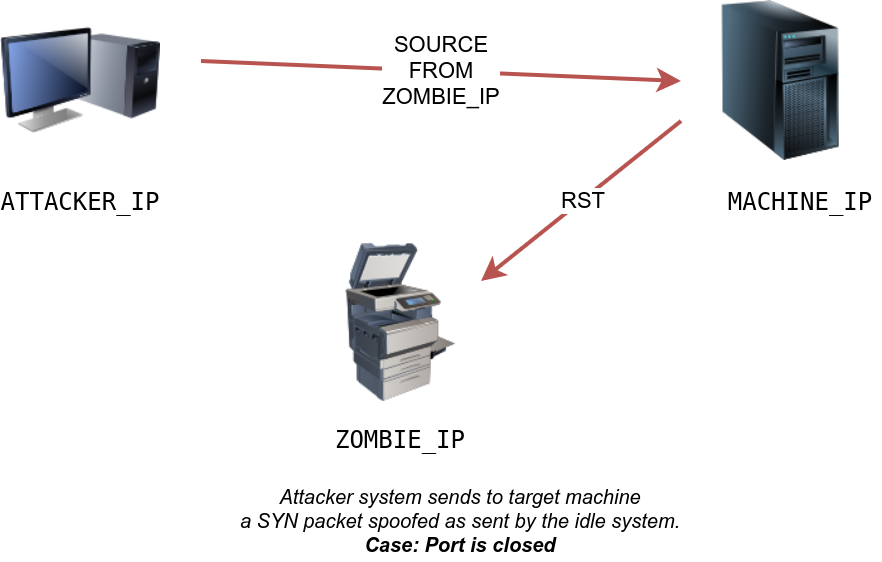
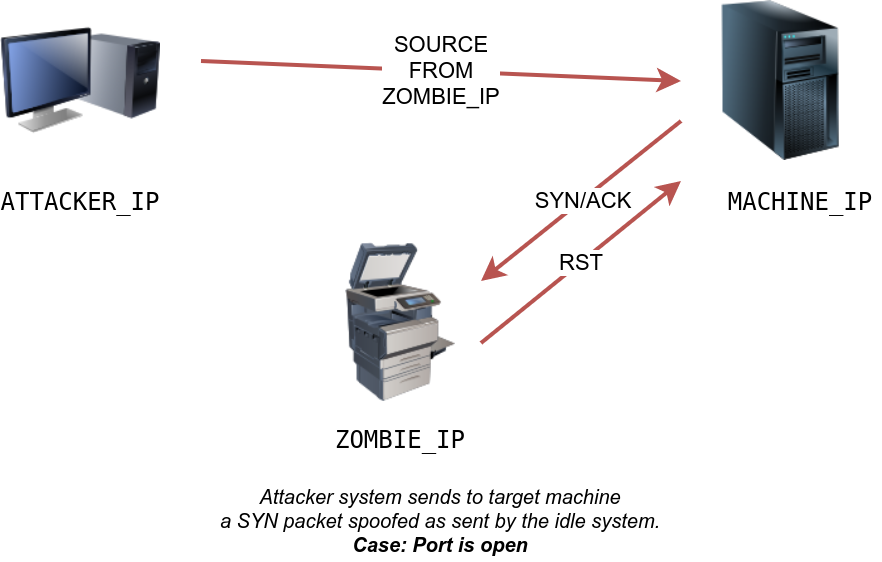
In the second scenario, as shown below, the TCP port is open, so the target machine responds with a SYN/ACK to the idle host (zombie). The idle host responds to this unexpected packet with an RST packet, thus incrementing its IP ID.
In the third scenario, the target machine does not respond at all due to firewall rules. This lack of response will lead to the same result as with the closed port; the idle host won’t increase the IP ID.
For the final step, the attacker sends another SYN/ACK to the idle host. The idle host responds with an RST packet, incrementing the IP ID by one again. The attacker needs to compare the IP ID of the RST packet received in the first step with the IP ID of the RST packet received in this third step. If the difference is 1, it means the port on the target machine was closed or filtered. However, if the difference is 2, it means that the port on the target was open.
It is worth repeating that this scan is called an idle scan because choosing an idle host is indispensable for the accuracy of the scan. If the “idle host” is busy, all the returned IP IDs would be useless.
You might consider adding --reason if you want Nmap to provide more details regarding its reasoning and conclusions. Consider the two scans below to the system; however, the latter adds --reason.
For more detailed output, you can consider using -v for verbose output or -vv for even more verbosity.
If -vv does not satisfy your curiosity, you can use -d for debugging details or -dd for even more details. You can guarantee that using -d will create an output that extends beyond a single screen.
| Option | Meaning |
|---|---|
-sV | determine service/version info on open ports |
-sV --version-light | try the most likely probes (2) |
-sV --version-all | try all available probes (9) |
-O | detect OS |
--traceroute | run traceroute to target |
--script=SCRIPTS | Nmap scripts to run |
-sC or --script=default | run default scripts |
-A | equivalent to -sV -O -sC --traceroute |
-oN | save output in normal format |
-oG | save output in grepable format |
-oX | save output in XML format |
-oA | save output in normal, XML and Grepable formats |
Once Nmap discovers open ports, you can probe the available port to detect the running service. Further investigation of open ports is an essential piece of information as the pentester can use it to learn if there are any known vulnerabilities of the service.
Adding -sV to your Nmap command will collect and determine service and version information for the open ports. You can control the intensity with --version-intensity LEVEL where the level ranges between 0, the lightest, and 9, the most complete. -sV --version-light has an intensity of 2, while -sV --version-all has an intensity of 9.
It is important to note that using -sV will force Nmap to proceed with the TCP 3-way handshake and establish the connection. The connection establishment is necessary because Nmap cannot discover the version without establishing a connection fully and communicating with the listening service. In other words, stealth SYN scan -sS is not possible when -sV option is chosen.
sudo nmap -sV --version-light 10.10.101.131OS Detection
Nmap can detect the Operating System (OS) based on its behaviour and any telltale signs in its responses. OS detection can be enabled using -O; this is an uppercase O as in OS.
sudo nmap -sS -O 10.10.101.131The OS detection is very convenient, but many factors might affect its accuracy. First and foremost, Nmap needs to find at least one open and one closed port on the target to make a reliable guess. Furthermore, the guest OS fingerprints might get distorted due to the rising use of virtualization and similar technologies. Therefore, always take the OS version with a grain of salt.
Traceroute
If you want Nmap to find the routers between you and the target, just add --traceroute. In the following example, Nmap appended a traceroute to its scan results. Note that Nmap's traceroute works slightly different than the traceroute command found on Linux and macOS or tracert found on MS Windows. Standard traceroute starts with a packet of low TTL (Time to Live) and keeps increasing until it reaches the target. Nmap’s traceroute starts with a packet of high TTL and keeps decreasing it.
sudo nmap -sS --traceroute 10.10.101.131A script is a piece of code that does not need to be compiled. In other words, it remains in its original human-readable form and does not need to be converted to machine language. Many programs provide additional functionality via scripts; moreover, scripts make it possible to add custom functionality that did not exist via the built-in commands. Similarly, Nmap provides support for scripts using the Lua language. A part of Nmap, Nmap Scripting Engine (NSE) is a Lua interpreter that allows Nmap to execute Nmap scripts written in Lua language. However, we don’t need to learn Lua to make use of Nmap scripts.
| Script Category | Description |
|---|---|
auth | Authentication related scripts |
broadcast | Discover hosts by sending broadcast messages |
brute | Performs brute-force password auditing against logins |
default | Default scripts, same as -sC |
discovery | Retrieve accessible information, such as database tables and DNS names |
dos | Detects servers vulnerable to Denial of Service (DoS) |
exploit | Attempts to exploit various vulnerable services |
external | Checks using a third-party service, such as Geoplugin and Virustotal |
fuzzer | Launch fuzzing attacks |
intrusive | Intrusive scripts such as brute-force attacks and exploitation |
malware | Scans for backdoors |
safe | Safe scripts that won't crash the target |
version | Retrieve service versions |
vuln | Checks for vulnerabilities or exploit vulnerable services |
# 使用默认脚本
sudo nmap -sS -sC 10.10.101.131

# 指定脚本
sudo nmap -sS -n --script "http-date" 10.10.101.131
sudo nmap -sS --script "ssh2-enum-algos" 10.10.90.159
sudo nmap -sV --script=ssh2-enum-algos -sV -p22 10.10.26.31
sudo nmap -sV --script=http-headers -p80 10.10.26.31Whenever you run a Nmap scan, it is only reasonable to save the results in a file. Selecting and adopting a good naming convention for your filenames is also crucial. The number of files can quickly grow and hinder your ability to find a previous scan result. The three main formats are:
grepable)Normal
As the name implies, the normal format is similar to the output you get on the screen when scanning a target. You can save your scan in normal format by using -oN FILENAME; N stands for normal. Here is an example of the result.
root@ip-10-10-105-8:~# sudo nmap -sS -sV -O -oN 10.10.105.8_scan 10.10.9.71
Starting Nmap 7.80 ( https://nmap.org ) at 2025-06-14 10:11 BST
Nmap scan report for 10.10.9.71
Host is up (0.00067s latency).
Not shown: 999 closed ports
PORT   STATE SERVICE VERSION
22/tcp open  ssh     OpenSSH 9.2p1 Debian 2+deb12u3 (protocol 2.0)
MAC Address: 02:29:48:EC:40:17 (Unknown)
...

root@ip-10-10-105-8:~# ls
10.10.105.8_scan  10.10.9.71  burp.json  CTFBuilder  Desktop  Downloads  Instructions  Pictures  Postman  Rooms  Scripts  snap  thinclient_drives  Tools

root@ip-10-10-105-8:~# cat 10.10.105.8_scan
# Nmap 7.80 scan initiated Sat Jun 14 10:11:53 2025 as: nmap -sS -sV -O -oN 10.10.105.8_scan 10.10.9.71
Nmap scan report for 10.10.9.71
Host is up (0.00067s latency).
....Grepable
The grepable format has its name from the command grep; grep stands for Global Regular Expression Printer. In simple terms, it makes filtering the scan output for specific keywords or terms efficient. You can save the scan result in grepable format using -oG FILENAME. The scan output, displayed above in normal format, is shown in the console below using grepable format. The normal output is 21 lines; however, the grepable output is only 4 lines. The main reason is that Nmap wants to make each line meaningful and complete when the user applies grep. As a result, in grepable output, the lines are so long and are not convenient to read compared to normal output.
pentester@TryHackMe$ cat MACHINE_IP_scan.gnmap
# Nmap 7.60 scan initiated Fri Sep 10 05:14:19 2021 as: nmap -sS -sV -O -oG MACHINE_IP_scan 10.10.9.71
Host: 10.10.9.71	Status: Up
Host: 10.10.9.71	Ports: 22/open/tcp//ssh//OpenSSH 6.7p1 Debian 5+deb8u8 (protocol 2.0)/, 25/open/tcp//smtp//Postfix smtpd/, 80/open/tcp//http//nginx 1.6.2/, 110/open/tcp//pop3//Dovecot pop3d/, 111/open/tcp//rpcbind//2-4 (RPC #100000)/, 143/open/tcp//imap//Dovecot imapd/	Ignored State: closed (994)	OS: Linux 3.13	Seq Index: 257	IP ID Seq: All zeros
# Nmap done at Fri Sep 10 05:14:28 2021 -- 1 IP address (1 host up) scanned in 9.99 secondsAn example use of grep is grep KEYWORD TEXT_FILE; this command will display all the lines containing the provided keyword. Let’s compare the output of using grep on normal output and grepable output. You will notice that the former does not provide the IP address of the host. Instead, it returned 80/tcp open http nginx 1.6.2, making it very inconvenient if you are sifting through the scan results of multiple systems. However, the latter provides enough information, such as the host’s IP address, in each line to make it complete.
pentester@TryHackMe$ grep http MACHINE_IP_scan.nmap
80/tcp  open  http    nginx 1.6.2
OS and Service detection performed. Please report any incorrect results at https://nmap.org/submit/ .pentester@TryHackMe$ grep http MACHINE_IP_scan.gnmap
Host: 10.10.32.105 Ports: 22/open/tcp//ssh//OpenSSH 6.7p1 Debian 5+deb8u8 (protocol 2.0)/, 25/open/tcp//smtp//Postfix smtpd/, 80/open/tcp//http//nginx 1.6.2/, 110/open/tcp//pop3//Dovecot pop3d/, 111/open/tcp//rpcbind//2-4 (RPC #100000)/, 143/open/tcp//imap//Dovecot imapd/ Ignored State: closed (994) OS: Linux 3.13 Seq Index: 257 IP ID Seq: All zerosXML
The third format is XML. You can save the scan results in XML format using -oX FILENAME. The XML format would be most convenient to process the output in other programs. Conveniently enough, you can save the scan output in all three formats using -oA FILENAME to combine -oN, -oG, and -oX for normal, grepable, and XML.
Script Kiddie
A fourth format is script kiddie. You can see that this format is useless if you want to search the output for any interesting keywords or keep the results for future reference. However, you can use it to save the output of the scan nmap -sS 127.0.0.1 -oS FILENAME, display the output filename, and look 31337 in front of friends who are not tech-savvy.
| Protocol | TCP Port | Application(s) | Data Security |
|---|---|---|---|
| FTP | 21 | File Transfer | Cleartext |
| HTTP | 80 | Worldwide Web | Cleartext |
| IMAP | 143 | Email (MDA) | Cleartext |
| POP3 | 110 | Email (MDA) | Cleartext |
| SMTP | 25 | Email (MTA) | Cleartext |
| Telnet | 23 | Remote Access | Cleartext |
The Telnet protocol is an application layer protocol used to connect to a virtual terminal of another computer. Using Telnet, a user can log into another computer and access its terminal (console) to run programs, start batch processes, and perform system administration tasks remotely.
Telnet is no longer considered a secure option, especially that anyone capturing your network traffic will be able to discover your usernames and passwords, which would grant them access to the remote system. The secure alternative is SSH.
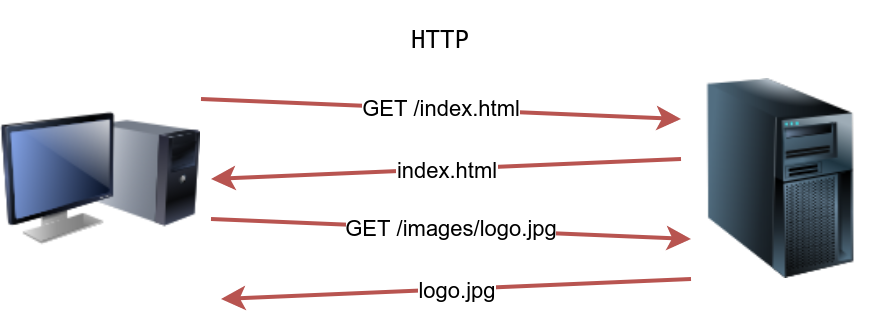
Hypertext Transfer Protocol (HTTP) is the protocol used to transfer web pages. Your web browser connects to the webserver and uses HTTP to request HTML pages and images among other files and submit forms and upload various files. Anytime you browse the World Wide Web (WWW), you are certainly using the HTTP protocol.
The image below shows a client requesting the HTML page index.html, which the webserver provides. Then the client requests an image, logo.jpg, and the web server sends it.
Launch the attached VM. From the AttackBox terminal, connect using Telnet to 10.10.231.84 80 and retrieve the file flag.thm. What does it contain?
root@ip-10-10-153-158:~# telnet 10.10.231.84 80
Trying 10.10.231.84...
Connected to 10.10.231.84.
Escape character is '^]'.
GET /flag.thm HTTP/1.1
host: telnet

HTTP/1.1 200 OK
Server: nginx/1.18.0 (Ubuntu)
Date: Sun, 15 Jun 2025 02:07:40 GMT
Content-Type: application/octet-stream
Content-Length: 39
Last-Modified: Wed, 15 Sep 2021 09:19:23 GMT
Connection: keep-alive
ETag: "6141ba9b-27"
Accept-Ranges: bytes

THM{e3eb0a1df437f3f97a64aca5952c8ea0}

Connection closed by foreign host.Three popular choices for HTTP servers are:
File Transfer Protocol (FTP) was developed to make the transfer of files between different computers with different systems efficient.
FTP also sends and receives data as cleartext; therefore, we can use Telnet (or Netcat) to communicate with an FTP server and act as an FTP client.
A command like STAT can provide some added information. The SYST command shows the System Type of the target (UNIX in this case). PASV switches the mode to passive. It is worth noting that there are two modes for FTP:
The command TYPE A switches the file transfer mode to ASCII, while TYPE I switches the file transfer mode to binary. However, we cannot transfer a file using a simple client such as Telnet because FTP creates a separate connection for file transfer.
root@ip-10-10-235-246:~# telnet 10.10.179.168 21
Trying 10.10.179.168...
Connected to 10.10.179.168.
Escape character is '^]'.
220 (vsFTPd 3.0.5)
USER frank
331 Please specify the password.
PASS D2xc9CgD
230 Login successful.
SYST
215 UNIX Type: L8
PASV
227 Entering Passive Mode (10,10,179,168,26,198).
TYPE A
200 Switching to ASCII mode.
STAT
211-FTP server status:
     Connected to ::ffff:10.10.235.246
     Logged in as frank
     TYPE: ASCII
     No session bandwidth limit
     Session timeout in seconds is 300
     Control connection is plain text
     Data connections will be plain text
     At session startup, client count was 1
     vsFTPd 3.0.5 - secure, fast, stable
211 End of status
QUIT
221 Goodbye.
Connection closed by foreign host.The image below shows how an actual file transfer would be conducted using FTP. To keep things simple in this figure, let’s only focus on the fact that the FTP client will initiate a connection to an FTP server, which listens on port 21 by default. All commands will be sent over the control channel. Once the client requests a file, another TCP connection will be established between them.

Considering the sophistication of the data transfer over FTP, let’s use an actual FTP client to download a text file. We only needed a small number of commands to retrieve the file. After logging in successfully, we get the FTP prompt, ftp>, to execute various FTP commands. We used ls to list the files and learn the file name; then, we switched to ascii since it is a text file (not binary). Finally, get FILENAME made the client and server establish another channel for file transfer.
root@ip-10-10-235-246:~# ftp 10.10.179.168
Connected to 10.10.179.168.
220 (vsFTPd 3.0.5)
Name (10.10.179.168:root): frank
331 Please specify the password.
Password:
230 Login successful.
Remote system type is UNIX.
Using binary mode to transfer files.
ftp> ls
200 PORT command successful. Consider using PASV.
150 Here comes the directory listing.
drwx------   10 1001     1001         4096 Sep 15  2021 Maildir
-rw-rw-r--    1 1001     1001         4006 Sep 15  2021 README.txt
-rw-rw-r--    1 1001     1001           39 Sep 15  2021 ftp_flag.thm
226 Directory send OK.
ftp> ascii
200 Switching to ASCII mode.
ftp> get ftp_flag.thm
local: ftp_flag.thm remote: ftp_flag.thm
200 PORT command successful. Consider using PASV.
150 Opening BINARY mode data connection for ftp_flag.thm (39 bytes).
WARNING! 2 bare linefeeds received in ASCII mode
File may not have transferred correctly.
226 Transfer complete.
39 bytes received in 0.00 secs (44.1832 kB/s)
ftp> exit
221 Goodbye.

root@ip-10-10-235-246:~# cat ftp_flag.thm
THM{364db6ad0e3ddfe7bf0b1870fb06fbdf}FTP servers and FTP clients use the FTP protocol. There are various FTP server software that you can select from if you want to host your FTP file server. Examples of FTP server software include:
Simple Mail Transfer Protocol (SMTP)
Email is one of the most used services on the Internet. There are various configurations for email servers; for instance, you may set up an email system to allow local users to exchange emails with each other with no access to the Internet. However, we will consider the more general setup where different email servers connect over the Internet.
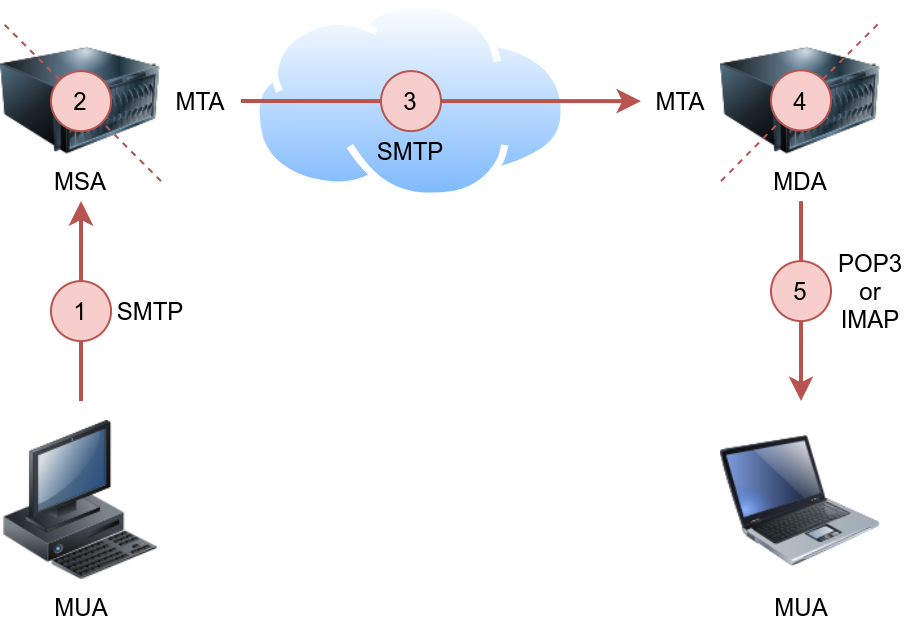
Email delivery over the Internet requires the following components:
The above four terms may look cryptic, but they are more straightforward than they appear. We will explain these terms using the figure below.
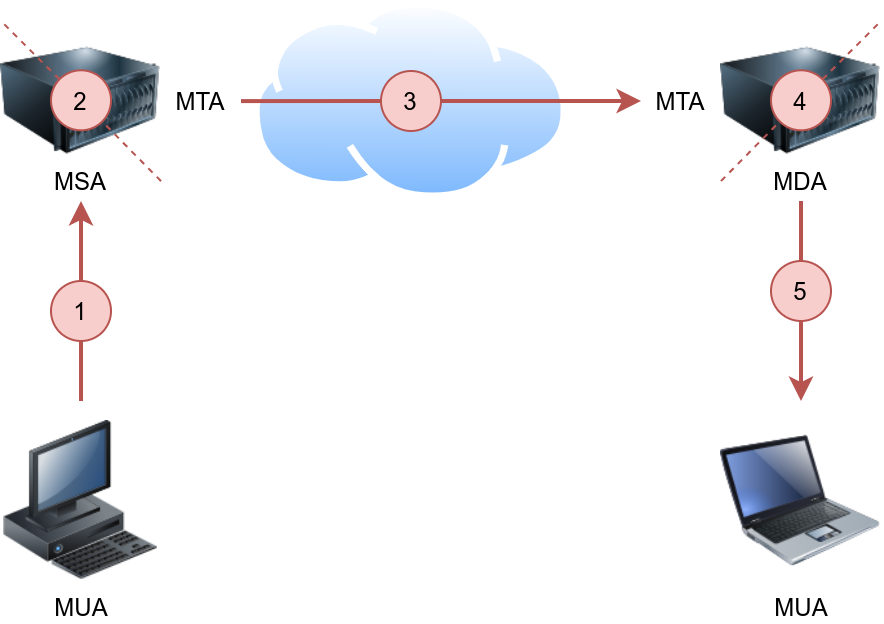
The figure shows the following five steps that an email needs to go through to reach the recipient’s inbox:
If the above steps sound confusing, consider the following analogy:
In the same way, we need to follow a protocol to communicate with an HTTP server, and we need to rely on email protocols to talk with an MTA and an MDA. The protocols are:
We explain SMTP in this task and elaborate on POP3 and IMAP in the following two tasks.
Simple Mail Transfer Protocol (SMTP) is used to communicate with an MTA server. Because SMTP uses cleartext, where all commands are sent without encryption, we can use a basic Telnet client to connect to an SMTP server and act as an email client (MUA) sending a message.
SMTP server listens on port 25 by default. To see basic communication with an SMTP server, we used Telnet to connect to it. Once connected, we issue helo hostname and then start typing our email.
root@ip-10-10-235-246:~# telnet 10.10.179.168 25
Trying 10.10.179.168...
Connected to 10.10.179.168.
Escape character is '^]'.
220 bento.localdomain ESMTP Postfix `THM{5b31ddfc0c11d81eba776e983c35e9b5}`
helo telnet
250 bento.localdomain
mail from:
250 2.1.0 Ok
rcpt to:
250 2.1.5 Ok
data
354 End data with .
subject: Sending email with Telnet
Hello Frank,
I am just writing to say hi!
.
250 2.0.0 Ok: queued as C3E7F45F06
quit
221 2.0.0 Bye
Connection closed by foreign host.After helo, we issue mail from:, rcpt to: to indicate the sender and the recipient. When we send our email message, we issue the command data and type our message. We issue <CR><LF>.<CR><LF> (or Enter . Enter to put it in simpler terms). The SMTP server now queues the message.
在计算机领域和通信技术中,MSA、MTA、MDA、MUA 是与邮件系统相关的重要组件,各自承担不同的功能。
四者的协作流程(以发送邮件为例)
延伸对比:与邮件系统相关的其他概念
| 组件 | 核心功能 | 常见协议 | 典型工具 |
|---|---|---|---|
| MSA | 用户邮件提交 | SMTP(587端口) | Postfix(配置为MSA) |
| MTA | 邮件服务器间传输 | SMTP(25端口) | Postfix、Sendmail |
| MDA | 邮件最终投递 | 本地文件系统 | Dovecot、Maildrop |
| MUA | 用户交互界面 | POP3/IMAP/SMTP | Outlook、Thunderbird |
| Anti-Spam | 垃圾邮件过滤 | - | SpamAssassin |
| Mail Archive | 邮件归档存储 | - | Mimecast、Barracuda |
总结 这四个组件构成了邮件系统的核心架构:MSA和MTA负责邮件的“发送与传输”,MDA负责“投递落地”,MUA则是用户的“操作入口”。理解它们的分工,有助于排查邮件系统故障(如发送失败、接收延迟等),或设计高效的邮件基础设施。
Post Office Protocol version 3 (POP3) is a protocol used to download the email messages from a Mail Delivery Agent (MDA) server, as shown in the figure below. The mail client connects to the POP3 server, authenticates, downloads the new email messages before (optionally) deleting them.
The example below shows what a POP3 session would look like if conducted via a Telnet client. First, the user connects to the POP3 server at the POP3 default port 110. Authentication is required to access the email messages; the user authenticates by providing his username USER frank and password PASS D2xc9CgD. Using the command STAT, we get the reply +OK 1 179; based on RFC 1939, a positive response to STAT has the format +OK nn mm, where nn is the number of email messages in the inbox, and mm is the size of the inbox in octets (byte). The command LIST provided a list of new messages on the server, and RETR 1 retrieved the first message in the list. We don’t need to concern ourselves with memorizing these commands; however, it is helpful to strengthen our understanding of such protocol.
pentester@TryHackMe$ telnet 10.10.179.168 110
Trying 10.10.179.168...
Connected to 10.10.179.168.
Escape character is '^]'.
+OK 10.10.179.168 Mail Server POP3 Wed, 15 Sep 2021 11:05:34 +0300
USER frank
+OK frank
PASS D2xc9CgD
+OK 1 messages (179) octets
STAT
+OK 1 179
LIST
+OK 1 messages (179) octets
1 179
.
RETR 1
+OK
From: Mail Server
To: Frank
subject: Sending email with Telnet
Hello Frank,
I am just writing to say hi!
.
QUIT
+OK 10.10.179.168 closing connection
Connection closed by foreign host.In general, your mail client (MUA) will connect to the POP3 server (MDA), authenticate, and download the messages. Although the communication using the POP3 protocol will be hidden behind a sleek interface, similar commands will be issued, as shown in the Telnet session above.
Based on the default settings, the mail client deletes the mail message after it downloads it. The default behaviour can be changed from the mail client settings if you wish to download the emails again from another mail client. Accessing the same mail account via multiple clients using POP3 is usually not very convenient as one would lose track of read and unread messages. To keep all mailboxes synchronized, we need to consider other protocols, such as IMAP.
Internet Message Access Protocol (IMAP) is more sophisticated than POP3. IMAP makes it possible to keep your email synchronized across multiple devices (and mail clients). In other words, if you mark an email message as read when checking your email on your smartphone, the change will be saved on the IMAP server (MDA) and replicated on your laptop when you synchronize your inbox.
Let’s take a look at sample IMAP commands. In the console output below, we use Telnet to connect to the IMAP server’s default port, and then we authenticate using LOGIN username password. IMAP requires each command to be preceded by a random string to be able to track the reply. So we added c1, then c2, and so on. Then we listed our mail folders using LIST "" "*", before checking if we have any new messages in the inbox using EXAMINE INBOX. We don’t need to memorize these commands; however, we are simply providing the example below to give a vivid image of what happens when the mail client communicates with an IMAP server.
root@ip-10-10-235-246:~# telnet 10.10.179.168 143
Trying 10.10.179.168...
Connected to 10.10.179.168.
Escape character is '^]'.
* OK [CAPABILITY IMAP4rev1 UIDPLUS CHILDREN NAMESPACE THREAD=ORDEREDSUBJECT THREAD=REFERENCES SORT QUOTA IDLE ACL ACL2=UNION STARTTLS ENABLE UTF8=ACCEPT] Courier-IMAP ready. Copyright 1998-2018 Double Precision, Inc.  See COPYING for distribution information.
c1 LOGIN frank D2xc9CgD
* OK [ALERT] Filesystem notification initialization error -- contact your mail administrator (check for configuration errors with the FAM/Gamin library)
c1 OK LOGIN Ok.
c2 LIST "" "*"
* LIST (\HasNoChildren) "." "INBOX.Trash"
* LIST (\HasNoChildren) "." "INBOX.Drafts"
* LIST (\HasNoChildren) "." "INBOX.Templates"
* LIST (\HasNoChildren) "." "INBOX.Sent"
* LIST (\Unmarked \HasChildren) "." "INBOX"
c2 OK LIST completed
c3 EXAMINE INBOX
* FLAGS (\Draft \Answered \Flagged \Deleted \Seen \Recent)
* OK [PERMANENTFLAGS ()] No permanent flags permitted
* 0 EXISTS
* 0 RECENT
* OK [UIDVALIDITY 749959532] Ok
* OK [MYRIGHTS "acdilrsw"] ACL
c3 OK [READ-ONLY] Ok
c4 LOGOUT
* BYE Courier-IMAP server shutting down
c4 OK LOGOUT completed
Connection closed by foreign host.| Protocol | TCP Port | Application(s) | Data Security |
|---|---|---|---|
| FTP | 21 | File Transfer | Cleartext |
| FTPS | 990 | File Transfer | Encrypted |
| HTTP | 80 | Worldwide Web | Cleartext |
| HTTPS | 443 | Worldwide Web | Encrypted |
| IMAP | 143 | Email (MDA) | Cleartext |
| IMAPS | 993 | Email (MDA) | Encrypted |
| POP3 | 110 | Email (MDA) | Cleartext |
| POP3S | 995 | Email (MDA) | Encrypted |
| SFTP | 22 | File Transfer | Encrypted |
| SSH | 22 | Remote Access and File Transfer | Encrypted |
| SMTP | 25 | Email (MTA) | Cleartext |
| SMTPS | 465 | Email (MTA) | Encrypted |
| Telnet | 23 | Remote Access | Cleartext |
| Option | Explanation |
|---|---|
-l username | Provide the login name |
-P WordList.txt | Specify the password list to use |
server service | Set the server address and service to attack |
-s PORT | Use in case of non-default service port number |
-V or -W | Show the username and password combinations being tried |
-d | Display debugging output if the verbose output is not helping |
Sniffing attack refers to using a network packet capture tool to collect information about the target. When a protocol communicates in cleartext, the data exchanged can be captured by a third party to analyse. A simple network packet capture can reveal information, such as the content of private messages and login credentials, if the data isn't encrypted in transit.
A sniffing attack can be conducted using an Ethernet (802.3) network card, provided that the user has proper permissions (root permissions on Linux and administrator privileges on MS Windows). There are many programs available to capture network packets. We consider the following:
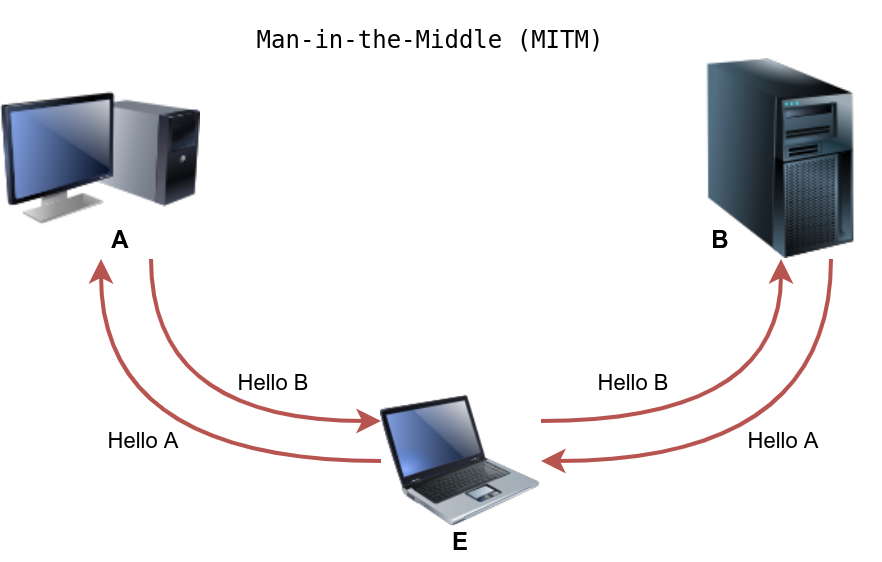
A Man-in-the-Middle (MITM) attack occurs when a victim (A) believes they are communicating with a legitimate destination (B) but is unknowingly communicating with an attacker (E). In the figure below, we have A requesting the transfer of $20 to M; however, E altered this message and replaced the original value with a new one. B received the modified messaged and acted on it.
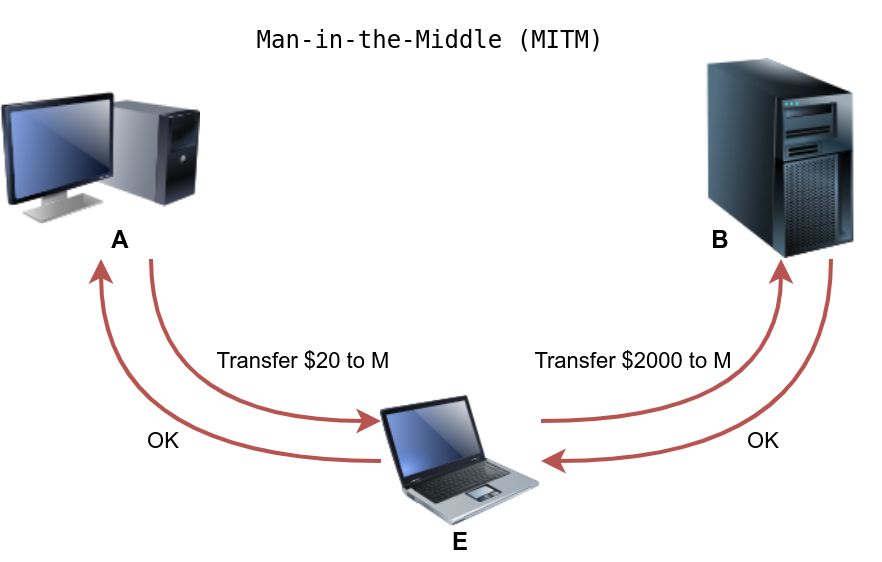
This attack is relatively simple to carry out if the two parties do not confirm the authenticity and integrity of each message. In some cases, the chosen protocol does not provide secure authentication or integrity checking; moreover, some protocols have inherent insecurities that make them susceptible to this kind of attack.
Any time you browse over HTTP, you are susceptible to a MITM attack, and the scary thing is that you cannot recognize it. Many tools would aid you in carrying out such an attack, such as Ettercap and Bettercap.
MITM can also affect other cleartext protocols such as FTP, SMTP, and POP3. Mitigation against this attack requires the use of cryptography. The solution lies in proper authentication along with encryption or signing of the exchanged messages. With the help of Public Key Infrastructure (PKI) and trusted root certificates, Transport Layer Security (TLS) protects from MITM attacks.
Transport Layer Security (TLS)
SSL (Secure Sockets Layer) started when the world wide web started to see new applications, such as online shopping and sending payment information. Netscape introduced SSL in 1994, with SSL 3.0 being released in 1996. But eventually, more security was needed, and TLS (Transport Layer Security) protocol was introduced in 1999. Before we explain what TLS and SSL provide, let’s see how they fit the networking model.
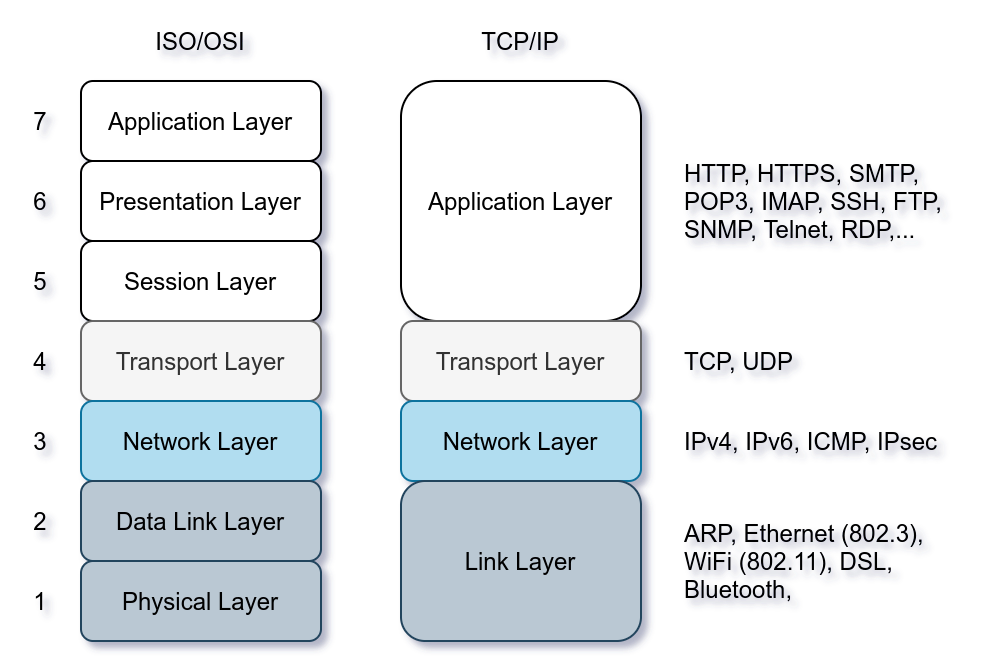
The common protocols we have covered so far send the data in cleartext; this makes it possible for anyone with access to the network to capture, save and analyze the exchanged messages. The image below shows the ISO/OSI network layers. The protocols we have covered so far in this room are on the application layer. Consider the ISO/OSI model; we can add encryption to our protocols via the presentation layer. Consequently, data will be presented in an encrypted format (ciphertext) instead of its original form.
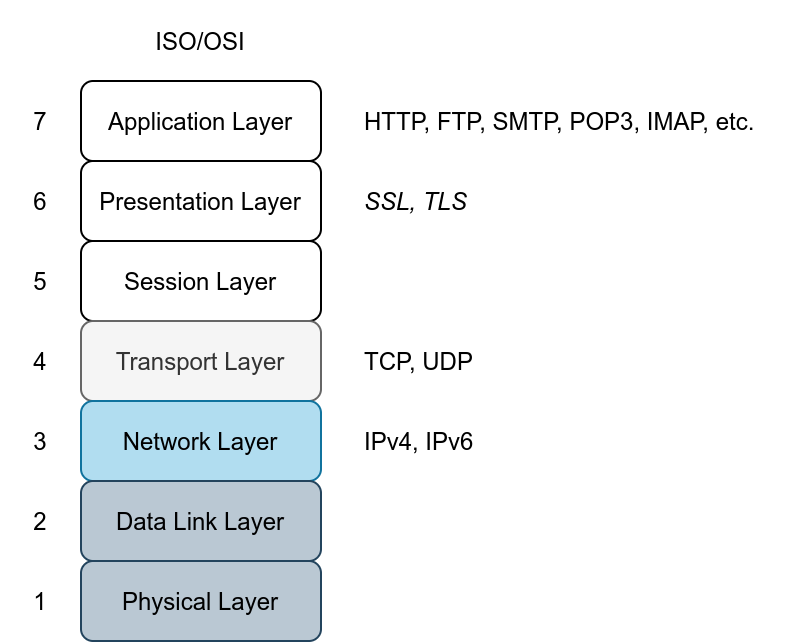
Because of the close relation between SSL and TLS, one might be used instead of the other. However, TLS is more secure than SSL, and it has practically replaced SSL. We could have dropped SSL and just written TLS instead of SSL/TLS, but we will continue to mention the two to avoid any ambiguity because the term SSL is still in wide use. However, we can expect all modern servers to be using TLS.
An existing cleartext protocol can be upgraded to use encryption via SSL/TLS. We can use TLS to upgrade HTTP, FTP, SMTP, POP3, and IMAP, to name a few. The following table lists the protocols we have covered and their default ports before and after the encryption upgrade via SSL/TLS. The list is not exhaustive; however, the purpose is to help us better understand the process.
| Protocol | Default Port | Secured Protocol | Default Port with TLS |
|---|---|---|---|
| HTTP | 80 | HTTPS | 443 |
| FTP | 21 | FTPS | 990 |
| SMTP | 25 | SMTPS | 465 |
| POP3 | 110 | POP3S | 995 |
| IMAP | 143 | IMAPS | 993 |
Considering the case of HTTP. Initially, to retrieve a web page over HTTP, the web browser would need at least perform the following two steps:
GET and POST requests.HTTPS requires an additional step to encrypt the traffic. The new step takes place after establishing a TCP connection and before sending HTTP requests. This extra step can be inferred from the ISO/OSI model in the image presented earlier. Consequently, HTTPS requires at least the following three steps:
To establish an SSL/TLS connection, the client needs to perform the proper handshake with the server. Based on RFC 6101, the SSL connection establishment will look like the figure below.
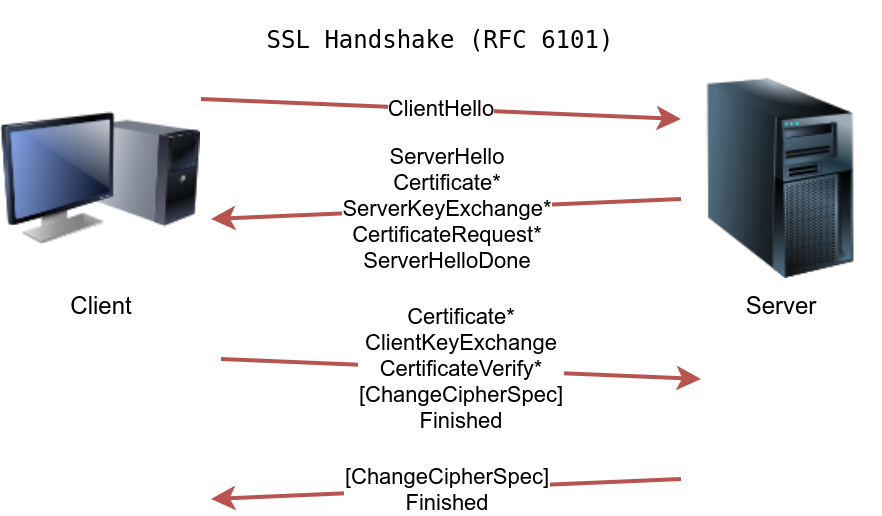
After establishing a TCP connection with the server, the client establishes an SSL/TLS connection, as shown in the figure above. The terms might look complicated depending on your knowledge of cryptography, but we can simplify the four steps as:
If this still sounds sophisticated, don’t worry; we only need the gist of it. A client was able to agree on a secret key with a server that has a public certificate. This secret key was securely generated so that a third party monitoring the channel wouldn’t be able to discover it. Further communication between the client and the server will be encrypted using the generated key.
Consequently, once an SSL/TLS handshake has been established, HTTP requests and exchanged data won’t be accessible to anyone watching the communication channel.
As a final note, for SSL/TLS to be effective, especially when browsing the web over HTTPS, we rely on public certificates signed by certificate authorities trusted by our systems. In other words, when we browse to TryHackMe over HTTPS, our browser expects the TryHackMe web server to provide a signed certificate from a trusted certificate authority. This way, our browser ensures that it is communicating with the correct server, and a MITM attack cannot occur.
Luckily, we don’t have to check the certificate manually for every site we visit; our web browser will do it for us. Our web browser will ensure that we are talking with the correct server and ensure that our communication is secure, thanks to the server’s certificate.
Secure Shell (SSH) was created to provide a secure way for remote system administration. In other words, it lets you securely connect to another system over the network and execute commands on the remote system. Put simply, the “S” in SSH stands for secure, which can be summarized simply as:
The above three points are ensured by cryptography. In more technical terms, they are part of confidentiality and integrity, made possible through the proper use of different encryption algorithms.
To use SSH, you need an SSH server and an SSH client. The SSH server listens on port 22 by default. The SSH client can authenticate using:
Note that if this is the first time we connect to this system, we will need to confirm the fingerprint of the SSH server’s public key to avoid man-in-the-middle (MITM) attacks. As explained earlier, MITM takes place when a malicious party, E, situates itself between A and B, and communicates with A, pretending to be B, and communicates with B pretending to be A, while A and B think that they are communicating directly with each other. In the case of SSH, we don’t usually have a third party to check if the public key is valid, so we need to do this manually. This attack is shown in the image below.
We can use SSH to transfer files using SCP (Secure Copy Protocol) based on the SSH protocol.
As a closing note, FTP could be secured using SSL/TLS by using the FTPS protocol which uses port 990. It is worth mentioning that FTP can also be secured using the SSH protocol which is the SFTP protocol. By default this service listens on port 22, just like SSH.
Authentication, or proving your identity, can be achieved through one of the following, or a combination of two:
Attacks against passwords are usually carried out by:
Let’s focus on dictionary attacks. Over time, hackers have compiled list after list containing leaked passwords from data breaches. One example is RockYou’s list of breached passwords. The choice of the word list should depend on your knowledge of the target. For instance, a French user might use a French word instead of an English one. Consequently, a French word list might be more promising.
We want an automated way to try the common passwords or the entries from a word list; here comes THC Hydra. Hydra supports many protocols, including FTP, POP3, IMAP, SMTP, SSH, and all methods related to HTTP. The general command-line syntax is: hydra -l username -P wordlist.txt server service where we specify the following options:
-l username: -l should precede the username, i.e. the login name of the target.-P wordlist.txt: -P precedes the wordlist.txt file, which is a text file containing the list of passwords you want to try with the provided username.server is the hostname or IP address of the target server.service indicates the service which you are trying to launch the dictionary attack.examples
#  will use mark as the username as it iterates over the provided passwords against the FTP server.
hydra -l mark -P /usr/share/wordlists/rockyou.txt 10.10.45.80 ftp

# is identical to the previous example. 10.10.45.80 ftp is the same as ftp://10.10.45.80:10021.
hydra -l mark -P /usr/share/wordlists/rockyou.txt ftp://10.10.45.80:10021

# will use frank as the user name as it tries to login via SSH using the different passwords.
hydra -l frank -P /usr/share/wordlists/rockyou.txt 10.10.45.80 ssh

hydra -l lazie -P /usr/share/wordlists/rockyou.txt -f 10.10.45.80 imap -V-f 在 Hydra 中代表 exit after first found pair,也就是:找到第一个有效的用户名/密码对后立即停止,不再继续尝试其他组合,适用于只需要找到一个有效凭据的场景。There are some extra optional arguments that you can add:
-s PORT to specify a non-default port for the service in question.-V or -vV, for verbose, makes Hydra show the username and password combinations that are being tried. This verbosity is very convenient to see the progress, especially if you are still not confident of your command-line syntax.-t n where n is the number of parallel connections to the target. -t 16 will create 16 threads used to connect to the target.-d, for debugging, to get more detailed information about what’s going on. The debugging output can save you much frustration; for instance, if Hydra tries to connect to a closed port and timing out, -d will reveal this right away.In summary, attacks against login systems can be carried out efficiently using a tool, such as THC Hydra combined with a suitable word list. Mitigation against such attacks can be sophisticated and depends on the target system. A few of the approaches include: